The great map update of 2012

Today we are announcing an update to the map tiles which we use site wide. A very high majority of the globe will be represented by Nokia’s clever looking tiles.

Nokia map tile

We are not stopping there. As some of you may know, Flickr has been using Open Street Maps (OSM) data to make map tiles for some places. We started with Beijing and the list has grown to twenty one additional places:

Mogadishu
Cairo
Algiers
Kiev
Tokyo
Tehran
Hanoi
Ho Chi Minh City
Manila
Davao
Cebu
Baghdad
Kabul
Accra
Hispaniola
Havana
Kinshasa
Harare
Nairobi
Buenos aires
Santiago

It has been a while since we last updated our OSM tiles. Since 2009, the OSM community has advanced quite a bit in the tools they provide and data quality. I went into a little detail about this in a talk I gave last year.

Introducing Pandonia

Nokia map tile

Today we are launching Buenos Aires and Santiago in a new style. We will be launching more cities in this new style in the near future. They are built from more recent OSM data and they will also have an entirely new style which we call Pandonia. Our new style was designed in TileMill from the osm-bright template, both created by the rad team at MapBox. TileMill changes the game when it comes to styling map tiles. The interface is developed to let you quickly iterate style changes to tiles and see the changes immediately. Ross Harmes will be writing a more detailed account of the work he did to create the Pandonia style. We appreciate the tips and guidance from Eric Gunderson, Tom MacWright, and the rest of the team at MapBox

We are looking forward to updating all of our OSM places with the Pandonia style in the near future and growing to more places after that… Antarctica? Null Island? The Moon? Stay tuned and see…

Changing our Javascript API

To host all of these new tiles we needed to find a flexible javascript api. Cloudmade’s Leaflet is a simple and open source tile serving javascript library. The events and methods map well to our previous JS API, which made upgrading simple for us. All of our existing map interfaces will stay the same with the addition of modern map tiles. They will also support touch screen devices better than ever. Leaflet’s layers mechanism will make it easier for us to blend different tile sources together seamlessly. We have a fork on GitHub which we plan to contribute to as time goes on. We’ll keep you posted.

Web workers and YUI

(Flickr is hiring! Check out our open job postings and what it’s like to work at Flickr.)

Web workers are awesome. They’ll change the way you think about JavaScript.

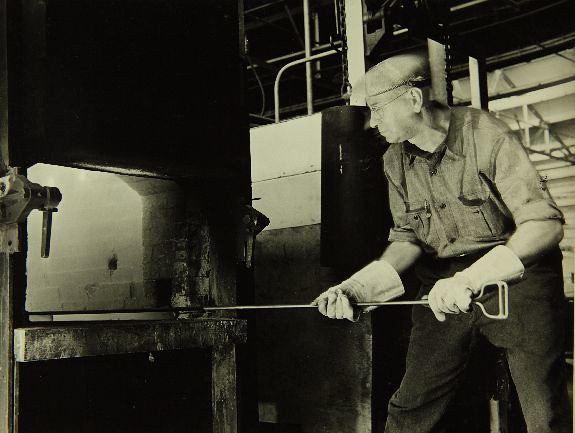
Factory Scenes : Consolidated/Convair Aircraft Factory San Diego

Chris posted an excellent writeup on how we do client-side Exif parsing in the new Uploader, which is how we can display thumbnails before uploading your photos to the Flickr servers. But parsing metadata from hundreds of files can be a little expensive.

In the old days, we’d attempt to divide our expensive JS into smaller parts, using setTimeout to yield to the UI thread, crossing our fingers, and hoping that the user could still scroll and click when they wanted to. If that didn’t work, then the feature was simply too fancy for the web.

Since then, a lot has happened. People started using better browsers. HTML got an orange logo. Web workers were discovered.

So now we can run JavaScript in separate threads (“parallel execution environments”), without interrupting the standard UI stuff the browser is always working on. We just need to put our job code in a separate file, and instantiate a web worker.

Without YUI

For simple, one-off tasks, you can just write some JavaScript in a new file and upload it to your server. Then create a worker like this:

var worker = new Worker('my_file.js');

worker.addEventListener('message', function (e) {
	// do something with the message from the worker
});

// pass some data into the worker
worker.postMessage({
	foo: bar
});

Of course, the worker thread won’t have access to anything in the main thread. You can post messages containing anything that’s JSON compatible, but not functions, cyclical references, or special objects like File references.

That means any modules or helper functions you’ve defined in your main thread are out of bounds, unless you’ve also included them in your worker file. That can be a drag if you’re accustomed to working in a framework.

With YUI

Practically speaking, a worker thread isn’t very different from the main thread. Workers can’t access the DOM, and they have a top-level self object instead of window. But plenty of our existing JavaScript modules and helper functions would be very useful in a worker thread.

Flickr is built on YUI. Its modular architecture is powerful and encourages clean, reusable code. We have a ton of small JS files—one per module—and the YUI Loader figures out how to put them all together into a single URL.

If we want to write our worker code like we write our normal code, our worker file can’t be just my_file.js. It needs to be a full combo URL, with YUI running inside it.

An aside for the brogrammers who have never seen modular JS in practice

Loader dynamically loads script and css files for YUI modules as well as external modules. It includes the dependency information for the version of the library in use, and will automatically pull in dependencies for the modules requested.

In development, we have one JS file per module. Let’s say photo.js, kitten.js, and puppy.js.

A page full of kitten photos might require two of those modules. So we tell YUI that we want to use photo.js and kitten.js, and the YUI Loader appends a script node with a combo URL that looks something like this:

<script src="/combo.php?photo.js&kitten.js">.

On our server, combo.php finds the two files on disk and prints out the contents, which are immediately executed inside the script node.

C-c-c-combo

Of course, the main thread is already running YUI, which we can use to generate the combo URL required to create a worker.

That URL needs to return the following:

  1. YUI.add() statements for any required modules. (Don’t forget yui-base)
  2. YUI.add() statement for the primary module with the expensive code.
  3. YUI.add() statement to execute the primary module.

Ok, so how do we generate this combo URL? Like so:

//
// Make a reference to our original YUI configuration object,
// with all of our module definitions and combo handler options.
//
// To make sure it's as clean as possible, we use a clone of the
// object from before we passed it into YUI.
//

var yconf = window.yconf; // global for demo purposes

//
// Y.Loader.resolve can be used to generate a combo URL with all
// the YUI modules needed within the web worker. (YUI 3.5 or later)
//
// The YUI Loader will bypass any required modules that have
// already been loaded in this instance, so in addition to the
// clean configuration object, we use a new YUI instance.
//

var Y2 = YUI(Y.merge(yconf));

var loader = new Y2.Loader({
	// comboBase must be on the same domain as the main thread
	comboBase: '/local/combo/path/',
	combine: true,
	ignoreRegistered: true,
	maxURLLength: 2048,
	require: ['my_worker_module']
});

var out = loader.resolve(true);

var combo_url = out.js[0];

Then, also in the main thread, we can start the worker instance:

//
// Use the combo URL to create a web worker.
// This is when the combo URL is downloaded, parsed, 
// and executed.
//

var worker = new window.Worker(combo_url);

To start using YUI, we need to pass our YUI config object into the worker thread. That could have been part of the combo URL, but our YUI config is pretty specific to the particular page you’re on, so we need to reuse the same object we started with in the main thread. So we use postMessage to pass it from the main thread to the worker:

//
// Post the YUI config into the worker.
// This is when the worker actually starts its work.
//

worker.postMessage({
	yconf: yconf
});

Now we’re almost done. We just need to write the worker code that waits for our YUI config before using the module. So, at the bottom of the combo response, in the worker thread:

self.addEventListener('message', function (e) {

	if (e.data.yconf) {

		//
		// make sure bootstrapping is disabled
		//
		
		e.data.yconf.bootstrap = false;

		//
		// instantiate YUI and use it to execute the callback
		//
		
		YUI(e.data.yconf).use('my_worker_module', function (Y) {

			// do some hard work!

		});

	}

}, false);

Yeah, I know the back-and-forth between the main thread and the worker makes that look complicated. But it’s actually just a few steps:

  1. Main thread generates a combo URL and instantiates a Web Worker.
  2. Worker thread parses and executes the JS returned by that URL.
  3. Main thread posts the page’s YUI config into the worker thread.
  4. Worker thread uses the config to instantiate YUI and “use” the worker module.

That’s it. Now get to work!

Parsing Exif client-side using JavaScript

What is Exif? A short primer.

Exif is short for Exchangeable image file format. A standard that specifies the formats to be used in images, sounds, and tags used by digital still cameras. In this case we are concerned with the tags standard and how it is used in still images.

How Flickr currently parses Exif data.

Currently we parse an image’s Exif data after it is uploaded to the Flickr servers and then expose that data on the photo’s metadata page (http://www.flickr.com/photos/rubixdead/7192796744/meta/in/photostream). This page will show you all the data recorded from your camera when a photo was taken, the camera type, lens, aperture, exposure settings, etc. We currently use ExifTool (http://www.sno.phy.queensu.ca/~phil/exiftool/) to parse all of this data, which is a robust, albeit server side only, solution.

An opportunity to parse Exif data on the client-side

Sometime in the beginning phases of spec’ing out the Uploadr project we realized modern browsers can read an image’s data directly from the disk, using the FileReader API (http://www.w3.org/TR/FileAPI/#FileReader-interface). This lead to the realization that we could parse Exif data while the photo is being uploaded, then expose this to the user while they are editing their photos in the Uploadr before they even hit the Upload button.

Why client-side Exif?

Why would we need to parse Exif on the client-side, if we are parsing it already on the server-side? Parsing Exif on the client-side is both fast and efficient. It allows us to show the user a thumbnail without putting the entire image in the DOM, which uses a lot of memory and kills performance. Users can also add titles, descriptions, and tags in a third-party image editing program saving the metadata into the photo’s Exif. When they drag those photos into the Uploadr, BOOM, we show them the data they have already entered and organized, eliminating the need to enter it twice.

Using Web Workers

We started doing some testing and research around parsing Exif data by reading a file’s bytes in JavaScript. We found a few people had accomplished this already, it’s not a difficult feat, but a messy one. We then quickly realized that making a user’s browser run through 10 megabytes of data can be a heavy operation. Web workers allow us to offload the parsing of byte data into a separate cpu thread. Therefore freeing up the user’s browser, so they can continue using Uploadr while Exif is being parsed.

Exif Processing Flow

Once we had a web worker prototype setup, we next had to write to code that would parse the actual bytes.

The first thing we do is pre-fetch the JavaScript used in the web worker thread. Then when a user adds an image to the Uploadr we create event handlers for the worker. When a web worker calls postMessage() we capture that, check for Exif data and then display it on the page. Any additional processing is also done at this time. Parsing XMP data, for example, is done outside of the worker because the DOM isn’t available in worker threads.

Using Blob.slice() we pull out the first 128kb of the image to limit load on the worker and speed things up. The Exif specification states that all of the data should exist in the first 64kb, but IPTC sometimes goes beyond that, especially when formatted as XMP.

if (file.slice) {
	filePart = file.slice(0, 131072);
} else if (file.webkitSlice) {
	filePart = file.webkitSlice(0, 131072);
} else if (file.mozSlice) {
	filePart = file.mozSlice(0, 131072);
} else {
	filePart = file;
}

We create a new FileReader object and pass in the Blob slice to be read. An event handler is created at this point to handle the reading of the Blob data and pass it into the worker. FileReader.readAsBinaryString() is called, passing in the blob slice, to read it as a binary string into the worker.

binaryReader = new FileReader();

binaryReader.onload = function () {

	worker.postMessage({
		guid: guid,
		binary_string: binaryReader.result
	});

};

binaryReader.readAsBinaryString(filePart);

The worker receives the binary string and passes it through multiple Exif processors in succession. One for Exif data, one for XMP formatted IPTC data and one for unformatted IPTC data. Each of the processors uses postMessage() to post the Exif data back out and is caught by the module. The data is displayed in the uploadr, which is later sent along to the API with the uploaded batch.

On asynchronous Exif parsing

When reading in Exif data asynchronously we ran into a few problems, because processing does not happen immediately. We had to prevent the user from sorting their photos until all the Exif data was parsed, namely the date and time for “order by” sorting. We also ran into a race condition when getting tags out of the Exif data. If a user had already entered tags we want to amend those tags with what was possibly saved in their photo. We also update the Uploadr with data from Exiftool once it is processed on the back-end.

The Nitty Gritty: Creating EXIF Parsers and dealing with typed arrays support
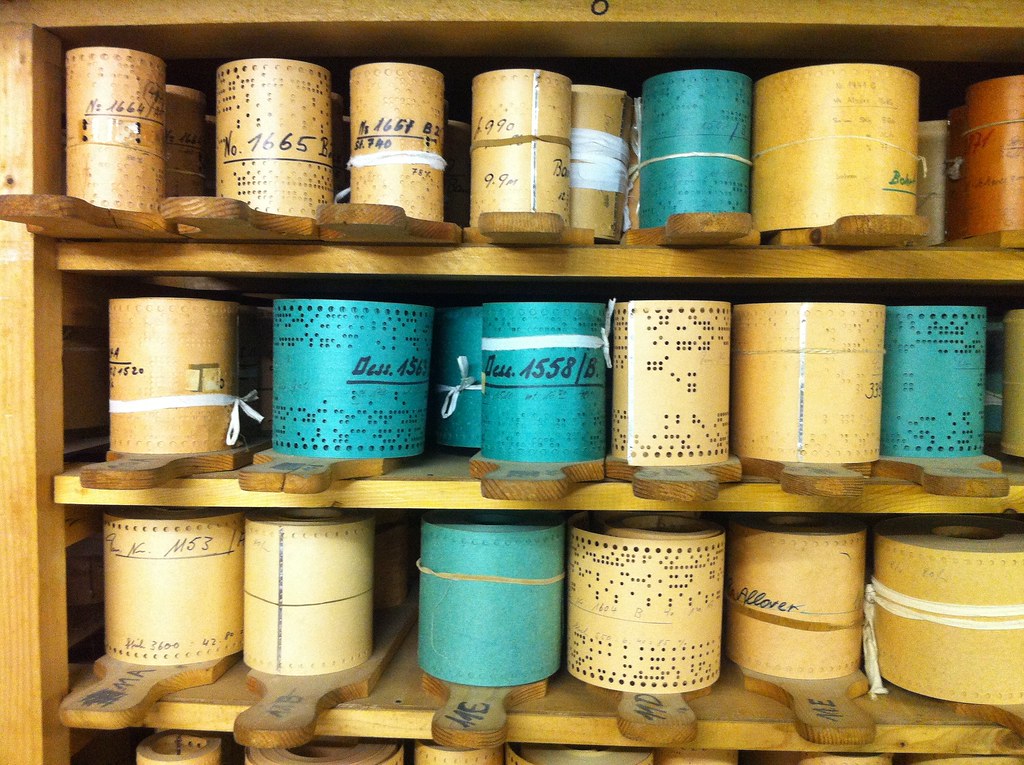
pre-electronic binary code
pre-electronic binary code by dret

Creating an Exif parser is no simple task, but there are a few things to consider:

  • What specification of Exif are we dealing with? (Exif, XMP, IPTC, any and all of the above?)
  • When processing the binary string data, is it big or little endian?
  • How do we read binary data in a browser?
  • Do we have typed arrays support or do we need to create our own data view?

First things first, how do we read binary data?

As we saw above our worker is fed a binary string, meaning this is a stream of ASCII characters representing values from 0-255. We need to create a way to access and parse this data. The Exif specification defines a few different data value types we will encounter:

  • 1 = BYTE An 8-bit unsigned integer
  • 2 = ASCII An 8-bit byte containing one 7-bit ASCII code. The final byte is terminated with NULL.
  • 3 = SHORT A 16-bit (2-byte) unsigned integer
  • 4 = LONG A 32-bit (4-byte) unsigned integer
  • 5 = RATIONAL Two LONGs. The first LONG is the numerator and the second LONG expresses the denominator.
  • 7 = UNDEFINED An 8-bit byte that can take any value depending on the field definition
  • 9 = SLONG A 32-bit (4-byte) signed integer (2’s complement notation)
  • 10 = SRATIONAL Two SLONGs. The first SLONG is the numerator and the second SLONG is the denominator

So, we need to be able to read an unsigned int (1 byte), an unsigned short (2 bytes), an unsigned long (4 bytes), an slong (4 bytes signed), and an ASCII string. Since the we read the stream as a binary string it is already in ASCII, that one is done for us. The others can be accomplished by using typed arrays, if supported, or some fun binary math.

Typed Array Support

Now that we know what types of data we are expecting, we just need a way to translate the binary string we have into useful values. The easiest approach would be typed arrays (https://developer.mozilla.org/en/JavaScript_typed_arrays), meaning we can create an ArrayBuffer using the string we received from from the FileReader, and then create typed arrays, or views, as needed to read values from the string. Unfortunately array buffer views do not support endianness, so the preferred method is to use DataView (http://www.khronos.org/registry/typedarray/specs/latest/#8), which essentially creates a view to read into the buffer and spit out various integer types. Due to lack of great support, Firefox does not support DataView and Safari’s typed array support can be slow, we are currently using a combination of manual byte conversion and ArrayBuffer views.

var arrayBuffer = new ArrayBuffer(this.data.length);
var int8View = new Int8Array(arrayBuffer);

for (var i = 0; i &amp;lt; this.data.length; i++) {
	int8View[i] = this.data[i].charCodeAt(0);
}

this.buffer = arrayBuffer;

this.getUint8 = function(offset) {
	if (compatibility.ArrayBuffer) {

	return new Uint8Array(this.buffer, offset, 1)[0];
	}
	else {
		return this.data.charCodeAt(offset) &amp;amp; 0xff;
	}
}

Above we are creating an ArrayBuffer of length to match the data being passed in, and then creating a view consisting of 8-bit signed integers which allows us to store data into the ArrayBuffer from the data passed in. We then process the charCode() at each location in the data string passed in and store it in the array buffer via the int8View. Next you can see an example function, getUint8(), where we get an unsigned 8-bit value at a specified offset. If typed arrays are supported we use a Uint8Array view to access data from the buffer at an offset, otherwise we just get the character code at an offset and then mask the least significant 8 bits.

To read a short or long value we can do the following:

this.getLongAt = function(offset,littleEndian) {

	//DataView method
	return new DataView(this.buffer).getUint32(offset, littleEndian);

	//ArrayBufferView method always littleEndian
	var uint32Array = new Uint32Array(this.buffer);
	return uint32Array[offset];

	//The method we are currently using
	var b3 = this.getUint8(this.endianness(offset, 0, 4, littleEndian)),
	b2 = this.getUint8(this.endianness(offset, 1, 4, littleEndian)),
	b1 = this.getUint8(this.endianness(offset, 2, 4, littleEndian)),
	b0 = this.getUint8(this.endianness(offset, 3, 4, littleEndian));

	return (b3 * Math.pow(2, 24)) + (b2 &amp;lt;&amp;lt; 16) + (b1 &amp;lt;&amp;lt; 8) + b0;

}

The DataView method is pretty straight forward, as is the ArrayBufferView method, but without concern for endianness. The last method above, the one we are currently using, gets the unsigned int at each byte location for the 4 bytes. Transposes them based on endianness and then creates a long integer value out of it. This is an example of the custom binary math needed to support data view in Firefox.

When originally beginning to build out the Exif parser I found this jDataView (https://github.com/vjeux/jDataView) library written by Christopher Chedeau aka Vjeux (http://blog.vjeux.com/). Inspired by Christopher’s jDataView module we created a DataView module for YUI.

Translating all of this into useful data

There are a few documents you should become familiar with if you are considering writing your own Exif parser:

The diagram above is taken straight from the Exif specification section 4.5.4, it describes the basic structure for Exif data in compressed JPEG images. Exif data is broken up into application segments (APP0, APP1, etc.). Each application segment contains a maker, length, Exif identification code, TIFF header, and usually 2 image file directories (IFDs). These IFD subdirectories contain a series of tags, of which each contains the tag number, type, count or length, and the data itself or offset to the data. These tags are described in Appendix A of the TIFF6 Spec, or at Table 41 JPEG Compressed (4:2:0) File APP1 Description Sample in the Exif spec and also broken down on the Exif spec page created by TsuruZoh Tachibanaya.

Finding APP1

The first thing we want to find is the APP1 marker, so we know we are in the right place. For APP1, this is always the 2 bytes 0xFFE1, We usually check the last byte of this for the value 0xE1, or 225 in decimal, to prevent any endianness problems. The next thing we want to know is the size of the APP1 data, we can use this to optimize and know when to stop reading, which is also 2 bytes. Next up is the Exif header, which is always the 4 bytes 0x45, 0x78, 0x69, 0x66, or “Exif” in ASCII, which makes it easy. This is always followed up 2 null bytes 0x0000. Then begins the TIFF header and then the 0th IFD, where our Exif is stored, followed by the 1st IFD, which usually contains a thumbnail of the image.

We are concerned with application segment 1 (APP1). APP2 and others can contain other metadata about this compressed image, but we are interested in the Exif attribute information.

Wherefore art thou, TIFF header?

Once we know we are at APP1 we can move on to the TIFF header which starts with the byte alignment, 0x4949 (II, Intel) or 0x4D4D (MM, Motorola), Intel being little endian and Motorola being big endian. Then we have the tag marker, which is always 0x2A00 (or 0x002A for big endian): “an arbitrary but carefully chosen number (42) that further identifies the file as a TIFF file”. Next we have the offset to the first IFD, which is usually 0x08000000, or 8 bytes from the beginning of the TIFF header (The 8 bytes: 0x49 0x49 0x2A 0x00 0x08 0x00 0x00 0x00). Now we can begin parsing the 0th IFD!
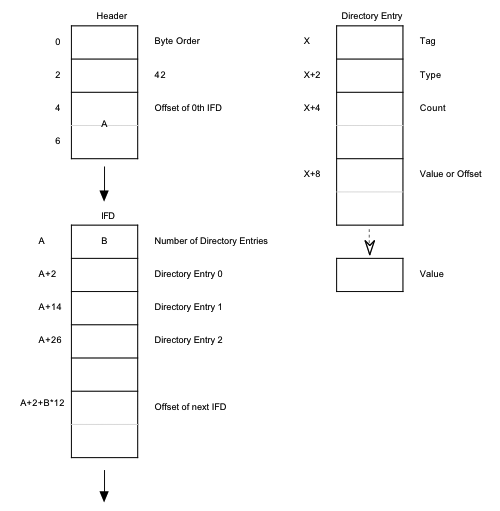
The diagram above (taken from the TIFF6.0 specification found here: http://partners.adobe.com/public/developer/en/tiff/TIFF6.pdf), shows the structure of the TIFF header, the following IFD and a directory entry contained within the IFD.

The IFD starts off with the number of directory entries in the IFD, 2 bytes, then follows with all of the directory entries and ends with the offset to the next IFD if there is one. Each directory entry is 12 bytes long and comprised of 4 parts: the tag number, the data format, the number of components, and the data itself or an offset to the data value in the file. Then follows the offset to the next IFD which is again 8 bytes.

Example: Processing some real world bytes

Let’s run through an example below! I took a screen shot from hexfiend (http://ridiculousfish.com/hexfiend/, which is an awesome little program for looking at raw hex data from any file, I highly recommend it) and highlighted the appropriate bytes from start of image (SOI) to some tag examples.
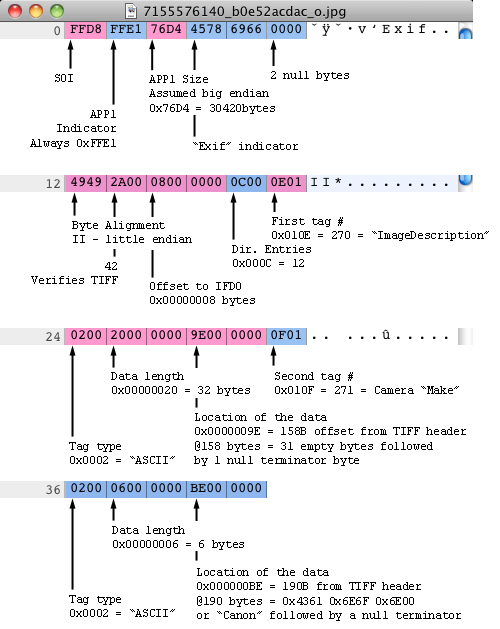
This is the first 48 bytes of the image file. I’ve grouped everything into 2 byte groups and 12 byte columns, because IFD entries are 12 bytes it makes it easier to read. You can see the start of image marker (SOI), APP1 mark and size, “Exif” mark and null bytes. Next is the beginning of the TIFF header including byte align, the 42 TIFF verification mark, the offset to the 0th IFD, the number of directory entries, and then the first 2 directory entries. These entries are in little endian and I wrote them out as big endian to make them easier to read. Both of these first entries are of ASCII type, which always point to an offset in the file and ends with a null terminator byte.

Writing code to parse Exif

Now that we understand the tag structure and what we are looking for in our 128k of data we sliced from the beginning of the image, we can write some code to do just that. A lot of insipration for this code comes from an exif parser written by Jacob Seidelin, http://blog.nihilogic.dk, the original you can find here: http://www.nihilogic.dk/labs/exif/exif.js. We used a lot of his tag mapping objects to translate the Exif tag number values into tag names as well as his logic that applies to reading and finding Exif data in a binary string.

First we start looking for the APP1 marker, by looping through the binary string recording our offset and moving it up as we go along.

if (dataview.getByteAt(0) != 0xFF || dataview.getByteAt(1) != 0xD8) {
	return;
}
else {
	offset = 2;
	length = dataview.length;
	
	while (offset &amp;lt; length) {
		marker = dataview.getByteAt(offset+1);
		if (marker == 225) {
			readExifData(dataview, offset + 4, dataview.getShortAt(offset+2, true)-2);
			break;
		}
		else if(marker == 224) {
			offset = 20;
		}
		else {
			offset += 2 + dataview.getShortAt(offset+2, true);
		}
	}
}

We check for a valid SOI marker (0xFFD8) and then loop through the string we passed in. If we find the APP1 marker (225) we start reading Exif data, if we find a APP0 marker (224) we move the offset up by 20 and continue reading, otherwise we move the offset up by 2 plus the length of the APP data segment we are at, because it is not APP1, we are not interested.

Once we find what we are looking for we can look for the Exif header, endianness, the TIFF header, and look for IFD0.

function readExifData(dataview, start, length) {

	var littleEndian;
	var TIFFOffset = start + 6;

	if (dataview.getStringAt(iStart, 4) != &quot;Exif&quot;) {
		return false;
	}

	if (dataview.getShortAt(TIFFOffset) == 0x4949) {
		littleEndian = true;
		self.postMessage({msg:&quot;----Yes Little Endian&quot;});
	}
	else if (dataview.getShortAt(TIFFOffset) == 0x4D4D) {
		littleEndian = false;
		self.postMessage({msg:&quot;----Not Little Endian&quot;});
	}
	else {
		return false;
	}

	if (dataview.getShortAt(TIFFOffset+2, littleEndian) != 0x002A) {
		return false;
	}

	if (dataview.getLongAt(TIFFOffset+4, littleEndian) != 0x00000008) {
		return false;
	}

	var tags = ExifExtractorTags.readTags(dataview, TIFFOffset, TIFFOffset+8, ExifExtractorTags.Exif.TiffTags, littleEndian);

This is the first part of the readExifData function that is called once we find our APP1 segment marker. We start by verifying the Exif marker, then figuring out endianness, then checking if our TIFF header verification marker exists (42), and then getting our tags and values by calling ExifExtractorTags.readTags. We pass in the dataview to our binary string, the offset, the offset plus 8, which bypasses the TIFF header, the tags mapping object, and the endianness.

Next we pass that data into a function that creates an object which maps all of the tag numbers to real world descriptions, and includes maps for tags that have mappable values.

this.readTags = function(dataview, TIFFStart, dirStart, strings, littleEndian) {
	var entries = dataview.getShortAt(dirStart, littleEndian);
	var tags = {};
	var i;

	for (i = 0; i &amp;lt; entries; i++) {
		var entryOffset = dirStart + i*12 + 2;
		var tag = strings[dataview.getShortAt(entryOffset, littleEndian)];

		tags[tag] = this.readTagValue(dataview, entryOffset, TIFFStart, dirStart, littleEndian);
	}

	if(tags.ExifIFDPointer) {
		var entryOffset = dirStart + i*12 + 2;
		var IFD1Offset = dataview.getLongAt(entryOffset,littleEndian);

		tags.IFD1Offset = IFD1Offset;
	}

	return tags;
}

This function is quite simple, once we know where we are at of course. For each entry we get the tag name from our tag strings and create a key on a tags object with a value of the tag. If there is an IFD1, we store that offset in the tags object as well. The readTagValue function takes the dataview object, the entry’s offset, the TIFF starting point, the directory starting point (TIFFStart + 8), and then endianness. It returns the tag’s value based on the data type (byte, short, long, ASCII).

We return a tags object which has keys and values for various Exif tags that were found in the IFD. We check if ExifIFDPointer exists on this object, if so, we have IFD entries to pass back out of the worker and show the user. We also check for GPS data and an offset to the next IFD, IFD1Offset, if that exists we know we have another IFD, which is usually a thumbnail image.

if (tags.ExifIFDPointer) {

	var ExifTags = ExifExtractorTags.readTags(dataview, TIFFOffset, TIFFOffset + tags.ExifIFDPointer, ExifExtractorTags.Exif.Tags, littleEndian);

	for (var tag in ExifTags) {
		switch (tag) {
			case &quot;LightSource&quot; :
			case &quot;Flash&quot; :
			case &quot;MeteringMode&quot; :
			case &quot;ExposureProgram&quot; :
			case &quot;SensingMethod&quot; :
			case &quot;SceneCaptureType&quot; :
			case &quot;SceneType&quot; :
			case &quot;CustomRendered&quot; :
			case &quot;WhiteBalance&quot; :
			case &quot;GainControl&quot; :
			case &quot;Contrast&quot; :
			case &quot;Saturation&quot; :
			case &quot;Sharpness&quot; :
			case &quot;SubjectDistanceRange&quot; :
			case &quot;FileSource&quot; :
				ExifTags[tag] = ExifExtractorTags.Exif.StringValues[tag][ExifTags[tag]];
				break;
			case &quot;ExifVersion&quot; :
			case &quot;FlashpixVersion&quot; :
				ExifTags[tag] = String.fromCharCode(ExifTags[tag][0], ExifTags[tag][1], ExifTags[tag][2], ExifTags[tag][3]);
				break;
			case &quot;ComponentsConfiguration&quot; :
				ExifTags[tag] =
					ExifExtractorTags.Exif.StringValues.Components[ExifTags[tag][0]]
					+ ExifExtractorTags.Exif.StringValues.Components[ExifTags[tag][1]]
					+ ExifExtractorTags.Exif.StringValues.Components[ExifTags[tag][2]]
					+ ExifExtractorTags.Exif.StringValues.Components[ExifTags[tag][3]];
				break;
		}
		
		tags[tag] = ExifTags[tag];
	}
}

This is the rest of the readTags function, basically we are checking if ExifIFDPointer exists and then reading tags again at that offset pointer. Once we get another tags object back, we check to see if that tag has a value that needs to be mapped to a readable value. For example if the Flash Exif tag returns 0x0019 we can map that to “Flash fired, auto mode”.

if(tags.IFD1Offset) {
	IFD1Tags = ExifExtractorTags.readTags(dataview, TIFFOffset, tags.IFD1Offset + TIFFOffset, ExifExtractorTags.Exif.TiffTags, littleEndian);
	
	if(IFD1Tags.JPEGInterchangeFormat) {
		readThumbnailData(dataview, IFD1Tags.JPEGInterchangeFormat, IFD1Tags.JPEGInterchangeFormatLength, TIFFOffset, littleEndian);
	}
}

function readThumbnailData(dataview, ThumbStart, ThumbLength, TIFFOffset, littleEndian) {

	if (dataview.length &amp;lt; ThumbStart+TIFFOffset+ThumbLength) {
		return;
	}

	var data = dataview.getBytesAt(ThumbStart+TIFFOffset,ThumbLength);
	var hexData = new Array();
	var i;

	for(i in data) {
		if (data[i] &amp;lt; 16) {
			hexData[i] = &quot;0&quot;+data[i].toString(16);
		}
		else {
			hexData[i] = data[i].toString(16);
		}
	}

	self.postMessage({guid:dataview.guid, thumb_src:&quot;data:image/jpeg,%&quot;+hexData.join('%')});
}

The directory entry for the thumbnail image is just like the others. If we find the IFD1 offset at the end of IFD0, we pass the data back into the readTags function looking for two specific tags: JPEGInterchangeFormat (the offset to the thumbnail) and JPEGInterchangeFormatLength (the size of the thumbnail in bytes). We read in the correct amount of raw bytes at the appropriate offset, convert each byte into hex, and pass it back as a data URI to be inserted into the DOM showing the user a thumbnail while their photo is being uploaded.

As we get data back from the readTags function, we post a message out of the worker with the tags as an object. Which will be caught caught by our event handlers from earlier, shown the user, and stored as necessary to be uploaded when the user is ready.

We use this same process to parse older IPTC data. Essentially we look for an APP14 marker, a Photoshop 3.0 marker, a “8BIM” marker, and then begin running through the bytes looking for segment type, size, and data. We map the segment type against a lookup table to get the segment name and get size number of bytes at the offset to get the segment data. This is all stored in a tags object and passed out of the worker.

XMP data is a little different, even easier. Basically we look for the slice of data surrounded by the values “<x:xmpmeta” to “</x:xmpmeta>” in the binary string, then pass that out of the worker to be parsed via Y.DataType.XML.parse().

Conclusion

In conclusion the major steps we take to process an image’s Exif are:

  1. Initialize a web worker
  2. Get a file reference
  3. Get a slice of the file’s data
  4. Read a byte string
  5. Look for APP1/APP0 markers
  6. Look for Exif and TIFF header markers
  7. Look for IFD0 and IFD1
  8. Process entries from IFD0 and IFD1
  9. Pass data back out of the worker

That is pretty much all there is to reading Exif! The key is to be very forgiving in the parsing of Exif data, because there are a lot of different cameras out there and the format has changed over the years.

One final note: Web workers have made client-side Exif processing feasible at scale. Tasks like this can be performed without web workers, but run the risk of locking the UI thread – certainly not ideal for a web app that begs for user interaction.

Flickr flamily floto

Like this post? Have a love of online photography? Want to work with us? Flickr is hiring engineers, designers and product managers in our San Francisco office. Find out more at flickr.com/jobs.


Group APIs

With over 1.5 million groups, it’s no doubt that they are an important part of Flickr. Today, we’re releasing a few new ways to interact with groups using our API.

Group Membership

Cat meeting...

We are adding two new methods to manage group membership through the API.

flickr.groups.join to join a group. Before calling this method, check if the group has rules using flickr.groups.getInfo. The user needs to agree to the rules before being able to join the group. Pass the accept_rules argument if the user accepted the rules.

flickr.groups.leave to leave a group. The user’s photos can also be deleted when leaving the group by passing the delete_photos argument.

Group Discussions

shut UP WALTON

We are also opening up group discussions in the API. You can now fetch a list of discussion topics for a group using flickr.groups.discuss.topics.getList, with sticky topics first, then regular topics sorted from newest to oldest.

&lt;rsp stat=&quot;ok&quot;&gt;
    &lt;topics group_id=&quot;46744914@N00&quot; iconserver=&quot;1&quot; iconfarm=&quot;1&quot; name=&quot;Tell a story in 5 frames (Visual story telling)&quot; members=&quot;12428&quot; privacy=&quot;3&quot; lang=&quot;en-us&quot; ispoolmoderated=&quot;1&quot; total=&quot;4621&quot; page=&quot;1&quot; per_page=&quot;2&quot; pages=&quot;2310&quot;&gt;
        &lt;topic id=&quot;72157625038324579&quot; subject=&quot;A long time ago in a galaxy far, far away...&quot; author=&quot;53930889@N04&quot; authorname=&quot;Smallportfolio_jm08&quot; role=&quot;member&quot; iconserver=&quot;5169&quot; iconfarm=&quot;6&quot; count_replies=&quot;8&quot; can_edit=&quot;0&quot; can_delete=&quot;0&quot; can_reply=&quot;0&quot; is_sticky=&quot;0&quot; is_locked=&quot;&quot; datecreate=&quot;1287070965&quot; datelastpost=&quot;1336905518&quot;&gt;
            &lt;message&gt; ... &lt;/message&gt;
        &lt;/topic&gt;
    &lt;/topics&gt;
&lt;/rsp&gt;

flickr.groups.discuss.topics.add to post a new topic to a group, passing a subject and the message content.

Additionally, you can fetch a list of replies for a topic using flickr.groups.discuss.replies.getList, which includes the information for the topic along with all the replies, sorted from oldest to newest.

&lt;rsp stat=&quot;ok&quot;&gt;
    &lt;replies&gt;
        &lt;topic topic_id=&quot;72157625038324579&quot; subject=&quot;A long time ago in a galaxy far, far away...&quot; group_id=&quot;46744914@N00&quot; iconserver=&quot;1&quot; iconfarm=&quot;1&quot; name=&quot;Tell a story in 5 frames (Visual story telling)&quot; author=&quot;53930889@N04&quot; authorname=&quot;Smallportfolio_jm08&quot; role=&quot;member&quot; author_iconserver=&quot;5169&quot; author_iconfarm=&quot;6&quot; can_edit=&quot;0&quot; can_delete=&quot;0&quot; can_reply=&quot;0&quot; is_sticky=&quot;0&quot; is_locked=&quot;&quot; datecreate=&quot;1287070965&quot; datelastpost=&quot;1336905518&quot; total=&quot;8&quot; page=&quot;1&quot; per_page=&quot;3&quot; pages=&quot;2&quot;&gt;
            &lt;message&gt; ... &lt;/message&gt;
        &lt;/topic&gt;
        &lt;reply id=&quot;72157625163054214&quot; author=&quot;41380738@N05&quot; authorname=&quot;BlueRidgeKitties&quot; role=&quot;member&quot; iconserver=&quot;2459&quot; iconfarm=&quot;3&quot; can_edit=&quot;0&quot; can_delete=&quot;0&quot; datecreate=&quot;1287071539&quot; lastedit=&quot;0&quot;&gt;
            &lt;message&gt; ... &lt;/message&gt;
        &lt;/reply&gt;
    &lt;/replies&gt;
&lt;/rsp&gt;

flickr.groups.discuss.replies.add to post a reply to a topic, passing the message content.

flickr.groups.discuss.replies.edit to edit a reply, passing the updated message.

flickr.groups.discuss.replies.delete to delete a reply.

You can only edit and delete replies when authorized as the owner of the reply. For now, it is not possible to edit or delete a topic through the API.

If you have any questions, comments, concerns, or just want to chat about these methods or anything else related to the API, please join the Flickr Developer mailing list.

Photos from fofurasfelinas and larissa_allen.

Liquid Photo Page Layout

The Flickr photo page has gone through several revisions over the years. It was initially designed for 800×600 pixel displays, with a 500 pixel wide photo and a 250 pixel wide sidebar.


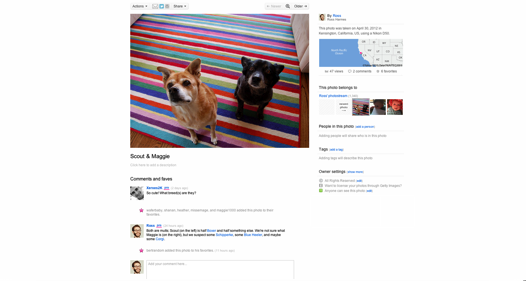
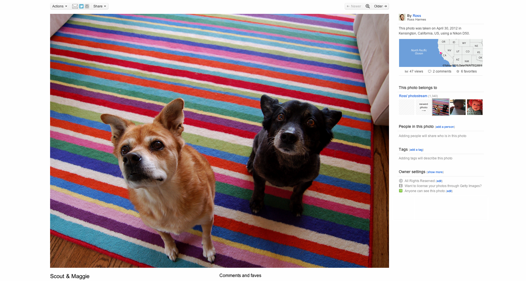
The 500×375 photo takes up 9.1% of the 1905×1079 pixels available in my viewport

By 2010, display resolutions had increased significantly, and 1024×768 became the new standard for our smallest supported resolution. We launched a re-designed photo page, designed for a width of 960. It featured a 640 pixel wide photo and a sidebar of 300 pixels.


The 640×480 photo takes up 14.9% of the 1905×1079 pixels available in my viewport

Since then the number of different display resolutions has increased and larger sizes have become more popular, but the number of users still on 1024×768 displays have made it hard to increase the width of the page beyond 960. We realized that we would always have to support smaller monitors, but that there was no reason not to give bigger photos to those with larger monitors. The recent launch of the 800, 1600, and 2048 photo sizes gave us a lot of different options for showing big, beautiful photos to members, and we wanted to take advantage of that. Starting today, we will display the biggest photo that we can on the photo page for your monitor.


The 1213×910 photo takes up 53.7% of the 1905×1079 pixels available in my viewport

Algorithmic

As you use the new liquid photo page, you may notice that the page content doesn’t always fill the entire viewport. This is because we created an algorithm for taking the width and height into account that will display content at a width that will best showcase the most common photo ratio, the 4:3. Here are the goals of that algorithm:

  1. Show the biggest photo the window allows
  2. Ensure the title and the sidebar are visible
  3. Keep the width of the page consistent across all photo pages, regardless of the individual photo dimensions
  4. Whenever possible, prefer native dimensions of a photo size (i.e., resist downsampling and never upsample)

Going Big

Big photos are really compelling. We knew from using the Flickr Light Box that our members’ photos look amazing at full screen, and we wanted to give the same experience on the photo page. This part of the algorithm was easy; as soon as the page starts loading, we read the innerWidth and innerHeight of the viewport (or the browser’s equivalent), and then go through the photo sizes that the photo owner allows us to display to find the best fit. If the photo is a little too big for the space we have to work with, we scale it down in the browser.

Providing Context

As great as a giant photo is, a photo is more than just its pixels. The context and story around a photo is just as important. Imagine a photo of a tiger; it’s impressive in its own right, but throw in a map showing that the tiger is in a public park, and a title stating, “A Tiger Escaped From the Zoo!” and then you really have something.</>

We decided that the title and the sidebar are important enough to make it worth showing a slightly smaller photo on the page. We adjusted the algorithm to take into account the width of the sidebar and its gutter (335 pixels) and the height of the first line of the title (45 pixels) when calculating how much available space there is for a photo.

Site Consistency

So far, so good. However, as we used the liquid photo page we noticed that it had one fatal flaw: Since the algorithm uses the dimensions of the photo that you are viewing to adjust the page width, it changes from photo to photo. This mean that if you’re browsing through some photos, the elements of the page are moving around from page to page. This is especially problematic with the header and the Next / Previous buttons; It’s incredibly difficult to navigate around if you always have to hunt around to find them first.

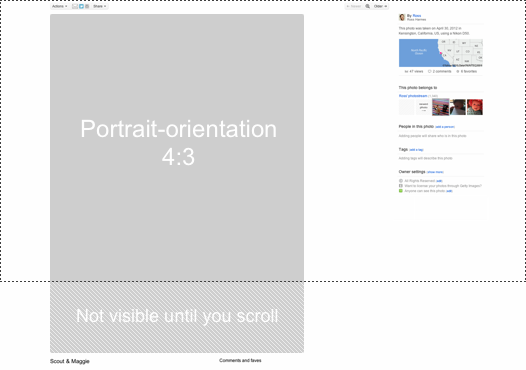
To fix this problem, we decided to make the algorithm ignore the dimensions of the currently displayed photo when calculating page width, and instead to always use the dimensions of an imaginary 4:3 photo. This means that the page width will always be the same for any given combination of viewport width and viewport height, and that the UI elements will be in the same places for each page. The downsides of this are that photos that aren’t 4:3 will have more whitespace around them and even potentially be cut off by the bottom of the page, forcing the viewer to scroll. Using a consistent width is definitely the lesser of the two evils, though. The current photo page has the same problem with photos that are taller than they are wide being below the fold, and we’ve been happily viewing them for years.

Going Native

These days, browsers do a pretty good job scaling a photo down. By default, most browsers err on the side of quality rather than speed, so the resulting photo should look good regardless of the size it is displayed. That being said, if we ever downsample a photo, then we are downloading more pixels than we need and throwing them away. This isn’t good for performance.

We adjusted the algorithm to favor native sizes, even if that means a slightly smaller photo is shown. We coded in detents, so that if a photo size is within 60 pixels of a native size, we will just use that size instead of downsampling a larger one. This means the page loads faster and that most common monitor resolutions will see photos at the native size, as this table illustrates (percentage use data from StatCounter):

Resolution Use % Page width Image size Image width Efficiency
1366 x 768 19.28% 975px Medium 640 640px 100.0%
1024 x 768 18.60% 975px Medium 640 640px 100.0%
1280 x 800 12.95% 1044px Medium 800 709px 88.6%
1280 x 1024 7.48% 1216px Large 1024 881px 86.0%
1440 x 900 6.60% 1135px Medium 800 800px 100.0%
1920 x 1080 5.09% 1359px Large 1024 1024px 100.0%
1600 x 900 3.83% 1135px Medium 800 800px 100.0%
1680 x 1050 3.63% 1359px Large 1024 1024px 100.0%
1360 x 768 2.32% 975px Medium 640 640px 100.0%

Titles Are for Squares, Man

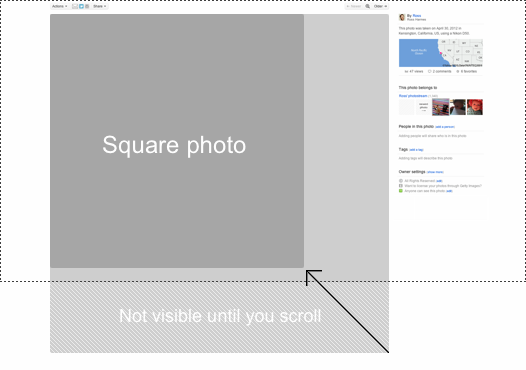
Square photos are an interesting loophole in the way we size photos. Because we’re targeting an imaginary 4:3 photo, square photos will be displayed with more actual pixels than any other size, taking up the full width and height allotted. While browsing the site we noticed this, as well as the fact that the title is never visible. In order to bring the overall pixel count more in line with landscape and portrait photos, we reduce the size of square photos a bit more than the others. This helps ensure that the titles are always visible as well.

Making it Fast

Now that the algorithm is complete, we need to work on the performance. We noticed that reading the viewport dimensions and resizing the page every single time you go to a photo is unnecessary and distracting (since the page loads with a width of 960 and must be adjusted after the JavaScript loads on the page). To fix this, we cache the viewport dimensions in a cookie that can be read by the PHP code that generates the page. The first time you go to a liquid photo page, we have no choice but to adjust the page width on the fly. But every other photo page you visit will have the dimensions stored from the last page, and the page will be rendered with the correct width from the start.

More to Come

We have a lot more changes in store for this year. Stay tuned!

Building The Flickr Web Uploadr: The Grid

The new Flickr Web Uploadr is the result of a good amount of prototyping, research and good old-fashioned testing across the team that built it. This article goes into some of the details behind the “grid” – the area where photo thumbnails are shown – and sheds a little light on some of the thinking and logic behind the scenes. It’s a little lengthy, but don’t worry, there are pictures!

In April 2012, Flickr started rolling out its new web-based upload UI to the masses. We’re stoked to see it out there, and user feedback has been overwhelmingly positive. The product is an ongoing work in progress and enhancements are still being added, but the core is quite well-established and the experience is a significant upgrade over the one provided by the previous web-based uploadr.

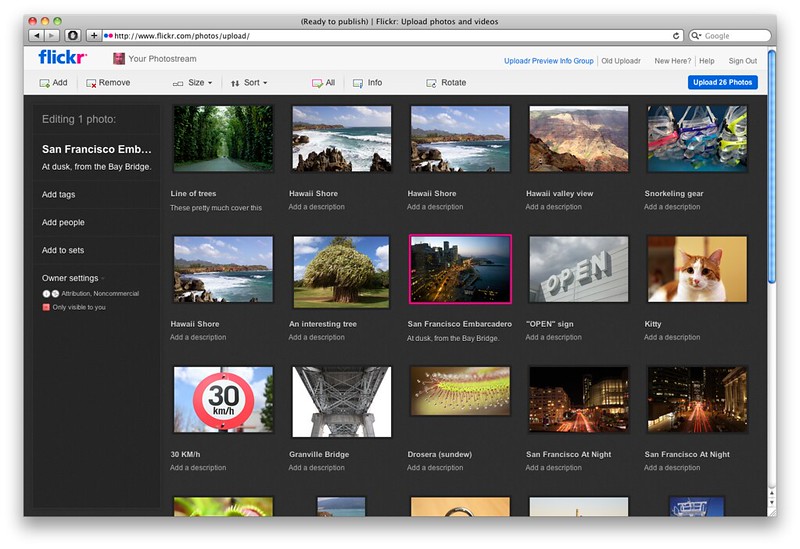
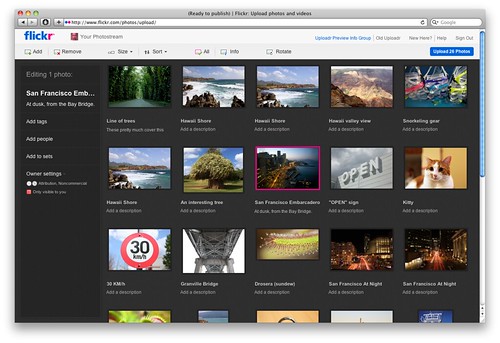
Flickr Web Uploader UI (2012)
The new Flickr Web Uploadr. It’s powerful, it’s got a dark background, and it’s fast.

The new uploadr has also simply been fun to work on; there are numerous interesting challenges in terms of UI, interactions, performance and sheer scale on the front-end that we had to feel confident in tackling before we were able to commit to moving forward with the project.

Building The Grid: Prototypes

Initial discussions about the new Flickr uploadr weren’t too detailed, because I think everyone already had a pretty good idea of what we wanted to see in a browser: Something more desktop-like, feature-wise (like our older XUL-based Flickr Uploadr application) that would load and show photo thumbnails in a grid arrangement, with a desktop-like selection and batch editing model.

The next step was to start building a prototype in plain old HTML, CSS and JavaScript, and then figure out how many photos we could potentially get into the thing before it broke down. Could the grid handle selection and editing of 1,000 items? 10,000 items? I was cautiously optimistic. A continuous joke I had with the team was that I had built this before, in 2005: The project was an adventurous redesign of Yahoo! Photos, and joking aside, it actually did share a lot of design and interaction elements in common with what we were about to build. In 2005, we were targeting IE 6 and Firefox 1.5, so the landscape has changed a lot in terms of support and performance. Seven years later, it was fun to review some of the lessons and fun bits from the Y! Photos redesign as applicable to Flickr.

Prototype: Fluid Grid Layout

Some of the first prototypes involved building a grid layout, forming a two-column page that would be fluid to the browser width. We wanted to guarantee at least three photos per row would show in the grid, so the thumbnails could scale themselves relative to the browser size in order to fit in the space – easily done via CSS’ min-width and max-width attributes.


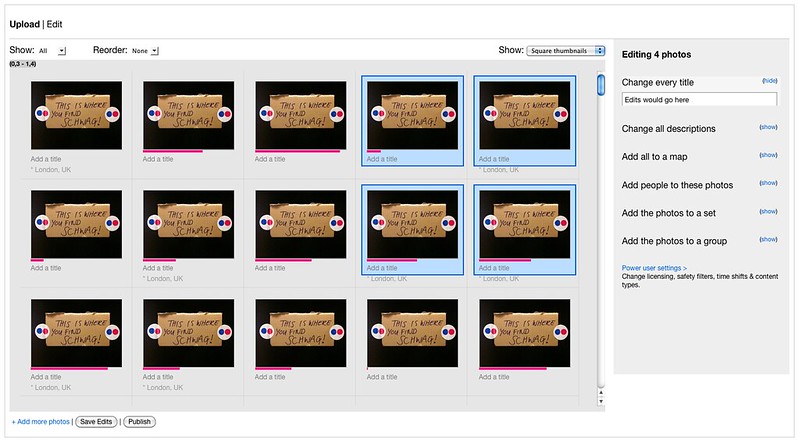
A very early version of the uploadr UI.

The earliest prototypes simply populated the DOM with a few hundred copies of a cloned photo item “template”, to give the idea of what a busy UI might look like. It was mostly just HTML and CSS at this point.

With the grid rendering in fluid form as a series of inline-block <li> elements, the next thing to start was the selection model.

Selection and Drag Events

Building a desktop-like selection and drag-and-drop model can be a technical challenge, given the underlying complexity. As anyone who’s built one of these will understand, there are a whole ton of interactions one must consider and account for between event monitoring, coordinate tracking, drag-to-select vs. rearrange intents, event cancellation, handling of invalid actions and so on.

Selection

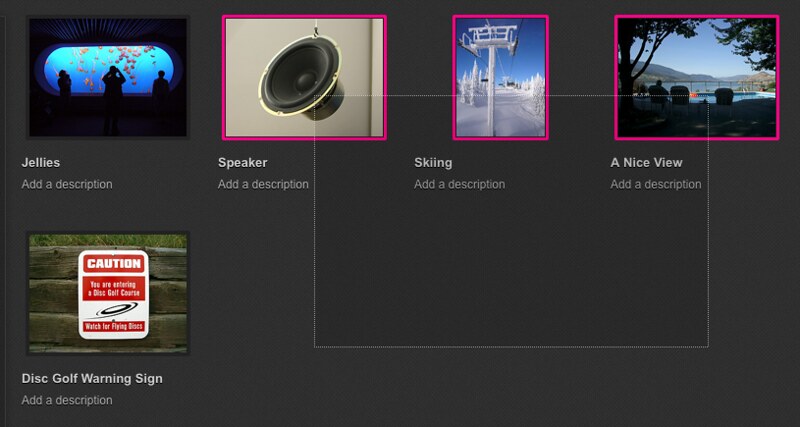
In general, all user interactions start with watching mousedown() events inside the grid area. If mousedown() fires within “whitespace”, any existing selection is reset and mousemove() events are then used to draw a selection marquee which compares coordinates to the grid, highlighting items based on basic region intersection logic (for example, xyToRowCol(), points can be checked to see what grid row/column they fall within and thus “from/to” ranges can be established for a given marquee box.) Once a mouseup() event fires, selection can be completed and the mousemove() and mouseup() handlers released.


Testing the selection UI at various grid sizes.

The above marquee drawing and intersection logic is not terribly fancy, but things start to get interesting when you throw in additional positioning considerations like vertical offset from window scrolling (and drag-initiated window scrolling), browser window resizing affecting layout, positioning of the marquee UI vs. coordinates of the underlying grid items and so forth. Keyboard modifiers can also affect selection mode – whether selection is exclusive, additive or toggle-based – so an intersect does not also always mean “select this item”, too.

Flickr Web Upload UI: Selection Screenshot
Marquee selection mode in action.

Dragging + Rearrange

When mousedown() fires on an unselected grid item, selection can immediately change to only that item (unless selection mode is additive or toggle-based via a modifier key.) If firing on an already-selected item, mousemove() is watched for a “threshold” of perhaps 4+ pixels of movement from the original coordinates, at which point “dragging” becomes active.

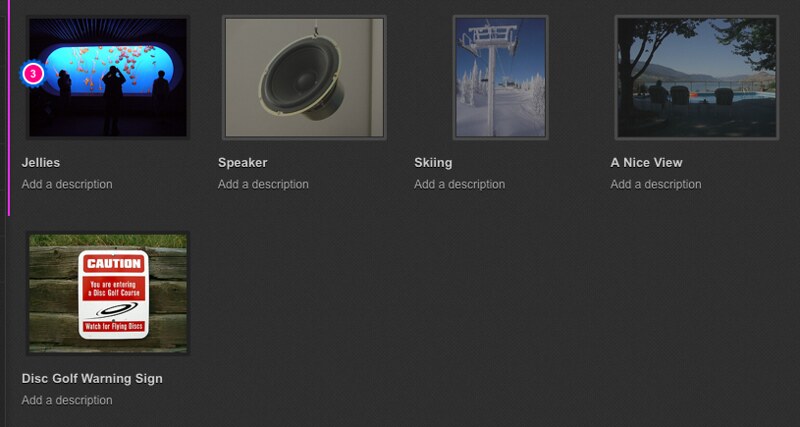
Once dragging has begun, the selected grid DOM elements are marked with a “disabled” CSS class, greying them out somewhat to indicate drag state, and mousemove() now moves around a cursor trailer that shows the count of items being rearranged.

Rearrange mode, once entered, is similar to the marquee selection mode except that now only a single mouse coordinate is checked in order to determine what row and column is the current “target” for rearrange – that is, what position the user intends to drag the selected photo(s) to. The logic here can get interesting in edge cases, because the user is able to insert both “before” and “after” a given target point based on whether the cursor is on the left side, or the right side of the target.

In terms of the UI, the current drag target simply has an “insert-before” or “insert-after” CSS class appended to it which results in the appropriate “insert point” marker (a CSS border) being applied to it.

Flickr Web Upload UI: Rearrange
Rearrange mode in action.

Once mouseup() fires on a valid rearrange target, the actual rearrange action is applied to both the UI and data model. The underlying JavaScript re-appends the dragged DOM nodes next to their new target sibling node and then splices the photo item array, matching the order of the array to the new layout shown in the UI.

Additional Selection Interactions

A few other use cases to consider: Clicking an item, then shift + clicking another should have the effect of setting an “anchor point”, and selecting a range of items from X-Y within the grid. The user should be able, once setting an anchor point, to “pivot” from that point by clicking while continuing to hold the shift key. (Put another way, holding shift should not set the anchor point when clicking.)

By holding CTRL (or the Command/Apple key on OS X), selection should be additive and toggle-based. My approach to this meant taking a “snapshot” of the selection when marquee drawing begins, and then applying the logic based on mouse coordinates and keypresses with each draw action. This way, you can draw a marquee over and out of an existing selection, causing it to “toggle” and reset accordingly without losing your original state. A new snapshot is only taken once the selection is finalized at mouseup() time.

Demo video: Uploadr Prototype UI

Here is a screencast of a very early version of the Uploadr grid UI, showing the basics of mouse-based selection interactions, scrolling and resizing. By this time, selection events were also firing and updating the “editr panel” area as well.

[flickr video=7177694856 secret=3fb0a325e4 w=500 h=398]

Enter The Keyboard

With mouse events working, additional consideration was given to keyboard shortcuts. We intended to have a UI that supported most if not all of the same selection, editing and rearrange actions that could be achieved via the mouse. An important part to making this work involved watching focus inside the grid, tracking the last-known selected item, and supporting the use of the arrow keys as a means of changing focus between grid items.

Focus-based navigation in the grid is interesting, more akin to mouse movement and hover behaviour. It is intentionally separate from keyboard-based selection (which is invoked with a toggle behaviour via the spacebar, or selection and editing of a single item via the return key.) Using this approach, it is relatively easy to navigate and build up a selection of items via the arrow keys and spacebar.

For rearrange, a cut-and-paste approach was used; CTRL or Command/Apple + X (“cut”) are used to begin rearrange, arrow keys set the target rearrange point, and CTRL + V or return will apply the rearrange at the given target. If active, pressing escape will exit rearrange mode.

Performance: Scaling The Front-End

An important step in the grid prototype, once it was rendering in a fluid fashion, was to see find all the ways in which we could get it to break down. Which browsers were first to choke under the DOM load as more nodes were written out? Was layout and rendering the bottleneck? Were too many events firing? Was the JS engine spending too much time updating the DOM?

After rendering several hundred photos in the UI, we started to see evidence of browsers getting laggy in terms of responsiveness, and CPU + RAM use trending upward. With plans to extend this UI to handle numbers of photos in the thousands, a number of optimizations were made up front including aggressive pruning of the DOM as the user scrolled the page.

In brief, the trick is to create a large page with no content and only generate the DOM to reflect the slice of the whole view being shown.

Given events like window scrolling and resize affecting browser coordinates and DOM layout, we are easily able to calculate and cache the changes as they happen, making quick lookups to determine precisely what range of grid items are in view for the user. A single “page” of grid items can then be generated on the fly, appended to the DOM and shown to the browser. Events like browser resize invalidates the coordinate cache, so the DOM reflows and the grid refresh / display process repeats itself in a throttled fashion when this happens.

Event Throttling: Responsiveness’ Dirty Little Secret

Native DOM events are useful, but they can fire quite aggressively and left unchecked, can really hurt the performance of your application. Scrolling and resize are good examples for the grid case, as we want the UI to respond with an updated display pretty quickly when scrolling – but we know that we only have to show new items when a new row comes into view, which is typically only every 200 vertical pixels. With resizing, we only need to reflow the grid when resizing has added or removed enough horizontal room that we’ve lost or gained a new column.

In short, if you know events will fire often, subscribe to all of them but only do expensive work if there are real changes to apply. Alternately, you could only let resize handlers (for example) fire once every 500 milliseconds and do the work every time, so your handler only fires twice a second in the worst-case scenario.

Cache The Hell Out Of The DOM

This was hinted at previously, but is worth repeating: Get references and read values once, particularly from the DOM, and cache them when initially retrieving and updating them in response to events. If you know what a value is going to be, don’t query for it.

In JavaScript, an internal lookup is far faster than reaching out to query the DOM for attributes like offsetWidth, for example. Simply reading certain attributes of DOM nodes can cause layout and reflow to happen in the browser, which means you’re making the browser do more work for information that is likely unchanged. Thrown into a loop mixed with DOM writes, this makes for pretty disastrous browser performance.

JavaScript frameworks like YUI et al should do their own caching of this data, but I see no downside in grabbing and storing this stuff locally yourself; as the implementer, you have the best idea of what data is most static and what is not.

Additionally, try to read at once and write at once to the DOM; don’t have loops that do a write and then a read, for example. Try to write DOM interactions that follow the browser’s rendering model, minimizing the back-and-forth of layout/reflow/display calculations. Use document fragments to build up collections of DOM nodes, and append them once to the DOM vs. using innerHTML, or – worse – multiple appendChild() calls. Don’t query className when you likely know what it’s going to be; track that state internally in JS, instead, and only write changes out to the DOM.

“Stateful” CSS Class Names

I’ve been a fan of the concept of “stateful” CSS – eg., .is_selected { border: red; } for years. Not only is state consistent, but using CSS in this way also encourages better separation of concerns (and less temptation to add or remove DOM nodes via JS when making changes.)

When you want to grey something out, for example, you may set a disabled property to true on a JS object. That easily translates to a CSS class name change including .disabled {} applied to the relevant DOM node. As a result, your DOM is logically reflecting your JS state. It’s also helpful when troubleshooting, because you can add the class name to nodes ad-hoc when testing UI features.

For the grid’s purposes, every grid item contains all relevant “states” and the markup for those states – selection, thumbnail, progress, overlay icons, messages, errors and so forth. This makes it very easy to change the item’s display with a single, or few additional CSS class names, and minimizes the amount of work JS has to do to update the DOM. It is also trivial to combine states this way, also – e.g., a photo upload that has a thumbnail, but is in a “failed” state because it’s over-size.

While uploading, for example, a grid item may have class="has-thumbnail working selected", then completes with class="has-thumbnail has-fullsize-thumbnail complete" when the upload has finished. All JS did here was update the class name (and while actively uploading, redraw a small progress meter on the item.) Thus, JS/DOM interaction is fairly minimal.

A single CSS change can also completely change the display of the grid, also. “Info view” is one example of this. When enabled, a single additional class on the grid container causes all photo items to show overlay icons with their privacy state, and additional icons if they have tags, are in a set and so on.

Flickr Web Upload UI: Info View
“Info” view, showing overlays with privacy, state and other information.

Broadcast Events FTW

Events are a great way for modular bits of code, written by the same or separate people, to work on separate problems independently. Among other things, the grid listens for events regarding file addition, removal, progress and success / failure states from the upload queue module. The grid generates and fires events itself reflecting changes around selection, editing and arrangement as the user is doing their work, which are picked up by the “editr panel” at left that updates to reflect the selection state. Provided that events are kept as simple notifications and relatively one-way, there is little risk of complex event-related tracing in the unlikely, er – event – that something that goes wrong.

Flickr uses YUI 3 extensively, and we write and plug our application code into the system as YUI 3 modules. In addition to the excellent modular framework approach, we take advantage of the DOM and Event functionality in particular.

In Summary

The grid is only one of several modules that make up the new Flickr Web Uploadr, and is primarily responsible for the display and updating of photo thumbnails, selection, arrangement and basic metadata. There is a lot more going on in terms of JavaScript and network state under the hood, including API calls and permissions; posts highlighting some of the other fun areas are forthcoming.

As it turns out, building a feature-rich browser-based application for millions of people that looks good, is fast and supports many use cases including constraints and unexpected error conditions, can be a challenge. It’s also part of the fun.

Flickr flamily floto

Like this post? Have a love of online photography? Want to work with us? Flickr is hiring engineers, designers and product managers in our San Francisco office. Find out more at flickr.com/jobs.

Raising the bar on web uploads

With over seven billion photos uploaded since day one, it’s safe to say that uploading is an important part of the Flickr experience.

There are numerous ways to get photos onto Flickr, but the native web-based one at flickr.com/photos/upload/ is especially important as it typically accounts for a majority of uploads to the site.

A brief history of Flickr “Web Uploadrs”

Flickr “Flashy” Uploadr UI (2008) vs. Basic Uploadr UI

Earlier versions of Flickr’s web-based upload UI used a simple <form> with six file inputs, and no more. As the site grew in scale, the native web upload experience had to scale to match. In early 2008, an HTML/Flash hybrid upgrade added support for batch file selection, allowing up to several gigabytes of files to be uploaded in one session. This was a much-needed step in the right direction.

The “flashy” uploader does one thing – sending lots of files – fast, and reliably. However, it was not designed to tackle the other tasks one often performs on photos including adding and editing of metadata, sorting and organizing. As a result, “upload and organize” has traditionally been reinforced as two separate actions on Flickr when using the web-based UI.

The new (mostly-HTML5-based) shiny

Thanks to HTML5-based features in newer browsers, we have been able to build a new uploader that’s pretty slick, and is more desktop application-like than ever before; it brings us closer to the idea of a one-stop “upload and organize” experience. At the same time, the UI also retains common web conventions and has a distinct Flickr feel to it. We think the result is a pretty good mix, combining some of the best parts of both.

As feedback from a group of beta testers have confirmed, it can also be deceivingly fast.

The new Flickr Web Uploader. It’s powerful, it’s got a dark background, and it’s fast.

Features: An Overview

Here are a few fun things the new uploader does:

  • Drag and drop batches of files from your OS. Where present and supported, EXIF thumbnails are shown in the UI almost immediately.

  • Fluid photo “grid” shows photo thumbnails, allows larger, lightbox-style previews, inline editing of description/title and rotation.

  • Mouse and keyboard-based grid selection and rearrange functionality similar to that of desktops.

  • “Editor panel” shows state of current selection, provides powerful batch editing features (title + description, adding of tags, people, sets, license, privacy etc.)

  • “Info” mode shows overlay icons on grid items, allowing for a quick overview of pending edits (privacy, people, tags etc.)

  • Auto-retry and recovery cases for dropped / lost connection cases

Technical Bits

A small book could probably be written on the process, prototypes and technology decisions made during the development of this uploader, but we’ll save the gory details for a couple of in-depth blog posts which will highlight specific parts of the UI. In the meantime, here are some notes on the tech used:

  • HTML5 File APIs

    Modern browser file APIs make up the core of file handling functionality, including drag-and-dropping of files right into the browser. FileReader-type APIs allow access to data from disk, enabling things like EXIF thumbnail parsing and retrieval where supported. EXIF parsing is almost instantaneous and thumbnails are hugely valuable, of course, in prompting users’ editing decisions.

    (For browsers without the relevant file APIs, a Flash-based fallback is used in which case file drag-and-drop is not supported, and EXIF thumb previews are not implemented.)

  • CSS3

    Thanks to growing support across newer browsers, we’ve been able to produce a modern design that takes advantage of CSS-based gradients to achieve visual goals that would have traditionally required external images, and occasionally, hacks or shims in our HTML and JavaScript.

    CSS3’s border-radius, text-shadow and box-shadow are also featured nicely in this new design, alongside visual transform effects such as rotate, zoom and scale. Eagle-eyed users of newer Webkit builds such as Chrome Canary may even see a little use of filter with blur here and there.

    CSS transitions are also featured extensively in the new uploader, a notable shift away from animation sequences which would traditionally have been calculated and rendered by JavaScript. Good candidates for transitions include the expanding or collapsing of a menu section, or a background color fade when a text area is focused, for example.

    While triggering transitions and/or transforms can be a little quirky depending on the current “state” of the element (for example, an element just added to the DOM may need a moment to settle and be rendered before transitioning,) the advantage of using CSS vs. JS for “enhancement”-style UI effects like these is absolutely clear.

  • YUI3

    Thanks to YUI3, the new Flickr Uploader is a highly-modularized, component-based application. The editr module itself is comprised of about 35 sub-modules, following YUI’s standard module pattern. In Flickr’s case, modules are defined as being JavaScript, CSS or string (i.e., language translation) components. This compartmentalization approach reduces the overall complexity of code, encourages extensibility and allows developers to work on features within a specific scope.

A sneak peek: Screencast (Beta Version)

At time of writing, the new uploader is being gradually rolled out to the masses. For those who haven’t seen it yet, here’s a demo screencast of an earlier beta version showing some of the interactions for common upload and editing use cases. (Best viewed full-screen, and with “HD” on.) The video gives an idea of what the experience is like, but it’s best seen in person. We’ve really had a lot of fun building this one.

[flickr video=6928227556 show_info=true secret=11b73352d1 w=500 h=281]

Building an HTML5 Photo Editor

Introducing guest blogger, Ari Fuchs. He is a Lead API Engineer and Developer Evangelist at Aviary. He has spent the last 3 years building out Aviary’s internal and external facing APIs, and is now working with partners to bring Aviary’s tools to the masses. He also did a lot of work to bring the Aviary editor to Flickr. Follow him on Twitter and send him a nice message to make him feel better about his stolen bike. Now, on to his post…

At Aviary, we’ve been passionate about photos since day one. It’s been five years since we released our first creative tool, Phoenix, a powerful, free Flash-based photo editor. Phoenix offered functionality on par with Adobe Photoshop 5 and a price point that opened its usage to anyone with an internet connection. As amateur photographers worldwide began trying their hand at editing, we watched our product join the ranks of a small number of companies working to democratize the process of photo editing for the first time.

Around two years ago we began rethinking the future of our tool set. While our original tools offered incredible functionality, they did have a learning curve which meant that the average person couldn’t just sit down and begin editing without investing time to become familiar with the tools. We wanted to build a powerful editor that anyone could use.

Because we were rebuilding the editor from the ground up, we took the opportunity to switch from a Flash based solution to one built using HTML5 technologies. We saw this as an opportunity to build on a growing standard, and to support the most platforms.

In fall of 2010 we released our HTML5 photo editor which has evolved into the product we’re proud to share with you today.

Widget Encapsulation

During our initial foray into the online editor space, we took a straightforward approach by having API users launch our editor in a new page or window. This simplified integrations and allowed us to own the editing experience.

When we rebuilt our editor in JavaScript, we took the opportunity to re-architect our API as well. Our first big change was making the editor embeddable. This meant that third party developers could load the editor on their own sites, maintaining user engagement while controlling their experience. We built out customization options that allowed the site owner to decide which tools appeared in the editor. A real estate site, for example, might not want its users adding mustache stickers to appliances in photos.

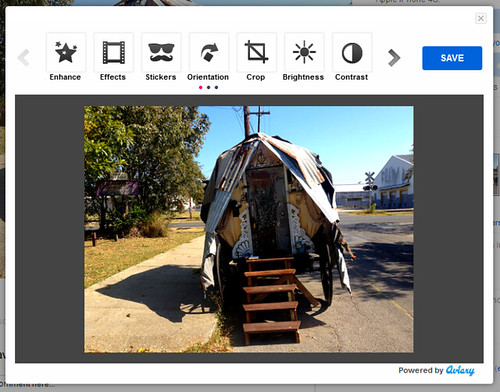
Our editor, unlike many rich HTML widgets, does not require an iframe and is truly embedded into a hosting webpage. This posed many challenges during development, but the result is a more seamless, lightweight integration.

Aviary embeded in Flickr

Constructor API

When we rebuilt our API, we took a leap by assuming that web developers integrating our editor would have experience with other JavaScript libraries and plugins. We built our API to use a Constructor method that accepts a configuration object to allow for the aforementioned tool customization. The configuration object is also used to configure callbacks, image URLs, language settings, etc., and allows us to continue building out our API without losing backwards compatibility.

Simplifying the Save Process

Saving image data is always a challenge in the browser, and can require various cross-browser workarounds. An obvious method would be to initiate a form post to the server and include the base64 image data in a hidden field. This breaks in Safari, where form fields have an undocumented value length limit. We worked around this by switching to an ajax post with the appropriate CORS headers to get around cross domain issues. In browsers that don’t support CORS, we fall back to the form post method.

To hide this complexity from the developer, we’ve abstracted the save process completely. When a user saves an edited image, we temporarily save the image data to our own servers and return a public URL so the host application can download the image to their own.

High Resolution Photos

One of the coolest features of our editor is the high resolution image support — that being said, it certainly has a number of challenges. There’s the practical issue of limited real estate in the browser (keep an eye out for updates addressing this in the near future), as well as performance issues that are harder to quantify. Even in Flash based tools, the size of the image you can edit in the browser is limited by a number of gating factors: hardware specs, number of running processes, etc. To get around these client limitations, we’ve set a configurable maxSize on the editor and added a configuration field for an original-resolution version of the image to be edited: hiresUrl.

When a hiresUrl is supplied, every user edit action is logged. On save, the aptly named “actionlist” is sent to our server along with the hiresUrl. When it hits our render farm, the actionlist is replayed on the high resolution image, and the final results are returned to the host site via a new hiresUrl.

{
    "metadata": {
        "imageorigsize": [
            800,
            530
        ]
    },
    "actionlist": [
        {
            "action": "setfeathereditsize",
            "width": 800,
            "height": 530
        },
        {
            "action": "flatten"
        },
        {
            "action": "redeye",
            "radius": 5,
            "pointlist": [
                [545, 183], [546,183], [547,182], [548,181], [548,179], [548,177], [547,177], [545,177], [544,177], [543,177], [542,177], [541,179], [541,181], [541,183], [542,184]
            ]
        },
        {
            "action": "redeye",
            "radius": 5,
            "pointlist": [
                [481, 191], [481,193], [481,195], [482,196], [483,197], [484,198], [485,197], [485,196], [485,193], [485,190], [485,189], [485,188], [484,188], [482,188], [480,189], [480,190], [480, 191]
            ]
        },
        {
            "action": "sharpen",
            "value": 21.69312,
            "flatten": true
        }
    ]
}

As a side note, we maintain feature parity across all of our platforms (mobile included) by prototyping new tools and filters in the JavaScript first, and then porting them to C for our render farm and Android, and then to Objective-C for our iPhone SDK. By maintaining feature parity and synchronizing output across platforms, we’re able to ensure that users get the edits they expect on their high resolution photos, and we keep the door open for future server-side support for our mobile SDKs where the original photo might not be stored on the device.

Tools and Libraries

We use some pretty awesome tools to help us maintain cross-browser compatibility.

LESS CSS

We moved a lot of the cross-browser concerns to build-time with LESS and a library of mix-ins inspired initially by Twitter Bootstrap, though the final result is wholly our own. LESS’s color math and variables let us achieve a textured and rounded look and feel while minimizing complexity during development.

/* LESS */
.avpw_inset_button_group {
#gradient > .vertical(lighten(@conveyorBelt, 4%), darken(@conveyorBelt, 1%));
.box-shadow(inset 0 0 4px darken(@conveyorBelt, 20%));
.border-radius(8px);
}

/* EXPANDED */
.avpw_inset_button_group {
  background-color: #2a2a2a;
  background-repeat: repeat-x;
  background-image: -khtml-gradient(linear, left top, left bottom, from(#383838), to(#2a2a2a));
  background-image: -moz-linear-gradient(top, #383838, #2a2a2a);
  background-image: -ms-linear-gradient(top, #383838, #2a2a2a);
  background-image: -webkit-gradient(linear, left top, left bottom, color-stop(0%, #383838), color-stop(100%, #2a2a2a));
  background-image: -webkit-linear-gradient(top, #383838, #2a2a2a);
  background-image: -o-linear-gradient(top, #383838, #2a2a2a);
  background-image: linear-gradient(top, #383838, #2a2a2a);
  filter: progid:DXImageTransform.Microsoft.gradient(startColorstr='#383838', endColorstr='#2a2a2a', GradientType=0);
  -webkit-box-shadow: inset 0 0 4px #000000;
  -moz-box-shadow: inset 0 0 4px #000000;
  box-shadow: inset 0 0 4px #000000;
  -webkit-border-radius: 8px;
  -moz-border-radius: 8px;
  border-radius: 8px;
}

CSS3

With CSS3, we’ve just about managed a complete break from the DHTML effects of the past. The new UI uses CSS3 transitions and transforms wherever possible to remain future-proof.

Flash

Yes, our editor does indeed have a Flash fallback for browsers that lack certain HTML5 features (namely canvas). We initially built the editor as a move away from Flash, but because of the legacy IE7 and IE8 userbases on our larger partner sites, we had to go back and rebuild certain components in Flash to support those browsers.

We’ve architected the editor so that Flash is only being used where necessary. Some tools, such as draw, have been completely rebuilt in Flash; for others, like effects, the bitmap data is being exported and manipulated in JavaScript (using a reverse implementation of pibeca). This allows for code reuse, and enables us to build new features faster with more backwards compatibility.

Future

While the feedback for our editor has been overwhelmingly fantastic, we’re continuing to work hard building out new tools and features, and performance enhancements to our existing set.

Scott Schiller on Web Audio

We recently had a Flickr Frontend Night at BayJax, the Bay Area JavaScript group. We’ll be posting the videos from those talks over the next couple of weeks.

First up! Frontend Engineer, DJ, and all-around nice guy Scott Schiller, with his great talk on Web Audio.

Scott used impress.js to make his awesome slides (using HTML and CSS Transitions). If you want to dig deeper into Scott’s talk, there is the HD version on YouTube, slides, the Wheels of Steel demo, and the HTML5 game he created, SURVIVOR.

Big thanks to Gonzalo Cordero for organizing the event, and to Ryan Grove and Allen Rabinovich for their great work filming it.

On a side note, if you’re in Austin for SxSW next week, be sure to check out talks by Flickr’s own Eric Gelinas (Geo Interfaces for Actual Humans) and Stephen Woods (Creating Responsive HTML5 Touch Interfaces).

Thanks to softdroid.net for creating a Ukrainian translation of this post.

Farewell FlickrAuth

Last year, we added support for OAuth 1.0 – a much better way to have your users authenticating against Flickr. More information on Flickr user authentication via this method is available here in our Developer Guide and specifically here.

If you are app already uses OAuth, then you can skip this post and look at some gorgeous photos instead. However – if your app still uses the old Authentication API, you will need to update it to OAuth by July 31st this year.

Updating to OAuth is easy and you don’t worry about any user impact. You can exchange an old auth token from the old Authentication API, to an OAuth access token. The process simply requires that you make an authenticated request to the flickr.auth.oauth.getAccessToken API, which will exchange the old token used to make the request, with a new OAuth access token. Again, everything is documented right here. Flickr member Jef Poskanzer has also written an overview and comparison between the two auth methods: http://acme.com/flickr/authmap.html.

After July 31st, we will no longer support the old Authentication API.

More information is available in the Flickr API FAQ’s, and in the Flickr Developer guide, but if you have specific questions about updating your app, you may file a help ticket here.

Thanks for making Flickr more fun by contributing to our growing collection of apps!

Your Engineering Team at Flickr
(@FlickrAPI)