
tl;dr version: transform3d() is your friend, but use sparingly. Chrome Dev Tools are awesome.
What’s old is new again: Stealing from the arcade
Back in 1985, games like Super Mario Bros. popularized the effect of horizontal parallax scrolling – a technique wherein the background moves at a slower speed relative to the foreground, giving the impression of depth. In 2013, the web is seeing a trend of vertical parallax effects as developers look to make pages feel more interactive and responsive. Your author’s $0.25, for the record, is that we’ll continue to see arcade and demoscene-era effects being ported over to the mainstream web in creative ways as client-side performance improves.
While the effect can be aesthetically pleasing when executed correctly, parallax motion tends to be expensive to render – and when performance is lacking, the user’s impression of your site may follow suit.
Vertical parallaxing is pretty straightforward in behaviour: For every Y pixels of vertical axis scrolling, move an absolutely-positioned image in the same direction at scale. There are some additional considerations for the offset of the element on the page and how far it can move, but the implementation remains quite simple.
The following are some findings made while working on Flickr’s redesigned signed-out homepage at flickr.com/new/, specifically related to rendering and scrolling performance.
Events and DOM performance
To optimize performance in the browser environment, it’s important to consider the expensive parts of DOM “I/O”. You ideally want a minimal amount of both, particularly since this is work being done during scrolling. Executing JavaScript on scroll is one of the worst ways to interrupt the browser, typically because it’s done to introduce reflow/layout and painting – thus, denying the browser the chance to use GPU/hardware-accelerated scrolling. window.onscroll() can also fire very rapidly on desktops, making way for a veritable flood of expensive scroll → reflow → paint operations if your “paths” are not fast.
A typical parallax implementation will hook into window.onscroll(), and will update the backgroundPosition or marginTop of an element with a background image attached in order to make it move. An <img> could be used here, but backgrounds are convenient because they allow for positioning in relative units, tiling and so on.
A minimal parallax example, just the script portion:
window.onscroll = function(e) {

  var parallax = document.getElementById('parallax-background');

  parallax.style.marginTop = (window.scrollY/2) + 'px';

}
This could work for a single element, but quickly breaks down if multiple elements are to be updated. In any case, references to the DOM should be cached for faster look-ups; reading window.scrollY and other DOM attributes can be expensive due to potential to cause layout/reflow themselves, and thus should also be stored in a local variable for each onscroll() event to minimize thrashing.
An additional performance consideration: Should all parallax elements always be moved, even those which are outside of the viewport? Quick tests suggested savings were negligible in this case at best. Even if the additional work to determine in-view elements were free, moving only one element did not notably improve performance relative to moving only three at a time. It appears that Webkit’s rendering engine is smart about this, as the only expensive operations seen here involve painting things within the viewport.
In any event, using marginTop or backgroundPosition alone will not perform well as neither take advantage of hardware-accelerated compositing.
And now, VOIDH (Video Or It Didn’t Happen) of marginTop-based parallax performing terribly:
[flickr video=8859509880 secret=412e7dafff w=639 h=364]
Look at that: Terrible. Jank city! You can try it for yourself in your browser of choice, via via ?notransform=1.
Enter the GPU: Hardware Acceleration To The Rescue
Despite caching our DOM references and scroll properties, the cost of drawing all these pixels in software is very high. The trick to performance here is to have the GPU (hardware) take on the job of accelerating the compositing of the expensive bits, which can be done much faster than in software rendering.
Elements can be promoted to a “layer” in rendering terms, via CSS transforms like translate3d(). When this and other translateZ()-style properties are applied, the element will then be composited by the GPU, avoiding expensive repaints. In this case, we are interested in having fast-moving parallax backgrounds. Thus, translate3d() can be applied directly to the parallax element.
window.onscroll = function(e) {

  // note: most browsers presently use prefixes: webkitTransform, mozTransform etc.

  var parallax = document.getElementById('parallax-background');

  parallax.style.transform = 'translate3d(0px,' + (window.scrollY/2) + 'px, 0px)';

}
In webkit-based browsers like Safari and Chrome, the results speak for themselves.
[flickr video=8758952624 secret=f414d2f2fd w=640 h=448]
Look, ma! Way less jank! The performance here is comparable to the same page with parallax disabled (i.e., regular browser scrolling/drawing.)
GPU acceleration sounds like a magic bullet, but it comes at the cost of both video memory and cache. If you create too many layers, you may see rendering problems and even degraded performance – so use them selectively.
It’s also worth noting that browser-based hardware acceleration and performance rests on having agreement between the browser, drivers, OS, and hardware. Firefox might be sluggish on one machine, and butter-smooth on another. High-density vs. standard-resolution screens make a big difference in paint cost. All GPUs are made equal, but some GPUs are made more equal than others. The videos and screenshots for this post were made on my work laptop, which may perform quite differently than your hardware. Ultimately, you need to test your work on a variety of devices to see what real-world performance is like – and this is where Chrome’s dev tools come in handy.
Debugging Render Performance
In brief, Chrome’s Developer Tools are awesome. Chrome Canary typically has the freshest features in regards to profiling, and Safari also has many of the same. The features most of interest to this entry are the Timeline → Frames view, and the gear icon’s “Show Paint rectangles” and “Show composited layer borders” options.
Timeline → Frames view: Helpful in identifying expensive painting operations.

Paint rectangles + composited layer borders, AKA “Plaid mode.” Visually identify layers.
Timeline → Frames view
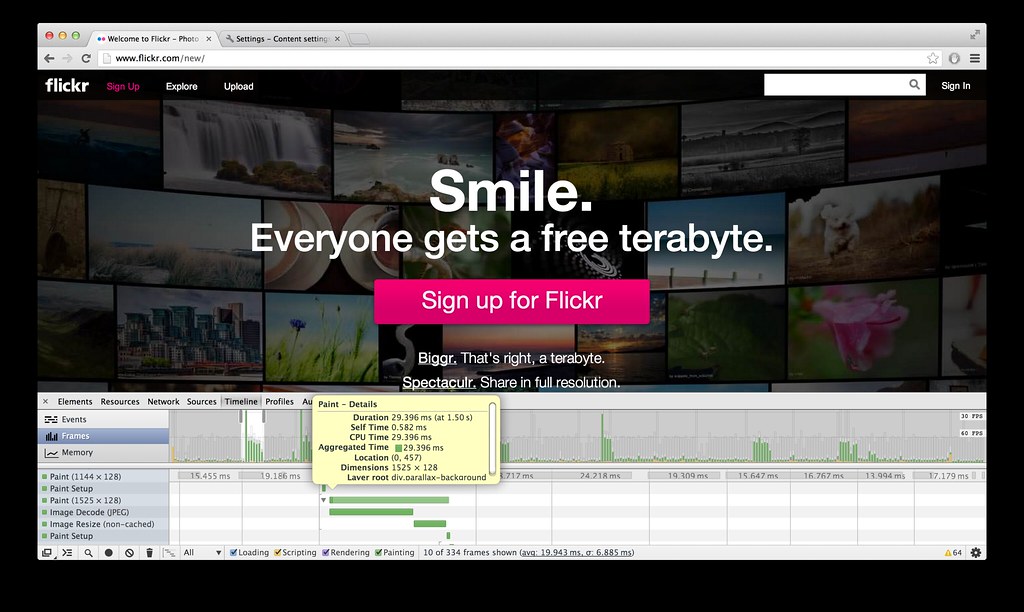
Timeline’s “Frames” view allows you to see how much time is spent calculating and drawing each frame during runtime, which gives a good idea of rendering performance. To maintain a refresh rate of 60 frames per second, each frame must take no longer than 16 milliseconds to draw. If you have JS doing expensive things during scroll events, this can be particularly challenging.
Expensive frames in Flickr’s case stem primarily from occasional decoding of JPEGs and non-cached image resizes, and more frequently, compositing and painting. The less of each that your page requires, the better.
Paint rectangles
It is interesting to see what content is being painted (and re-painted) by the browser, particularly during scroll events. Enabling paint rectangles in Chrome’s dev tools results in red highlights on paint areas. In the ideal case when scrolling, you should see red only around the scrollbar area; in the best scenario, the browser is able to efficiently move the rest of the HTML content in hardware-accelerated fashion, effectively sliding it vertically on the screen without having to perform expensive paint operations. Script-based DOM updates, CSS :hover and transition effects can all cause painting to happen when scrolling, so keep these things in mind as well.
Composited layer borders
As mentioned previously, layers are elements that have been promoted and are to be composited by the GPU, via CSS properties like translate3d(), translateZ() and so on. With layer borders enabled, you can get a visual representation of promoted elements and review whether your CSS is too broad or too specific in creating these layers. The browser itself may also create additional layers based on a number of scenarios such as the presence of child elements, siblings, or elements that overlap an existing layer.
Composited borders are shown in brown. Cyan borders indicate a tile, which combines with other tiles to form a larger composited layer.
Other notes
Image rendering costs
When using parallax effects, “full-bleed” images that cover the entire page width are also popular. One approach is to simply use a large centered background image for all clients, regardless of screen size; alternately, a responsive @media query-style approach can be taken where separate images are cut to fit within common screen widths like 1024, 1280, 1600, 2048 etc. In some cases, however, the single-size approach can work quite nicely.
In the case of the Flickr homepage, the performance cost in using 2048-pixel-wide background images for all screens seemed to be negligible – even in spite of “wasted” pixels for those browsing at 1024×768. The approach we took uses clip-friendly content, typically a centered “hero” element with shading and color that extends to the far edges. Using this approach, the images are quite width-agnostic. The hero-style images also compress quite nicely as JPEGs thanks to their soft gradients and lighting; as one example, we got a 2048×950-pixel image of a flower down to 68 KB with little effort.
Bandwidth aside, the 2048-pixel-wide images clip nicely on screens down to 1024 pixels in width and with no obvious flaws. However, Chrome’s dev tools also show that there are costs associated with decoding, compositing, re-sizing and painting images which should be considered.
Testing on my work laptop*, “Image resized (non-cached)” is occasionally shown in Chrome’s timeline → frames view after an Image Decode (JPEG) operation – both of which appear to be expensive, contributing to a frame that took 60 msec in one case. It appears that this happens the first time a large parallax image is scrolled into the viewport. It is unclear why there is a resize (and whether it can be avoided), but I suspect it’s due to the retina display on this particular laptop. I’m not using background-size or otherwise applying scaling/sizing in CSS, merely positioning eg., background-position:50% 50%; and background-repeat: no-repeat;. As curiosity sets in, this author will readily admit he has some more research to do on this front. ;)
There are also aspects to RAM and caching that can affect GPU performance. I did not dig deeply into this specifically for Flickr’s new homepage, but it is worth considering the impact of the complexity and number of layers present and active at any given time. If regular scrolling triggers non-cached image resizes each time an asset is scrolled into view, there may be a cache eviction problem stemming from having too many layers active or present at once.
* Work laptop: Mid-2012 15″ Retina MBP, 16 GB RAM, 2.6 Ghz Intel i7, NVIDIA GeForce GT 650M/1024 MB, OS X 10.8.3.
Debugging in action
Here are two videos showing performance of flickr.com/new/ with transforms disabled and enabled, respectively.
Transforms off (marginTop-based parallax)
[flickr video=8845365987 secret=cfe2155de7 w=640 h=361]
Notice the huge spikes on the timeline with transforms disabled, indicating many frames that are taking up to 80 msec to draw; this is terrible for performance, “blowing the frame budget” of 16 ms, and lowers UI responsiveness significantly. Red paint rectangles indicate that the whole viewport is being repainted on scroll, a major contributor to performance overhead. With compositing borders, you see that every “strip” of the page – each parallax background, in effect – is rendered as a single layer. A quick check of the FPS meter and “continuous repaint” graphs does not look great.
Side note: Continuous repaint is most useful when not scrolling. The feature causes repeated painting of the viewport, and displays an FPS graph with real-time performance numbers. You can go into the style editor while continuous repaint is on and flip things off, e.g., disabling box-shadow, border-radius or hiding expensive elements via display to see if the frame rate improves.
Transforms on (translate3d()-based parallax)
[flickr video=8845359795 secret=5fa8467374 w=639 h=364]
With GPU acceleration, you see much-improved frame times, thus a higher framerate and a smoother, more-responsive UI. There is still the occasional spike when a new image scrolls into view, but there is much less jank overall than before. Paint rectangles are much less common thanks to the GPU-accelerated compositing, and layer borders now indicate that more individual elements are being promoted. The FPS meter and continuous repaint mode does have a few dips and spikes, but performance is notably improved.
You may notice that I intentionally trigger video playback in this case, to see how it performs. The flashing red is the result of repainting as the video plays back – and in spite of overflow: hidden-based clipping we apply for the parallax effect on the video, it’s interesting to notice that the overflowed content, while not visible, is also being painted.
Miscellany
Random bits: HTML5 <video>

A frame from a .webm and H.264-encoded video, shown in the mobile portion of Flickr’s redesigned home page.
We wanted the signed-out Flickr homepage to highlight our mobile offerings, including an animation or video showing a subtly-rotating iPhone demoing the Flickr iOS app on a static background. Instead of an inline video box, it felt appropriate to have a full-width video following the pattern used for the parallax images. The implementation is nearly the same, and simply uses a <video> element instead of a CSS background.
With video, the usual questions came up around performance and file size: Would a 2048-pixel-wide video be too heavy for older computers to play back? What if we cropped the video only to be as wide as needed to cover the area being animated (eg., 500 pixels), and used a static JPEG background to fill in the remainder of the space?
As it turned out, encoding a 2048×700 video and positioning it like a background element – even including a slight parallax effect – was quite reasonable. Playback was flawless on modern laptops and desktops, and even a 2006-era 1.2 GHz Fujitsu laptop running WinXP was able to run the video at reasonable speed. Per rendering documentation from the Chrome team, <video> elements are automatically promoted to layers for the GPU where applicable and thus benefit from accelerated rendering. Due to the inline nature of the video, we excluded it from display on mobile devices, and show a static image to clients that don’t support HTML5 video.
Perhaps the most interesting aspect of the video was file size. In our case, the WebM-encoded video (supported natively in Chrome, Firefox, and Opera) was clearly able to optimize for the low amount of motion within the wide frame, as eight seconds of 2048×700 video at 24 fps resulted in a .webm file of only 900 KB. Impressive! By comparison, the H.264-encoded equivalent ended up being about 3.8 MB, with a matching data rate of ~3.8 mbps.
The “Justified” View
It’s worth mentioning that the Justified photos at the bottom of the page lazy-load in, and have been excluded from any additional display optimizations in this case. There is an initial spike with the render and subsequent loading of images, but things settle down pretty quickly. Blindly assigning translate-type transforms to the Justified photo container – a complex beast in and of itself – causes all sorts of rendering hell to break loose.
In Review
This article represents my findings and approach to getting GPU-accelerated compositing working for background images in the Webkit-based Chrome and Safari browsers, in May 2013. With ever-changing rendering engines getting smarter over time, your mileage may vary as the best route to the “fast path” changes. As numerous other articles have said regarding performance, “don’t guess it, test it.”
To recap:
- Painting: Expensive. Repaints should be minimal, and limited to small areas. Reduce by carefully choosing layers.
- Compositing: Good! Fast when done by the GPU.
- Layers: The secret to speed, when done correctly. Apply sparingly.
References / further reading:
- Google I/O 2013: Web Page Design with the GPU in Mind (YouTube)
- GPU Accelerated Compositing in Chrome (Chromium)
- Accelerated Compositing in Chrome: The Layer Model (HTML5Rocks)
- Scrolling (HTML5Rocks)
- Parallaxin’ (HTML5Rocks)
- jankfree.org
… And finally, did I mention we’re hiring? (hint: view-source :))