What is Exif? A short primer.
Exif is short for Exchangeable image file format. A standard that specifies the formats to be used in images, sounds, and tags used by digital still cameras. In this case we are concerned with the tags standard and how it is used in still images.
How Flickr currently parses Exif data.
Currently we parse an image’s Exif data after it is uploaded to the Flickr servers and then expose that data on the photo’s metadata page (http://www.flickr.com/photos/rubixdead/7192796744/meta/in/photostream). This page will show you all the data recorded from your camera when a photo was taken, the camera type, lens, aperture, exposure settings, etc. We currently use ExifTool (http://www.sno.phy.queensu.ca/~phil/exiftool/) to parse all of this data, which is a robust, albeit server side only, solution.
An opportunity to parse Exif data on the client-side
Sometime in the beginning phases of spec’ing out the Uploadr project we realized modern browsers can read an image’s data directly from the disk, using the FileReader API (http://www.w3.org/TR/FileAPI/#FileReader-interface). This lead to the realization that we could parse Exif data while the photo is being uploaded, then expose this to the user while they are editing their photos in the Uploadr before they even hit the Upload button.
Why client-side Exif?
Why would we need to parse Exif on the client-side, if we are parsing it already on the server-side? Parsing Exif on the client-side is both fast and efficient. It allows us to show the user a thumbnail without putting the entire image in the DOM, which uses a lot of memory and kills performance. Users can also add titles, descriptions, and tags in a third-party image editing program saving the metadata into the photo’s Exif. When they drag those photos into the Uploadr, BOOM, we show them the data they have already entered and organized, eliminating the need to enter it twice.
Using Web Workers
We started doing some testing and research around parsing Exif data by reading a file’s bytes in JavaScript. We found a few people had accomplished this already, it’s not a difficult feat, but a messy one. We then quickly realized that making a user’s browser run through 10 megabytes of data can be a heavy operation. Web workers allow us to offload the parsing of byte data into a separate cpu thread. Therefore freeing up the user’s browser, so they can continue using Uploadr while Exif is being parsed.
Exif Processing Flow
Once we had a web worker prototype setup, we next had to write to code that would parse the actual bytes.
The first thing we do is pre-fetch the JavaScript used in the web worker thread. Then when a user adds an image to the Uploadr we create event handlers for the worker. When a web worker calls postMessage() we capture that, check for Exif data and then display it on the page. Any additional processing is also done at this time. Parsing XMP data, for example, is done outside of the worker because the DOM isn’t available in worker threads.
Using Blob.slice() we pull out the first 128kb of the image to limit load on the worker and speed things up. The Exif specification states that all of the data should exist in the first 64kb, but IPTC sometimes goes beyond that, especially when formatted as XMP.
if (file.slice) {
	filePart = file.slice(0, 131072);
} else if (file.webkitSlice) {
	filePart = file.webkitSlice(0, 131072);
} else if (file.mozSlice) {
	filePart = file.mozSlice(0, 131072);
} else {
	filePart = file;
}
We create a new FileReader object and pass in the Blob slice to be read. An event handler is created at this point to handle the reading of the Blob data and pass it into the worker. FileReader.readAsBinaryString() is called, passing in the blob slice, to read it as a binary string into the worker.
binaryReader = new FileReader();

binaryReader.onload = function () {

	worker.postMessage({
		guid: guid,
		binary_string: binaryReader.result
	});

};

binaryReader.readAsBinaryString(filePart);
The worker receives the binary string and passes it through multiple Exif processors in succession. One for Exif data, one for XMP formatted IPTC data and one for unformatted IPTC data. Each of the processors uses postMessage() to post the Exif data back out and is caught by the module. The data is displayed in the uploadr, which is later sent along to the API with the uploaded batch.
On asynchronous Exif parsing
When reading in Exif data asynchronously we ran into a few problems, because processing does not happen immediately. We had to prevent the user from sorting their photos until all the Exif data was parsed, namely the date and time for “order by” sorting. We also ran into a race condition when getting tags out of the Exif data. If a user had already entered tags we want to amend those tags with what was possibly saved in their photo. We also update the Uploadr with data from Exiftool once it is processed on the back-end.
The Nitty Gritty: Creating EXIF Parsers and dealing with typed arrays support
pre-electronic binary code by dret
Creating an Exif parser is no simple task, but there are a few things to consider:
- What specification of Exif are we dealing with? (Exif, XMP, IPTC, any and all of the above?)
- When processing the binary string data, is it big or little endian?
- How do we read binary data in a browser?
- Do we have typed arrays support or do we need to create our own data view?
First things first, how do we read binary data?
As we saw above our worker is fed a binary string, meaning this is a stream of ASCII characters representing values from 0-255. We need to create a way to access and parse this data. The Exif specification defines a few different data value types we will encounter:
- 1 = BYTE An 8-bit unsigned integer
- 2 = ASCII An 8-bit byte containing one 7-bit ASCII code. The final byte is terminated with NULL.
- 3 = SHORT A 16-bit (2-byte) unsigned integer
- 4 = LONG A 32-bit (4-byte) unsigned integer
- 5 = RATIONAL Two LONGs. The first LONG is the numerator and the second LONG expresses the denominator.
- 7 = UNDEFINED An 8-bit byte that can take any value depending on the field definition
- 9 = SLONG A 32-bit (4-byte) signed integer (2’s complement notation)
- 10 = SRATIONAL Two SLONGs. The first SLONG is the numerator and the second SLONG is the denominator
So, we need to be able to read an unsigned int (1 byte), an unsigned short (2 bytes), an unsigned long (4 bytes), an slong (4 bytes signed), and an ASCII string. Since the we read the stream as a binary string it is already in ASCII, that one is done for us. The others can be accomplished by using typed arrays, if supported, or some fun binary math.
Typed Array Support
Now that we know what types of data we are expecting, we just need a way to translate the binary string we have into useful values. The easiest approach would be typed arrays (https://developer.mozilla.org/en/JavaScript_typed_arrays), meaning we can create an ArrayBuffer using the string we received from from the FileReader, and then create typed arrays, or views, as needed to read values from the string. Unfortunately array buffer views do not support endianness, so the preferred method is to use DataView (http://www.khronos.org/registry/typedarray/specs/latest/#8), which essentially creates a view to read into the buffer and spit out various integer types. Due to lack of great support, Firefox does not support DataView and Safari’s typed array support can be slow, we are currently using a combination of manual byte conversion and ArrayBuffer views.
var arrayBuffer = new ArrayBuffer(this.data.length);
var int8View = new Int8Array(arrayBuffer);

for (var i = 0; i < this.data.length; i++) {
	int8View[i] = this.data[i].charCodeAt(0);
}

this.buffer = arrayBuffer;

this.getUint8 = function(offset) {
	if (compatibility.ArrayBuffer) {

	return new Uint8Array(this.buffer, offset, 1)[0];
	}
	else {
		return this.data.charCodeAt(offset) & 0xff;
	}
}
Above we are creating an ArrayBuffer of length to match the data being passed in, and then creating a view consisting of 8-bit signed integers which allows us to store data into the ArrayBuffer from the data passed in. We then process the charCode() at each location in the data string passed in and store it in the array buffer via the int8View. Next you can see an example function, getUint8(), where we get an unsigned 8-bit value at a specified offset. If typed arrays are supported we use a Uint8Array view to access data from the buffer at an offset, otherwise we just get the character code at an offset and then mask the least significant 8 bits.
To read a short or long value we can do the following:
this.getLongAt = function(offset,littleEndian) {

	//DataView method
	return new DataView(this.buffer).getUint32(offset, littleEndian);

	//ArrayBufferView method always littleEndian
	var uint32Array = new Uint32Array(this.buffer);
	return uint32Array[offset];

	//The method we are currently using
	var b3 = this.getUint8(this.endianness(offset, 0, 4, littleEndian)),
	b2 = this.getUint8(this.endianness(offset, 1, 4, littleEndian)),
	b1 = this.getUint8(this.endianness(offset, 2, 4, littleEndian)),
	b0 = this.getUint8(this.endianness(offset, 3, 4, littleEndian));

	return (b3 * Math.pow(2, 24)) + (b2 << 16) + (b1 << 8) + b0;

}
The DataView method is pretty straight forward, as is the ArrayBufferView method, but without concern for endianness. The last method above, the one we are currently using, gets the unsigned int at each byte location for the 4 bytes. Transposes them based on endianness and then creates a long integer value out of it. This is an example of the custom binary math needed to support data view in Firefox.
When originally beginning to build out the Exif parser I found this jDataView (https://github.com/vjeux/jDataView) library written by Christopher Chedeau aka Vjeux (http://blog.vjeux.com/). Inspired by Christopher’s jDataView module we created a DataView module for YUI.
Translating all of this into useful data
There are a few documents you should become familiar with if you are considering writing your own Exif parser:
- The Exif specification in its entirety:
- The TIFF 6.0 specification which has a good breakdown of the tags and Tiff header:
- A breakdown of the Exif specification originally put together by TsuruZoh Tachibanaya, but hosted now at MIT:

The diagram above is taken straight from the Exif specification section 4.5.4, it describes the basic structure for Exif data in compressed JPEG images. Exif data is broken up into application segments (APP0, APP1, etc.). Each application segment contains a maker, length, Exif identification code, TIFF header, and usually 2 image file directories (IFDs). These IFD subdirectories contain a series of tags, of which each contains the tag number, type, count or length, and the data itself or offset to the data. These tags are described in Appendix A of the TIFF6 Spec, or at Table 41 JPEG Compressed (4:2:0) File APP1 Description Sample in the Exif spec and also broken down on the Exif spec page created by TsuruZoh Tachibanaya.
Finding APP1
The first thing we want to find is the APP1 marker, so we know we are in the right place. For APP1, this is always the 2 bytes 0xFFE1, We usually check the last byte of this for the value 0xE1, or 225 in decimal, to prevent any endianness problems. The next thing we want to know is the size of the APP1 data, we can use this to optimize and know when to stop reading, which is also 2 bytes. Next up is the Exif header, which is always the 4 bytes 0x45, 0x78, 0x69, 0x66, or “Exif” in ASCII, which makes it easy. This is always followed up 2 null bytes 0x0000. Then begins the TIFF header and then the 0th IFD, where our Exif is stored, followed by the 1st IFD, which usually contains a thumbnail of the image.
We are concerned with application segment 1 (APP1). APP2 and others can contain other metadata about this compressed image, but we are interested in the Exif attribute information.
Wherefore art thou, TIFF header?
Once we know we are at APP1 we can move on to the TIFF header which starts with the byte alignment, 0x4949 (II, Intel) or 0x4D4D (MM, Motorola), Intel being little endian and Motorola being big endian. Then we have the tag marker, which is always 0x2A00 (or 0x002A for big endian): “an arbitrary but carefully chosen number (42) that further identifies the file as a TIFF file”. Next we have the offset to the first IFD, which is usually 0x08000000, or 8 bytes from the beginning of the TIFF header (The 8 bytes: 0x49 0x49 0x2A 0x00 0x08 0x00 0x00 0x00). Now we can begin parsing the 0th IFD!
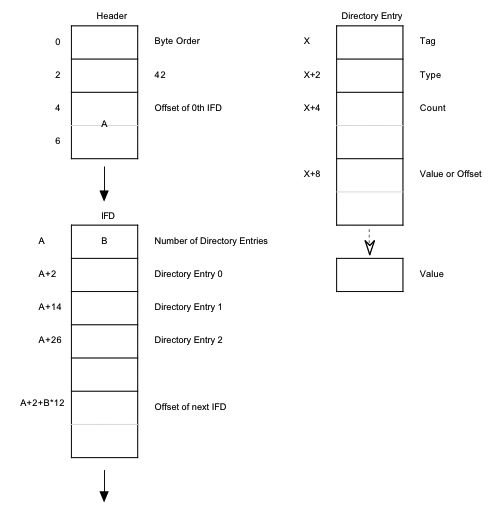
The diagram above (taken from the TIFF6.0 specification found here: http://partners.adobe.com/public/developer/en/tiff/TIFF6.pdf), shows the structure of the TIFF header, the following IFD and a directory entry contained within the IFD.
The IFD starts off with the number of directory entries in the IFD, 2 bytes, then follows with all of the directory entries and ends with the offset to the next IFD if there is one. Each directory entry is 12 bytes long and comprised of 4 parts: the tag number, the data format, the number of components, and the data itself or an offset to the data value in the file. Then follows the offset to the next IFD which is again 8 bytes.
Example: Processing some real world bytes
Let’s run through an example below! I took a screen shot from hexfiend (http://ridiculousfish.com/hexfiend/, which is an awesome little program for looking at raw hex data from any file, I highly recommend it) and highlighted the appropriate bytes from start of image (SOI) to some tag examples.
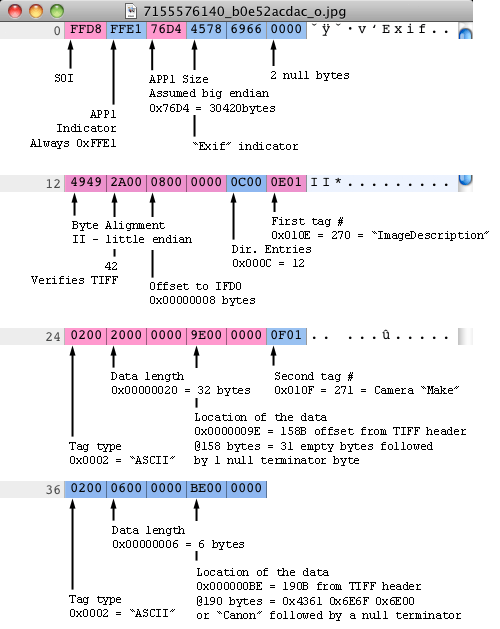
This is the first 48 bytes of the image file. I’ve grouped everything into 2 byte groups and 12 byte columns, because IFD entries are 12 bytes it makes it easier to read. You can see the start of image marker (SOI), APP1 mark and size, “Exif” mark and null bytes. Next is the beginning of the TIFF header including byte align, the 42 TIFF verification mark, the offset to the 0th IFD, the number of directory entries, and then the first 2 directory entries. These entries are in little endian and I wrote them out as big endian to make them easier to read. Both of these first entries are of ASCII type, which always point to an offset in the file and ends with a null terminator byte.
Writing code to parse Exif
Now that we understand the tag structure and what we are looking for in our 128k of data we sliced from the beginning of the image, we can write some code to do just that. A lot of insipration for this code comes from an exif parser written by Jacob Seidelin, http://blog.nihilogic.dk, the original you can find here: http://www.nihilogic.dk/labs/exif/exif.js. We used a lot of his tag mapping objects to translate the Exif tag number values into tag names as well as his logic that applies to reading and finding Exif data in a binary string.
First we start looking for the APP1 marker, by looping through the binary string recording our offset and moving it up as we go along.
if (dataview.getByteAt(0) != 0xFF || dataview.getByteAt(1) != 0xD8) {
	return;
}
else {
	offset = 2;
	length = dataview.length;

	while (offset < length) {
		marker = dataview.getByteAt(offset+1);
		if (marker == 225) {
			readExifData(dataview, offset + 4, dataview.getShortAt(offset+2, true)-2);
			break;
		}
		else if(marker == 224) {
			offset = 20;
		}
		else {
			offset += 2 + dataview.getShortAt(offset+2, true);
		}
	}
}
We check for a valid SOI marker (0xFFD8) and then loop through the string we passed in. If we find the APP1 marker (225) we start reading Exif data, if we find a APP0 marker (224) we move the offset up by 20 and continue reading, otherwise we move the offset up by 2 plus the length of the APP data segment we are at, because it is not APP1, we are not interested.
Once we find what we are looking for we can look for the Exif header, endianness, the TIFF header, and look for IFD0.
function readExifData(dataview, start, length) {

	var littleEndian;
	var TIFFOffset = start + 6;

	if (dataview.getStringAt(iStart, 4) != "Exif") {
		return false;
	}

	if (dataview.getShortAt(TIFFOffset) == 0x4949) {
		littleEndian = true;
		self.postMessage({msg:"----Yes Little Endian"});
	}
	else if (dataview.getShortAt(TIFFOffset) == 0x4D4D) {
		littleEndian = false;
		self.postMessage({msg:"----Not Little Endian"});
	}
	else {
		return false;
	}

	if (dataview.getShortAt(TIFFOffset+2, littleEndian) != 0x002A) {
		return false;
	}

	if (dataview.getLongAt(TIFFOffset+4, littleEndian) != 0x00000008) {
		return false;
	}

	var tags = ExifExtractorTags.readTags(dataview, TIFFOffset, TIFFOffset+8, ExifExtractorTags.Exif.TiffTags, littleEndian);
This is the first part of the readExifData function that is called once we find our APP1 segment marker. We start by verifying the Exif marker, then figuring out endianness, then checking if our TIFF header verification marker exists (42), and then getting our tags and values by calling ExifExtractorTags.readTags. We pass in the dataview to our binary string, the offset, the offset plus 8, which bypasses the TIFF header, the tags mapping object, and the endianness.
Next we pass that data into a function that creates an object which maps all of the tag numbers to real world descriptions, and includes maps for tags that have mappable values.
this.readTags = function(dataview, TIFFStart, dirStart, strings, littleEndian) {
	var entries = dataview.getShortAt(dirStart, littleEndian);
	var tags = {};
	var i;

	for (i = 0; i < entries; i++) {
		var entryOffset = dirStart + i*12 + 2;
		var tag = strings[dataview.getShortAt(entryOffset, littleEndian)];

		tags[tag] = this.readTagValue(dataview, entryOffset, TIFFStart, dirStart, littleEndian);
	}

	if(tags.ExifIFDPointer) {
		var entryOffset = dirStart + i*12 + 2;
		var IFD1Offset = dataview.getLongAt(entryOffset,littleEndian);

		tags.IFD1Offset = IFD1Offset;
	}

	return tags;
}
This function is quite simple, once we know where we are at of course. For each entry we get the tag name from our tag strings and create a key on a tags object with a value of the tag. If there is an IFD1, we store that offset in the tags object as well. The readTagValue function takes the dataview object, the entry’s offset, the TIFF starting point, the directory starting point (TIFFStart + 8), and then endianness. It returns the tag’s value based on the data type (byte, short, long, ASCII).
We return a tags object which has keys and values for various Exif tags that were found in the IFD. We check if ExifIFDPointer exists on this object, if so, we have IFD entries to pass back out of the worker and show the user. We also check for GPS data and an offset to the next IFD, IFD1Offset, if that exists we know we have another IFD, which is usually a thumbnail image.
if (tags.ExifIFDPointer) {

	var ExifTags = ExifExtractorTags.readTags(dataview, TIFFOffset, TIFFOffset + tags.ExifIFDPointer, ExifExtractorTags.Exif.Tags, littleEndian);

	for (var tag in ExifTags) {
		switch (tag) {
			case "LightSource" :
			case "Flash" :
			case "MeteringMode" :
			case "ExposureProgram" :
			case "SensingMethod" :
			case "SceneCaptureType" :
			case "SceneType" :
			case "CustomRendered" :
			case "WhiteBalance" :
			case "GainControl" :
			case "Contrast" :
			case "Saturation" :
			case "Sharpness" :
			case "SubjectDistanceRange" :
			case "FileSource" :
				ExifTags[tag] = ExifExtractorTags.Exif.StringValues[tag][ExifTags[tag]];
				break;
			case "ExifVersion" :
			case "FlashpixVersion" :
				ExifTags[tag] = String.fromCharCode(ExifTags[tag][0], ExifTags[tag][1], ExifTags[tag][2], ExifTags[tag][3]);
				break;
			case "ComponentsConfiguration" :
				ExifTags[tag] =
					ExifExtractorTags.Exif.StringValues.Components[ExifTags[tag][0]]
					+ ExifExtractorTags.Exif.StringValues.Components[ExifTags[tag][1]]
					+ ExifExtractorTags.Exif.StringValues.Components[ExifTags[tag][2]]
					+ ExifExtractorTags.Exif.StringValues.Components[ExifTags[tag][3]];
				break;
		}

		tags[tag] = ExifTags[tag];
	}
}
This is the rest of the readTags function, basically we are checking if ExifIFDPointer exists and then reading tags again at that offset pointer. Once we get another tags object back, we check to see if that tag has a value that needs to be mapped to a readable value. For example if the Flash Exif tag returns 0x0019 we can map that to “Flash fired, auto mode”.
if(tags.IFD1Offset) {
	IFD1Tags = ExifExtractorTags.readTags(dataview, TIFFOffset, tags.IFD1Offset + TIFFOffset, ExifExtractorTags.Exif.TiffTags, littleEndian);

	if(IFD1Tags.JPEGInterchangeFormat) {
		readThumbnailData(dataview, IFD1Tags.JPEGInterchangeFormat, IFD1Tags.JPEGInterchangeFormatLength, TIFFOffset, littleEndian);
	}
}

function readThumbnailData(dataview, ThumbStart, ThumbLength, TIFFOffset, littleEndian) {

	if (dataview.length < ThumbStart+TIFFOffset+ThumbLength) {
		return;
	}

	var data = dataview.getBytesAt(ThumbStart+TIFFOffset,ThumbLength);
	var hexData = new Array();
	var i;

	for(i in data) {
		if (data[i] < 16) {
			hexData[i] = "0"+data[i].toString(16);
		}
		else {
			hexData[i] = data[i].toString(16);
		}
	}

	self.postMessage({guid:dataview.guid, thumb_src:"data:image/jpeg,%"+hexData.join('%')});
}
The directory entry for the thumbnail image is just like the others. If we find the IFD1 offset at the end of IFD0, we pass the data back into the readTags function looking for two specific tags: JPEGInterchangeFormat (the offset to the thumbnail) and JPEGInterchangeFormatLength (the size of the thumbnail in bytes). We read in the correct amount of raw bytes at the appropriate offset, convert each byte into hex, and pass it back as a data URI to be inserted into the DOM showing the user a thumbnail while their photo is being uploaded.
As we get data back from the readTags function, we post a message out of the worker with the tags as an object. Which will be caught caught by our event handlers from earlier, shown the user, and stored as necessary to be uploaded when the user is ready.
We use this same process to parse older IPTC data. Essentially we look for an APP14 marker, a Photoshop 3.0 marker, a “8BIM” marker, and then begin running through the bytes looking for segment type, size, and data. We map the segment type against a lookup table to get the segment name and get size number of bytes at the offset to get the segment data. This is all stored in a tags object and passed out of the worker.
XMP data is a little different, even easier. Basically we look for the slice of data surrounded by the values “<x:xmpmeta” to “</x:xmpmeta>” in the binary string, then pass that out of the worker to be parsed via Y.DataType.XML.parse().
Conclusion
In conclusion the major steps we take to process an image’s Exif are:
- Initialize a web worker
- Get a file reference
- Get a slice of the file’s data
- Read a byte string
- Look for APP1/APP0 markers
- Look for Exif and TIFF header markers
- Look for IFD0 and IFD1
- Process entries from IFD0 and IFD1
- Pass data back out of the worker
That is pretty much all there is to reading Exif! The key is to be very forgiving in the parsing of Exif data, because there are a lot of different cameras out there and the format has changed over the years.
One final note: Web workers have made client-side Exif processing feasible at scale. Tasks like this can be performed without web workers, but run the risk of locking the UI thread – certainly not ideal for a web app that begs for user interaction.

Like this post? Have a love of online photography? Want to work with us? Flickr is hiring engineers, designers and product managers in our San Francisco office. Find out more at flickr.com/jobs.