When we began prototyping geofences, our goal was to encourage people to geotag more photos without having to be too concerned about privacy.
Introducing people to geofences
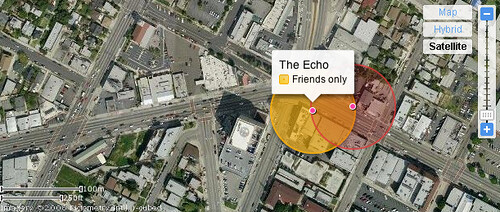
The term “geofence” may sound complicated, but our implementation is quite simple. A geofence is a user-defined boundary around a specific area on a map. We decided to keep the creation and editing process similar to geotagging on the photo page. We understand from developing the photo page map that it is important to provide a way to search for a location as well as simply drop something in the right place on the map. The geofence is represented by a selector-circle on a modal map panel with simple edit controls on the side.
In previous map interfaces we used canvas elements to generate scalable components like our new selector-circle. One example of this would be the location circle in photos nearby. Our resident browser performance task-master, Scott Schiller, decided this time to compare the performance of continuing to use canvas with that of the now widely supported css border-radius feature. Using border-radius made for a smoother performing interface in our tests against the early prototypes of geofences. We loved the result.
The only noticeable downside to our current implementation is that it attaches a click handler to the entire element which is displayed as a selector-circle with css. This means that the actual click-able area is not a circle at all, it is a square.
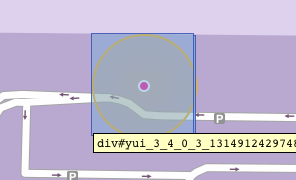
We are currently working to find the most elegant way to get around this issue. The code below shows one possible solution:
var root_node   = Y.one('#circle_container_node'),
    circle_node = root_node.one('.selector-circle');

function getCenterPoint() {
	var half_node_width = circle_node.get('offsetWidth')/2;

	return [(circle_node.getX()+half_node_width),(circle_node.getY()+half_node_width)];
}

function getDistanceFromCentroid(xy) {

	var centroid_point = getCenterPoint();

	return Math.sqrt(Math.round(Math.pow(centroid_point[0]-xy[0], 2.0)) + Math.round(Math.pow(centroid_point[1]-xy[1], 2.0)));
}

circle_node.on('click',function(e){

	if(getDistanceFromCentroid([e.pageX,e.pageY]) < half_node_width) {
		//handle
	}

});
Sustainably supporting a sill relevant, but older browser
Don’t you still have a fair amount of users on IE7, which does not support border radius? Yes, we do, and thanks for pointing that out so eloquently. We decided to use the CSS3PIE framework which uses clever tricks to make IE7 support modern css features like border-radius, box-shadow, border-image, multiple background images and linear-gradient as background image. What is awesome about using CSS3PIE, is that it allows us to give IE7 users a nearly identical experience as that enjoyed by modern browser users without a lot of branched code.
.selector-circle {
	border:solid 8px rgba(68, 68, 68, .4);
	background-color:rgba(0, 100, 220, .5);
	border-radius: 999px;
        /*Neeed for CSSPIE to support rgba*/
        -pie-background:rgba(0, 100, 220, .5);
}
Relative sizing
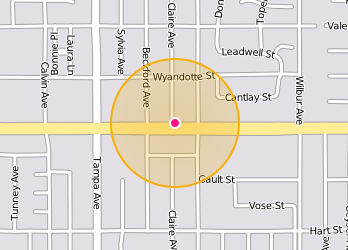
We determined a sensible size range of 50 to 10,000 meters for a geofence, then dreamt up a few ways to allow folks to select an appropriate size within this range on the map. A lot of people (myself included) are not very good at judging distance in kilometers or miles without a visual example. We establish a connection between changing to the radius dropdown menu, the size of the selector-circle, and the zoom level of the map by making sure that a change to one is reflected in all of them.
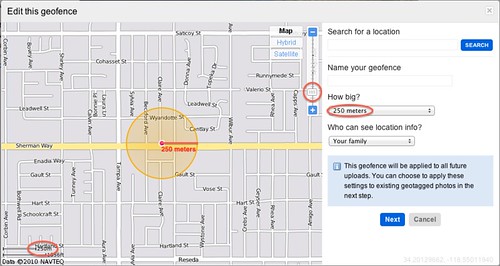
Something had to be done to keep the geofence visible on the map even if the selector-circle has become too small to be seen in a selected zoom level. The selector-circle was given a center-point which would not change with changes of radius or zoom. It is always visible even if the surrounding fence is too small
Geofences are privacy defaults, not filters
A geofence is only applied as a default to at the time of uploading or geotagging a photo. It will not, on it’s own, affect photos already in that area. We created a process which one could follow to apply geofences to existing photos as a convenience. Nolan Caudill goes into detail about the code behind this process in his post from last week. Now, imagine if you did not realize that a large number of your photos, which you intended to stay public were in an area covered by a geofence. After applying the geofence settings, they would be suddenly hidden from the map. Changing all of those photos individually or even as a batch in the organizr would be, what we in the industry call, a massive honking bummer. A final step was added to the end of the creation and edit of geofences to show which photos could be affected. We display a list of potentially affected photos with a color-coded indicators of what their privacy will be after the geofence settings are applied to help people to make as informed a choice as possible.
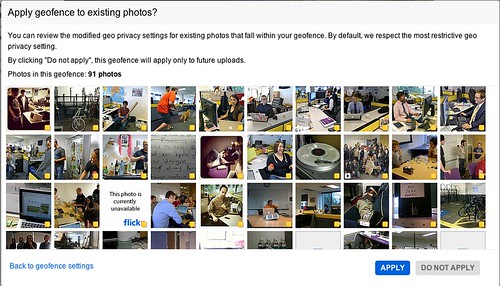
In most cases you will get an idea of which photos will be affected right away, but areas with lots of photos can be carefully assessed as well.
Showing all of the fences at once
In the prototype phase, geofences were displayed in a list and the only way to see them on a map was individually. We decided to create a map which displays all of the circles, in one place, over the list, to make it easier to see how fences might interact. One great example is that if two fences of similar privacy value (like family and friends for instance) overlap, the intersecting area is considered private. With this in mind, it is nice to at least be able to see on the map where your fences cross. In some later release, we would love to show an appropriate red color-code in these intersecting areas.
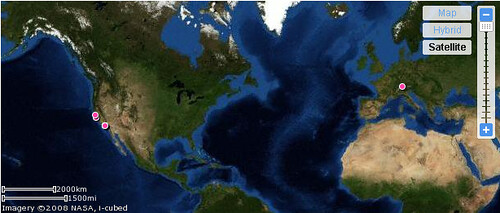
Most people will create geofences with names like Home, Office, and School. For most people, these places are pretty close to each other. Some people might have places which they want to protect and are further apart. It is important for the map flexible enough to include the entire globe if you were to have one or two geofences abroad. We use a center-point to represent geofences which are too small to be seen, and we calculate the best zoom and center of the map when we load of the geo preferences page.
World view
Neighborhood view