About Eric Gelinas

I am a native Los Angelino who is currently in San Francisco making big data pictures at Stamen

We saved you a step…

It seems when we launched version 2.0 of our Flickr shapes, we posted them with a flaw which made them useless to most popular geo applications.

Awwwww…

Luckily, Christopher Manning wrote a python script which makes them useful.

Yaaaayyyyy!

The least we can do is post an update which has already been christopher-manning-ified, So, we are very happy to announce version 2.0.1 of the Flickr shape files which can be downloaded here:
http://www.flickr.com/services/shapefiles/2.0.1/

Look, it works:


Flickr Shapes 2.0.1 in TileMill

A very hearty THANKS! from your friends at Flickr, Christopher.

The great map update of 2012

Today we are announcing an update to the map tiles which we use site wide. A very high majority of the globe will be represented by Nokia’s clever looking tiles.

Nokia map tile

We are not stopping there. As some of you may know, Flickr has been using Open Street Maps (OSM) data to make map tiles for some places. We started with Beijing and the list has grown to twenty one additional places:

Mogadishu
Cairo
Algiers
Kiev
Tokyo
Tehran
Hanoi
Ho Chi Minh City
Manila
Davao
Cebu
Baghdad
Kabul
Accra
Hispaniola
Havana
Kinshasa
Harare
Nairobi
Buenos aires
Santiago

It has been a while since we last updated our OSM tiles. Since 2009, the OSM community has advanced quite a bit in the tools they provide and data quality. I went into a little detail about this in a talk I gave last year.

Introducing Pandonia

Nokia map tile

Today we are launching Buenos Aires and Santiago in a new style. We will be launching more cities in this new style in the near future. They are built from more recent OSM data and they will also have an entirely new style which we call Pandonia. Our new style was designed in TileMill from the osm-bright template, both created by the rad team at MapBox. TileMill changes the game when it comes to styling map tiles. The interface is developed to let you quickly iterate style changes to tiles and see the changes immediately. Ross Harmes will be writing a more detailed account of the work he did to create the Pandonia style. We appreciate the tips and guidance from Eric Gunderson, Tom MacWright, and the rest of the team at MapBox

We are looking forward to updating all of our OSM places with the Pandonia style in the near future and growing to more places after that… Antarctica? Null Island? The Moon? Stay tuned and see…

Changing our Javascript API

To host all of these new tiles we needed to find a flexible javascript api. Cloudmade’s Leaflet is a simple and open source tile serving javascript library. The events and methods map well to our previous JS API, which made upgrading simple for us. All of our existing map interfaces will stay the same with the addition of modern map tiles. They will also support touch screen devices better than ever. Leaflet’s layers mechanism will make it easier for us to blend different tile sources together seamlessly. We have a fork on GitHub which we plan to contribute to as time goes on. We’ll keep you posted.

Building an HTML5 Photo Editor

Introducing guest blogger, Ari Fuchs. He is a Lead API Engineer and Developer Evangelist at Aviary. He has spent the last 3 years building out Aviary’s internal and external facing APIs, and is now working with partners to bring Aviary’s tools to the masses. He also did a lot of work to bring the Aviary editor to Flickr. Follow him on Twitter and send him a nice message to make him feel better about his stolen bike. Now, on to his post…

At Aviary, we’ve been passionate about photos since day one. It’s been five years since we released our first creative tool, Phoenix, a powerful, free Flash-based photo editor. Phoenix offered functionality on par with Adobe Photoshop 5 and a price point that opened its usage to anyone with an internet connection. As amateur photographers worldwide began trying their hand at editing, we watched our product join the ranks of a small number of companies working to democratize the process of photo editing for the first time.

Around two years ago we began rethinking the future of our tool set. While our original tools offered incredible functionality, they did have a learning curve which meant that the average person couldn’t just sit down and begin editing without investing time to become familiar with the tools. We wanted to build a powerful editor that anyone could use.

Because we were rebuilding the editor from the ground up, we took the opportunity to switch from a Flash based solution to one built using HTML5 technologies. We saw this as an opportunity to build on a growing standard, and to support the most platforms.

In fall of 2010 we released our HTML5 photo editor which has evolved into the product we’re proud to share with you today.

Widget Encapsulation

During our initial foray into the online editor space, we took a straightforward approach by having API users launch our editor in a new page or window. This simplified integrations and allowed us to own the editing experience.

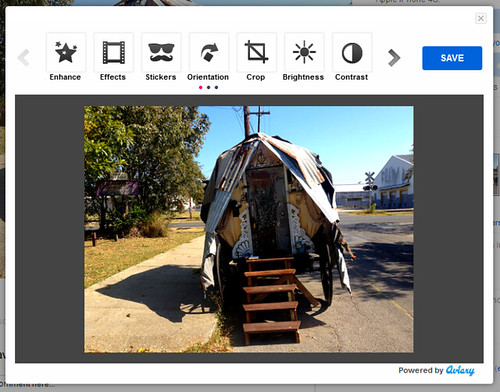
When we rebuilt our editor in JavaScript, we took the opportunity to re-architect our API as well. Our first big change was making the editor embeddable. This meant that third party developers could load the editor on their own sites, maintaining user engagement while controlling their experience. We built out customization options that allowed the site owner to decide which tools appeared in the editor. A real estate site, for example, might not want its users adding mustache stickers to appliances in photos.

Our editor, unlike many rich HTML widgets, does not require an iframe and is truly embedded into a hosting webpage. This posed many challenges during development, but the result is a more seamless, lightweight integration.

Aviary embeded in Flickr

Constructor API

When we rebuilt our API, we took a leap by assuming that web developers integrating our editor would have experience with other JavaScript libraries and plugins. We built our API to use a Constructor method that accepts a configuration object to allow for the aforementioned tool customization. The configuration object is also used to configure callbacks, image URLs, language settings, etc., and allows us to continue building out our API without losing backwards compatibility.

Simplifying the Save Process

Saving image data is always a challenge in the browser, and can require various cross-browser workarounds. An obvious method would be to initiate a form post to the server and include the base64 image data in a hidden field. This breaks in Safari, where form fields have an undocumented value length limit. We worked around this by switching to an ajax post with the appropriate CORS headers to get around cross domain issues. In browsers that don’t support CORS, we fall back to the form post method.

To hide this complexity from the developer, we’ve abstracted the save process completely. When a user saves an edited image, we temporarily save the image data to our own servers and return a public URL so the host application can download the image to their own.

High Resolution Photos

One of the coolest features of our editor is the high resolution image support — that being said, it certainly has a number of challenges. There’s the practical issue of limited real estate in the browser (keep an eye out for updates addressing this in the near future), as well as performance issues that are harder to quantify. Even in Flash based tools, the size of the image you can edit in the browser is limited by a number of gating factors: hardware specs, number of running processes, etc. To get around these client limitations, we’ve set a configurable maxSize on the editor and added a configuration field for an original-resolution version of the image to be edited: hiresUrl.

When a hiresUrl is supplied, every user edit action is logged. On save, the aptly named “actionlist” is sent to our server along with the hiresUrl. When it hits our render farm, the actionlist is replayed on the high resolution image, and the final results are returned to the host site via a new hiresUrl.

{
    "metadata": {
        "imageorigsize": [
            800,
            530
        ]
    },
    "actionlist": [
        {
            "action": "setfeathereditsize",
            "width": 800,
            "height": 530
        },
        {
            "action": "flatten"
        },
        {
            "action": "redeye",
            "radius": 5,
            "pointlist": [
                [545, 183], [546,183], [547,182], [548,181], [548,179], [548,177], [547,177], [545,177], [544,177], [543,177], [542,177], [541,179], [541,181], [541,183], [542,184]
            ]
        },
        {
            "action": "redeye",
            "radius": 5,
            "pointlist": [
                [481, 191], [481,193], [481,195], [482,196], [483,197], [484,198], [485,197], [485,196], [485,193], [485,190], [485,189], [485,188], [484,188], [482,188], [480,189], [480,190], [480, 191]
            ]
        },
        {
            "action": "sharpen",
            "value": 21.69312,
            "flatten": true
        }
    ]
}

As a side note, we maintain feature parity across all of our platforms (mobile included) by prototyping new tools and filters in the JavaScript first, and then porting them to C for our render farm and Android, and then to Objective-C for our iPhone SDK. By maintaining feature parity and synchronizing output across platforms, we’re able to ensure that users get the edits they expect on their high resolution photos, and we keep the door open for future server-side support for our mobile SDKs where the original photo might not be stored on the device.

Tools and Libraries

We use some pretty awesome tools to help us maintain cross-browser compatibility.

LESS CSS

We moved a lot of the cross-browser concerns to build-time with LESS and a library of mix-ins inspired initially by Twitter Bootstrap, though the final result is wholly our own. LESS’s color math and variables let us achieve a textured and rounded look and feel while minimizing complexity during development.

/* LESS */
.avpw_inset_button_group {
#gradient > .vertical(lighten(@conveyorBelt, 4%), darken(@conveyorBelt, 1%));
.box-shadow(inset 0 0 4px darken(@conveyorBelt, 20%));
.border-radius(8px);
}

/* EXPANDED */
.avpw_inset_button_group {
  background-color: #2a2a2a;
  background-repeat: repeat-x;
  background-image: -khtml-gradient(linear, left top, left bottom, from(#383838), to(#2a2a2a));
  background-image: -moz-linear-gradient(top, #383838, #2a2a2a);
  background-image: -ms-linear-gradient(top, #383838, #2a2a2a);
  background-image: -webkit-gradient(linear, left top, left bottom, color-stop(0%, #383838), color-stop(100%, #2a2a2a));
  background-image: -webkit-linear-gradient(top, #383838, #2a2a2a);
  background-image: -o-linear-gradient(top, #383838, #2a2a2a);
  background-image: linear-gradient(top, #383838, #2a2a2a);
  filter: progid:DXImageTransform.Microsoft.gradient(startColorstr='#383838', endColorstr='#2a2a2a', GradientType=0);
  -webkit-box-shadow: inset 0 0 4px #000000;
  -moz-box-shadow: inset 0 0 4px #000000;
  box-shadow: inset 0 0 4px #000000;
  -webkit-border-radius: 8px;
  -moz-border-radius: 8px;
  border-radius: 8px;
}

CSS3

With CSS3, we’ve just about managed a complete break from the DHTML effects of the past. The new UI uses CSS3 transitions and transforms wherever possible to remain future-proof.

Flash

Yes, our editor does indeed have a Flash fallback for browsers that lack certain HTML5 features (namely canvas). We initially built the editor as a move away from Flash, but because of the legacy IE7 and IE8 userbases on our larger partner sites, we had to go back and rebuild certain components in Flash to support those browsers.

We’ve architected the editor so that Flash is only being used where necessary. Some tools, such as draw, have been completely rebuilt in Flash; for others, like effects, the bitmap data is being exported and manipulated in JavaScript (using a reverse implementation of pibeca). This allows for code reuse, and enables us to build new features faster with more backwards compatibility.

Future

While the feedback for our editor has been overwhelmingly fantastic, we’re continuing to work hard building out new tools and features, and performance enhancements to our existing set.

Creating an interface for geofences

When we began prototyping geofences, our goal was to encourage people to geotag more photos without having to be too concerned about privacy.

Introducing people to geofences

The term “geofence” may sound complicated, but our implementation is quite simple. A geofence is a user-defined boundary around a specific area on a map. We decided to keep the creation and editing process similar to geotagging on the photo page. We understand from developing the photo page map that it is important to provide a way to search for a location as well as simply drop something in the right place on the map. The geofence is represented by a selector-circle on a modal map panel with simple edit controls on the side.

selector-circle

In previous map interfaces we used canvas elements to generate scalable components like our new selector-circle. One example of this would be the location circle in photos nearby. Our resident browser performance task-master, Scott Schiller, decided this time to compare the performance of continuing to use canvas with that of the now widely supported css border-radius feature. Using border-radius made for a smoother performing interface in our tests against the early prototypes of geofences. We loved the result.

The only noticeable downside to our current implementation is that it attaches a click handler to the entire element which is displayed as a selector-circle with css. This means that the actual click-able area is not a circle at all, it is a square.

box around selector-circle

We are currently working to find the most elegant way to get around this issue. The code below shows one possible solution:

var root_node   = Y.one('#circle_container_node'),
    circle_node = root_node.one('.selector-circle');

function getCenterPoint() {
	var half_node_width = circle_node.get('offsetWidth')/2;
	
	return [(circle_node.getX()+half_node_width),(circle_node.getY()+half_node_width)];
}

function getDistanceFromCentroid(xy) {
	
	var centroid_point = getCenterPoint();

	return Math.sqrt(Math.round(Math.pow(centroid_point[0]-xy[0], 2.0)) + Math.round(Math.pow(centroid_point[1]-xy[1], 2.0)));
}

circle_node.on('click',function(e){
	
	if(getDistanceFromCentroid([e.pageX,e.pageY]) < half_node_width) {
		//handle
	}
	
});

Sustainably supporting a sill relevant, but older browser

Don’t you still have a fair amount of users on IE7, which does not support border radius? Yes, we do, and thanks for pointing that out so eloquently. We decided to use the CSS3PIE framework which uses clever tricks to make IE7 support modern css features like border-radius, box-shadow, border-image, multiple background images and linear-gradient as background image. What is awesome about using CSS3PIE, is that it allows us to give IE7 users a nearly identical experience as that enjoyed by modern browser users without a lot of branched code.

.selector-circle {
	border:solid 8px rgba(68, 68, 68, .4);
	background-color:rgba(0, 100, 220, .5);
	border-radius: 999px;
        /*Neeed for CSSPIE to support rgba*/
        -pie-background:rgba(0, 100, 220, .5);
}

Relative sizing

We determined a sensible size range of 50 to 10,000 meters for a geofence, then dreamt up a few ways to allow folks to select an appropriate size within this range on the map. A lot of people (myself included) are not very good at judging distance in kilometers or miles without a visual example. We establish a connection between changing to the radius dropdown menu, the size of the selector-circle, and the zoom level of the map by making sure that a change to one is reflected in all of them.

Zoom level of map in relation to the size of the selector-circle

Something had to be done to keep the geofence visible on the map even if the selector-circle has become too small to be seen in a selected zoom level. The selector-circle was given a center-point which would not change with changes of radius or zoom. It is always visible even if the surrounding fence is too small

Geofences are privacy defaults, not filters

A geofence is only applied as a default to at the time of uploading or geotagging a photo. It will not, on it’s own, affect photos already in that area. We created a process which one could follow to apply geofences to existing photos as a convenience. Nolan Caudill goes into detail about the code behind this process in his post from last week. Now, imagine if you did not realize that a large number of your photos, which you intended to stay public were in an area covered by a geofence. After applying the geofence settings, they would be suddenly hidden from the map. Changing all of those photos individually or even as a batch in the organizr would be, what we in the industry call, a massive honking bummer. A final step was added to the end of the creation and edit of geofences to show which photos could be affected. We display a list of potentially affected photos with a color-coded indicators of what their privacy will be after the geofence settings are applied to help people to make as informed a choice as possible.

Existing photo apply panel

In most cases you will get an idea of which photos will be affected right away, but areas with lots of photos can be carefully assessed as well.

Showing all of the fences at once

In the prototype phase, geofences were displayed in a list and the only way to see them on a map was individually. We decided to create a map which displays all of the circles, in one place, over the list, to make it easier to see how fences might interact. One great example is that if two fences of similar privacy value (like family and friends for instance) overlap, the intersecting area is considered private. With this in mind, it is nice to at least be able to see on the map where your fences cross. In some later release, we would love to show an appropriate red color-code in these intersecting areas.

Most people will create geofences with names like Home, Office, and School. For most people, these places are pretty close to each other. Some people might have places which they want to protect and are further apart. It is important for the map flexible enough to include the entire globe if you were to have one or two geofences abroad. We use a center-point to represent geofences which are too small to be seen, and we calculate the best zoom and center of the map when we load of the geo preferences page.

World view

The world view of the map

Neighborhood view

The neighborhood view of the map

Inspiration Tuesday

When I poke my head above my monitor at FlickrHQ, I can see a lot of headphones. Ever wonder what inspires us to write code (besides fried chicken sandwiches and cocktails)? Well I did a little snooping in the playlists of a few Flickreenos:

Zack

Zack in headphones

Top Tracks:

  • Fitz & The Tantrums – MoneyGrabber
  • Ear Infections mix – Goldenchyld
  • Live In San Diego – Goldenchyld
  • Little Birdy – Brother
  • Parliament – Red Hot Mama


Ross

Ross in headphones

Top Tracks:

  • David Gray – Flame Turns Blue
  • Kings of Convenience – Singing Softly to Me
  • Grizzly Bear – Southern Point
  • The Roots – The Next Movement
  • Iron & Wine – Jezebel

Trevor

Trevor in headphones

Top Tracks:

  • Crawler – Cosmic Tide
  • Quest for Fire – Next to the Fire
  • Bison BC – Die of Devotion
  • Radiohead – Little by Little
  • DMX Krew – Do It All Nite


Scott

Scott in headphones

Top Tracks:

  • Wax Tailor – No Pity
  • Ray Charles – Eleanor Rigby
  • Steve Martin – How to Meet a Girl
  • KRS-One – MC’s Act Like They Don’t Know
  • Quantic – Snakes in the Grass


Dubious friendship

Oh, and I suppose I should share mine too:

•  Blueprint Car Crash – Gun Moll
•  Little Dragon – Come Home
•  Angus & Julia Stone – Black Crow
•  Plants and Animals – Celebration
•  of Montreal – Coquet Coquette


Find even more of what inspires us on our FlickrHQ Last.Fm Group

Photos by waferbaby

A YUI3 Module for the Flickr API

Flickr API YUI3 ModuleDuring the redesign of our photo page, we created a YUI3 API  module, used for all Flickr API transactions. This module has been designed to load component modules as needed, which makes for a speedy initial load. For example, the YUI3 IO module, which handles XMLHttpRequests in the YUI3 library, is loaded only if writing to the Flickr API. Read requests are all handled by the Get Module, which is included in the core of YUI3. A byproduct of this approach is that read requests can be made cross domain, without a proxy.

Reading from Flickr

Simply include gallery-flickr-api in your requirement definition. Then use the Y.flickrAPI.callMethod function, passing the Flickr API method name and callback as arguments. Have a look at the YUI3 Gallery page for more information about using gallery modules. Read requests can be made cross-domain without a proxy, since the request and response will be loaded as a script resource instead of using XMLHttpRequest.

YUI().use('gallery-flickr-api', function(Y) {

Y.flickrAPI.callMethod('flickr.panda.getPhotos',
{
api_key: 'your_api_key',
panda_name: 'ling ling',
extras: 'license, date_taken, owner_name',
per_page: 50,
page:1
},
{
success : function(response_object) {
//Success Code
},
failure : function(response_object) {
//Failure Code
}
});

});

Writing to Flickr

Okay, writing to Flickr API (i.e. post requests) is a little trickier. You will need to make sure that your API key is enabled to read and write. As soon as you make the first API request to write, the YUI3 IO module will be loaded (if it is not already). It is important to note that write requests can only be done on the same domain, which is the standard security restriction of the XMLHttpRequest for browsers. POST requests to the Flickr API, will require some sort of proxy which will accept the post request on your domain and handle the cross-domain communication with api.flickr.com

YUI().use('gallery-flickr-api', function(Y) {

Y.flickrAPI.callMethod('flickr.favorites.add',
{
api_key: 'your_api_key',
photo_id: a_photo_id
},
{
success : function(response_object) {
//Success Code
},
failure : function(response_object) {
//Failure Code
}
});

});

We hope that you make use of this new module. It is a great way to get quick prototypes and full scale applications made using the Flickr API in a short amount of time. See you in the App Garden!