Configuration management for distributed systems (using GitHub and cfg4j)

Norbert Potocki, Software Engineer @ Yahoo Inc.

Warm up: Why configuration management?

When working with large-scale software systems, configuration management becomes crucial; supporting non-uniform environments gets greatly simplified if you decouple code from configuration. While building complex software/products such as Flickr, we had to come up with a simple, yet powerful, way to manage configuration. Popular approaches to solving this problem include using configuration files or having a dedicated configuration service. Our new solution combines the extremely popular GitHub and cfg4j library, giving you a very flexible approach that will work with applications of any size.

Why should I decouple configuration from the code?

  • Faster configuration changes (e.g. flipping feature toggles): Configuration can simply be injected without requiring parts of your code to be reloaded and re-executed. Config-only updates tend to be faster than code deployment.
  • Different configuration for different environments: Running your app on a laptop or in a test environment requires a different set of settings than production instance.
  • Keeping credentials private: If you don’t have a dedicated credential store, it may be convenient to keep credentials as part of configuration. They usually aren’t supposed to be “public,” but the code still may be. Be a good sport and don’t keep credentials in a public GitHub repo. :)

Meet the Gang: Overview of configuration management players

Let’s see what configuration-specific components we’ll be working with today:

image
Figure 1 –  Overview of configuration management components

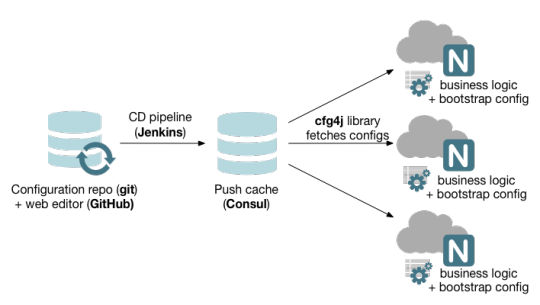
Configuration repository and editor: Where your configuration lives. We’re using Git for storing configuration files and GitHub as an ad hoc editor.

Push cache : Intermediary store that we use to improve fetch speed and to ease load on GitHub servers.

CD pipeline: Continuous deployment pipeline pushing changes from repository to push cache, and validating config correctness.

Configuration library: Fetches configs from push cache and exposing them to your business logic.

Bootstrap configuration : Initial configuration specifying where your push cache is (so that library knows where to get configuration from).

All these players work as a team to provide an end-to-end configuration management solution.

The Coach: Configuration repository and editor

The first thing you might expect from the configuration repository and editor is ease of use. Let’s enumerate what that means:

  • Configuration should be easy to read and write.
  • It should be straightforward to add a new configuration set.
  • You most certainly want to be able to review changes if your team is bigger than one person.
  • It’s nice to see a history of changes, especially when you’re trying to fix a bug in the middle of the night.
  • Support from popular IDEs – freedom of choice is priceless.
  • Multi-tenancy support (optional) is often pragmatic.

So what options are out there that may satisfy those requirements? The three very popular formats for storing configuration are YAML, Java Property files, and XML files. We use YAML – it is widely supported by multiple programming languages and IDEs, and it’s very readable and easy to understand, even by a non-engineer.

We could use a dedicated configuration store; however, the great thing about files is that they can be easily versioned by version control tools like Git, which we decided to use as it’s widely known and proven.

Git provides us with a history of changes and an easy way to branch off configuration. It also has great support in the form of GitHub which we use both as an editor (built-in support for YAML files) and collaboration tool (pull requests, forks, review tool). Both are nicely glued together by following the Git flow branching model. Here’s an example of a configuration file that we use:

Figure 2 –  configuration file preview

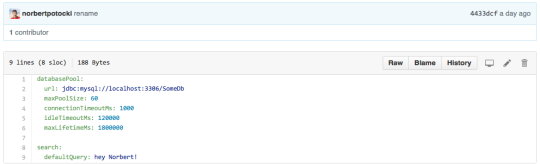
One of the goals was to make managing multiple configuration sets (execution environments) a breeze. We need the ability to add and remove environments quickly. If you look at the screenshot below, you’ll notice a “prod-us-east” directory in the path. For every environment, we store a separate directory with config files in Git. All of them have the exact same structure and only differ in YAML file contents.

This solution makes working with environments simple and comes in very handy during local development or new production fleet rollout (see use cases at the end of this article). Here’s a sample config repo for a project that has only one “feature”:

Figure 3 –  support for multiple environments

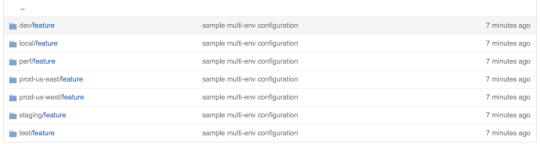
Some of the products that we work with at Yahoo have a very granular architecture with hundreds of micro-services working together. For scenarios like this, it’s convenient to store configurations for all services in a single repository. It greatly reduces the overhead of maintaining multiple repositories. We support this use case by having multiple top-level directories, each holding configurations for one service only.

The sprinter: Push cache

The main role of push cache is to decrease the load put on the GitHub server and improve configuration fetch time. Since speed is the only concern here, we decided to keep the push cache simple: it’s just a key-value store. Consul was our choice, in part because it’s fully distributed.

You can install Consul clients on the edge nodes and they will keep being synchronized across the fleet. This greatly improves both the reliability and the performance of the system. If performance is not a concern, any key-value store will do. You can skip using push cache altogether and connect directly to Github, which comes in handy during development (see use cases to learn more about this).

The Manager: CD Pipeline

When the configuration repository is updated, a CD pipeline kicks in. This fetches configuration, converts it into a more optimized format, and pushes it to cache. Additionally, the CD pipeline validates the configuration (once at pull-request stage and again after being merged to master) and controls multi-phase deployment by deploying config change to only 20% of production hosts at one time.

The Mascot: Bootstrap configuration

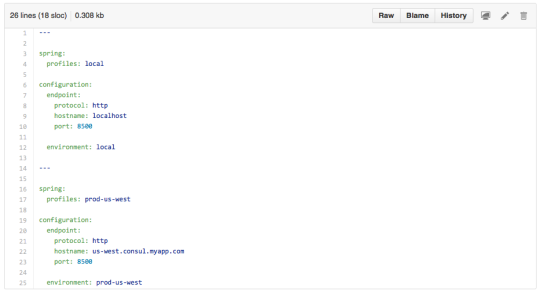
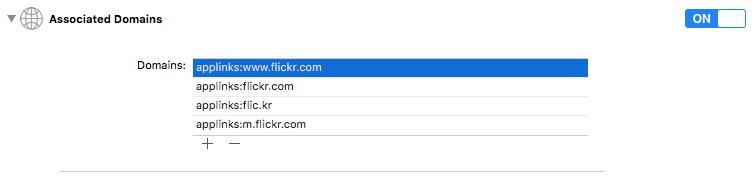
Before we can connect to the push cache to fetch configuration, we need to know where it is. That’s where bootstrap configuration comes into play. It’s very simple. The config contains the hostname, port to connect to, and the name of the environment to use. You need to put this config with your code or as part of the CD pipeline. This simple yaml file binding Spring profiles to different Consul hosts suffices for our needs:

image
Figure 4 –  bootstrap configuration

The Cool Guy: Configuration library

image

The configuration library takes care of fetching the configuration from push cache and exposing it to your business logic. We use the library called cfg4j (“configuration for java”). This library re-loads configurations from the push cache every few seconds and injects them into configuration objects that our code uses. It also takes care of local caching, merging properties from different repositories, and falling back to user-provided defaults when necessary (read more at http://www.cfg4j.org/).

Briefly summarizing how we use cfg4j’s features:

  • Configuration auto-reloading: Each service reloads configuration every ~30 seconds and auto re-configures itself.
  • Multi-environment support: for our multiple environments (beta, performance, canary, production-us-west, production-us-east, etc.).
  • Local caching: Remedies service interruption when the push cache or configuration repository is down and also improves the performance for obtaining configs.
  • Fallback and merge strategies: Simplifies local development and provides support for multiple configuration repositories.
  • Integration with Dependency Injection containers – because we love DI!

If you want to play with this library yourself, there’s plenty of examples both in its documentation and cfg4j-sample-apps Github repository.

The Heavy Lifter: Configurable code

The most important piece is business logic. To best make use of a configuration service, the business logic has to be able to re-configure itself in runtime. Here are a few rules of thumb and code samples:

  • Use dependency injection for injecting configuration. This is how we do it using Spring Framework (see the bootstrap configuration above for host/port values):

https://gist.github.com/norbertpotocki/e91aa64b524592432630

  • Use configuration objects to inject configuration instead of providing configuration directly – here’s where the difference is:

Direct configuration injection (won’t reload as config changes)
https://gist.github.com/norbertpotocki/eac0a927ca2df45c2a0b

Configuration injection via “interface binding” (will reload as config changes):
https://gist.github.com/norbertpotocki/0c0b5b9aa9d11c06c937

The exercise: Common use-cases (applying our simple solution)

Configuration during development (local overrides)

When you develop a feature, a main concern is the ability to evolve your code quickly.  A full configuration-management pipeline is not conducive to this. We use the following approaches when doing local development:

  • Add a temporary configuration file to the project and use cfg4j’s MergeConfigurationSource for reading config both from the configuration store and your file. By making your local file a primary configuration source, you provide an override mechanism. If the property is found in your file, it will be used. If not, cfg4j will fall back to using values from configuration store. Here’s an example (reference examples above to get a complete code):

https://gist.github.com/norbertpotocki/289f3943249ea2813dcf

  • Fork the configuration repository, make changes to the fork and use cfg4j’s GitConfigurationSource to access it directly (no push
    cache required):

https://gist.github.com/norbertpotocki/dacdcc6671a2158ded5e

  • Set up your private push cache, point your service to the cache, and edit values in it directly.

Configuration defaults

When you work with multiple environments, some of them may share a configuration. That’s when using configuration defaults may be convenient. You can do this by creating a “default” environment and using cfg4j’s MergeConfigurationSource for reading config first from the original environment and then (as a fallback) from “default” environment.

Dealing with outages

Configuration repository, push cache, and configuration CD pipeline can experience outages. To minimize the impact of such events, it’s good practice to cache configuration locally (in-memory) after each fetch. cfg4j does that automatically.

Responding to incidents – ultra fast configuration updates (skipping configuration CD pipeline)

Tests can’t always detect all problems. Bugs leak to the production environment and at times it’s important to make a config change as fast as possible to stop the fire. If you’re using push cache, the fastest way to modify config values is to make changes directly within the cache. Consul offers a rich REST API and web ui for updating configuration in the key-value store.

Keeping code and configuration in sync

Verifying that code and configuration are kept in sync happens at the configuration CD pipeline level. One part of the continuous deployment process deploys the code into a temporary execution environment, and points it to the branch that contains the configuration changes. Once the service is up, we execute a batch of functional tests to verify configuration correctness.

The cool down: Summary

The presented solution is the result of work that we put into building huge-scale photo-serving services. We needed a simple, yet flexible, configuration management system. Combining Git, Github, Consul and cfg4j provided a very satisfactory solution that we encourage you to try.

I want to thank the following people for reviewing this article: Bhautik Joshi, Elanna Belanger, Archie Russell.

PS. You can also follow me on Twitter, GitHub, LinkedIn or my private blog.

The 32 Days Of Christmas!

LEGO City Advent Calendar - Day 7

When you have thousands of photos, it can be hard to find the photo you’re looking for. Want to search for that Christmas cat you saw at last year’s party? And what if that party wasn’t on Christmas day, but sometime the week before? To help improve the search ranking and relevance of national, personal, and religious holiday photos, we first have to see when the photos were taken; when, for example, is the Christmas season?

Understanding what people are looking for when they search for their own photos is an important part of improving Flickr. Earlier this year, we began a study (which will be published at CHI 2016 under the same name as this post) by trying to understand how people searched for their personal photos. We showed a group of 74 participants roughly 20 of their own photos on Flickr, and asked them what they’d put into the Flickr search box to find those photos. We did this a total of 1492 times.

It turns out 12% of the time people used a temporal term in searches for their own photos, meaning a word connected to time in some way. These might include a year (2015), a month (January), a season (winter), or a holiday or special event (Thanksgiving, Eid al-Fitr, Easter, Passover, Burning Man). Often, however, the date and time on the photograph didn’t match the search term: the year would be wrong, or people would search for a photograph of snow the weekend after Thanksgiving with the word “winter,” despite the fact that winter doesn’t officially begin until December 21st in the U.S. So we wanted to understand that situation: how often does fall feel like winter?

To answer this, we mapped 78.8 million Flickr photos tagged with a season name to the date the photo was actually taken.

Seasons Tagged by Date

As you’d expect, most of the photographs tagged with a season are taken during that season: 66% of photos tagged “winter” were taken between December 22 and March 20. About 9% of search words are off by two seasons: photos tagged “summer” that were taken between December 21st and March 20th, for example. We expect this may reflect antipodean seasons: while most Flickr users are in the Northern Hemisphere, it doesn’t seem unreasonable that 5% of “summer” photographs might have been taken in the Southern Hemisphere. More interesting, we think, are the off-by-one cases, like fall photographs labeled as “winter,” where we believe that the photo represents the experience of winter, regardless of the objective reality of the calendar. For example, if it snows the day after Thanksgiving, it definitely feels like winter.

On the topic of Thanksgiving, let’s look at photographs tagged “thanksgiving.”

Percentage of Photos Tagged "Thanksgiving"
The six days between November 22nd and 27th—the darkest blue area—cover 65% of the photos. Expanding that range to November 15–30th covers 83%. Expanding to all of November covers 85%, and including October (and thus Canadian Thanksgiving, in gray in early October) brings the total to 90%. But that means that 10% of all photos tagged “thanksgiving” are outside of this range. Every date in that image represents a total of a minimum of 40 photographs taken on that day between 2003 and 2014 inclusive, uploaded to Flickr and tagged “thanksgiving” with the only white spaces being days that don’t exist, like February 30th or April 31st. Manual verification of some of the public photos tagged “thanksgiving” on arbitrarily chosen dates finds these photographs tagged “thanksgiving” included pumpkins or turkeys, autumnal leaves or cornucopias—all images culturally associated with the holiday.

Not all temporal search terms are quite so complicated; some holidays are celebrated and photographed on a single day each year, like Canada Day (July 1st) or Boxing Day (December 26th). While these holidays can be easily translated to date queries, other holidays have more complicated temporal patterns. Have a look at these lunar holidays.

Lunar Holidays Tagged by Date

There are some events that occur on a lunar calendar like Chinese New Year, Easter, Eid (both al-Fitr and al-Adha), and Hanukkah. These events move around in a regular, algorithmically determinable, but sometimes complicated, way. Most of these holidays tend to oscillate as a leap calculation is added periodically to synchronize the lunar timing to the solar calendar. However Eids, on the Hijri calendar, have no such leap correction, and we see photos tagged “Eid” edge forward year after year.

Some holidays and events, like birthdays, happen on every day of the week. But they’re often celebrated, and thus photographed, on Friday, Saturday, and Sunday:

Day of the week tagged Birthday

So to get back to our original question: when are photos tagged “Christmas” actually taken?

Days tagged with Christmas

As you can see, more photos tagged “Christmas” are taken on December 25th than on any other day (19%). Christmas Eve is a close second, at 12%. If you look at other languages, this difference practically goes away: 9.2% of photos tagged “Noel” are taken on Christmas Eve, and 9.6% are taken on Christmas; “navidad” photos are 11.3% on Christmas Eve and 12.0% on Christmas. But Christmas photos are taken throughout December. We can now set a threshold for a definition of Christmas: say if at least 1% of the photos tagged “Christmas” were taken on that day, we’d rank it more relevant. That means that every day from December 1st to January 1st hits that definition, with December 2nd barely scraping in. That makes…32 days of Christmas!

Merry Christmas and Happy Holidays—for all the holidays you celebrate and photograph.

PS: Flickr is hiring! Labs is hiring! Come join us!

Flickr’s experience with iOS 9

In the last couple of months, Apple has released new features as part of iOS 9 that allow a deeper integration between apps and the operating system. Among those features are Spotlight Search integration, Universal Links, and 3D Touch for iPhone 6S and iPhone 6S Plus.

Here at Flickr, we have added support for these new features and we have learned a few lessons that we would love to share.

Spotlight Search

There are two different kinds of content that can be searched through Spotlight: the kind that you explicitly index, and the kind that gets indexed based on the state your app is in. To explicitly index content, you use Core Spotlight, which lets you index multiple items at once. To index content related to your app’s current state, you use NSUserActivity: when a piece of content becomes visible, you start an activity to make iOS aware of this fact. iOS can then determine which pieces of content are more frequently visited, and thus more relevant to the user. NSUserActivity also allows us to mark certain items as public, which means that they might be shown to other iOS users as well.

For a better user experience, we index as much useful information as we can right off the bat. We prefetch all the user’s albums, groups, and people they follow, and add them to the search index using Core Spotlight. Indexing an item looks like this:

// Create the attribute set, which encapsulates the metadata of the item we're indexing
CSSearchableItemAttributeSet *attributeSet = [[CSSearchableItemAttributeSet alloc] initWithItemContentType:(NSString *)kUTTypeImage];
attributeSet.title = photo.title;
attributeSet.contentDescription = photo.searchableDescription;
attributeSet.keywords = photo.keywords;
attributeSet.thumbnailData = UIImageJPEGRepresentation(photo.thumbnail, 0.98);

// Create the searchable item and index it.
CSSearchableItem *searchableItem = [[CSSearchableItem alloc] initWithUniqueIdentifier:[NSString stringWithFormat:@"%@/%@", photo.identifier, photo.searchContentType] domainIdentifier:@"FLKCurrentUserSearchDomain" attributeSet:attributeSet];
[[CSSearchableIndex defaultSearchableIndex] indexSearchableItems:@[ searchableItem ] completionHandler:^(NSError * _Nullable error) {
                       if (error) {
                           // Handle failures.
                       }
              }];

Since we have multiple kinds of data – photos, albums, and groups – we had to create an identifier that is a combination of its type and its actual model ID.

Many users will have a large amount of data to be fetched, so it’s important that we take measures to make sure that the app still performs well. Since searching is unlikely to happen right after the user opens the app (that’s when we start prefetching this data, if needed), all this work is performed by a low-priority NSOperationQueue. If we ever need to fetch images to be used as thumbnails, we request it with low-priority NSURLSessionDownloadTask. These kinds of measures ensure that we don’t affect the performance of any operation or network request triggered by user actions, such as fetching new images and pages when scrolling through content.

Flickr provides a huge amount of public content, including many amazing photos. If anybody searches for “Northern Lights” in Spotlight, shouldn’t we show them our best Aurora Borealis photos? For this public content – photos, public groups, tags and so on – we leverage NSUserActivity, with its new search APIs, to make it all searchable when viewed. Here’s an example:

CSSearchableItemAttributeSet *attributeSet = [[CSSearchableItemAttributeSet alloc] initWithItemContentType:(NSString *) kUTTypeImage];
// Setup attributeSet the same way we did before...
// Set the related unique identifier, so it matches to any existing item indexed with Core Spotlight.     
attributeSet.relatedUniqueIdentifier = [NSString stringWithFormat:@"%@/%@", photo.identifier, photo.searchContentType];
        
self.userActivity = [[NSUserActivity alloc] initWithActivityType:@"FLKSearchableUserActivityType"];
self.userActivity.title = photo.title;
self.userActivity.keywords = [NSSet setWithArray:photo.keywords];
self.userActivity.webpageURL = photo.photoPageURL;
self.userActivity.contentAttributeSet = attributeSet;
self.userActivity.eligibleForSearch = YES;
self.userActivity.eligibleForPublicIndexing = photo.isPublic;
self.userActivity.requiredUserInfoKeys = [NSSet setWithArray:self.userActivity.userInfo.allKeys];
        
[self.userActivity becomeCurrent];

Every time a user opens a photo, public group, location page, etc., we create a new NSUserActivity and make it current. The more often a specific activity is made current, the more relevant iOS considers it. In fact, the more often an activity is made current by any number of different users, the more relevant Apple considers it globally, and the more likely it will show up for other iOS users as well (provided it’s public).

Until now we’ve only seen half the picture. We’ve seen how to index things for Spotlight search; when a user finally does search and taps on a result, how do we take them to the right place in our app? We’ll get to this a bit later, but for now suffice it to say that you’ll get a call to the method application:continueUserActivity:restorationHandler: to our application delegate.

It’s important to note that if we wanted to make use of the userInfo in the NSUserActivity, iOS won’t give it back to you for free in this method. To get it, we have to make sure that we assigned an NSSet to the requiredUserInfoKeys property of our NSUserActivity when we created it. In their documentation, Apple also tells us that if you set the webpageURL property when eligibleForSearch is YES, you need to make sure that you’re pointing to the right web URL corresponding to your content, otherwise you might end up with duplicate results in Spotlight (Apple crawls your site for content to surface in Spotlight, and if it finds the same content at a different URL it’ll think it’s a different piece of content).

Universal Links

In order to support Universal Links, Apple requires that every domain supported by the app host an “apple-app-site-association” file at its root. This is a JSON file that describes which relative paths in your domains can be handled by the app. When a user taps a link from another app in iOS, if your app is able to handle that domain for a specific path, it will open your app and call application:continueUserActivity:restorationHandler:. Otherwise your application won’t be opened – Safari will handle the URL instead.

{
    "applinks": {
        "apps": [],
        "details": {
            "XXXXXXXXXX.com.some.flickr.domain": {
                "paths": [
                    "/",
                    "/photos/*",
                    "/people/*",
                    "/groups/*"
                ]
            }
        }
    }
}

This file has to be hosted on HTTPS with a valid certificate. Its MIME type needs to be “application/pkcs7-mime.” No redirects are allowed when requesting the file. If the only intent is to support Universal Links, no further steps are required. But if you’re also using this file to support Handoffs (introduced in iOS 8), then your file has to be CMS signed by a valid TLS certificate.

In Flickr, we have a few different domains. That means that each one of flickr.com, http://www.flickr.com, m.flickr.com and flic.kr must provide its own JSON association file, whether or not they differ. In our case, the flic.kr domain actually does support different paths, since it’s only used for short URLs; hence, its “apple-app-site-association” is different than the others.

On the client side, only a few steps are required to support Universal Links. First, “Associated Domains” must be enabled under the Capabilities tab of the app’s target settings. For each supported domain, an entry “applinks:” entry must be added. Here is how it looks for Flickr:

Screen Shot 2015-10-28 at 2.00.59 PM

That is it. Now if someone receives a text message with a Flickr link, she will jump right to the Flickr app when she taps on it.

Deep linking into the app

Great! We have Flickr photos showing up as search results and Flickr URLs opening directly in our app. Now we just have to get the user to the proper place within the app. There are different entry points into our app, and we need to make the implementation consistent and avoid code duplication.

iOS has been supporting deep linking for a while already and so has Flickr. To support deep linking, apps could register to handle custom URLs (meaning a custom scheme, such as myscheme://mydata/123). The website corresponding to the app could then publish links directly to the app. For every custom URL published on the Flickr website, our app translates it into a representation of the data to be shown. This representation looks like this:

@interface FLKRoute : NSObject

@property (nonatomic) FLKRouteType type;
@property (nonatomic, copy) NSString *identifier;

@end

It describes the type of data to present, and a unique identifier for that type of data.

- (void)navigateToRoute:(FLKRoute *)route
{
    switch (route.type) {
        case FLKRouteTypePhoto:
            // Navigate to photo screen
            break;
        case FLKRouteTypeAlbum:
           // Navigate to album screen
            break;
        case FLKRouteTypeGroup:
            // Navigate to group screen
            break;
        // ...
        default:
            break;
    }
}

Now, all we have to do is to make sure we are able to translate both NSURLs and NSUserActivity objects into FLKRoute instances. For NSURLs, this translation is straightforward. Our custom URLs follow the same pattern as the corresponding website URLs; their paths correspond exactly. So translating both website URLs and custom URLs is a matter of using NSURLComponents to extract the necessary information to create the FLKRoute object.

As for NSUserActivity objects passed into application:continueUserActivity:restorationHandler:, there are two cases. One arises when the NSUserActivity instance was used to index a public item in the app. Remember that when we created the NSUserActivity object we also assigned its webpageURL? This is really handy because it not only uniquely identifies the data we want to present, but also gives us a NSURL object, which we can handle the same way we handle deep links or Universal Links.

The other case is when the NSUserActivity originated from a CSSearchableItem; we have some more work to do in this case. We need to parse the identifier we created for the item and translate it into a FLKRoute. Remember that our item’s identifier is a combination of its type and the model ID. We can decompose it and then create our route object. Its simplified implementation looks like this:

FLKRoute * FLKRouteFromSearchableItemIdentifier(NSString *searchableItemIdentifier)
{
    NSArray *routeComponents = [searchableItemIdentifier componentsSeparatedByString:@"/"];
    if ([routeComponents count] != 2) { // type + id
        return nil;
    }
    
    // Handle the route type
    NSString *searchableItemContentType = [routeComponents firstObject];
    FLKRouteType type = FLKRouteTypeFromSearchableItemContentType(searchableItemContentType);
    
    // Get the item identifier
    NSString *itemIdentifier = [routeComponents lastObject];
    
    // Build the route object
    FLKRoute *route = [FLKRoute new];
    route.type = type;
    route.parameter = itemIdentifier;
    
    return route;
}

Now we have all our bases covered and we’re sure that we’ll drop the user in the right place when she lands in our app. The final application delegate method looks like this:

- (BOOL)application:(nonnull UIApplication *)application continueUserActivity:(nonnull NSUserActivity *)userActivity restorationHandler:(nonnull void (^)(NSArray * __nullable))restorationHandler
{
    FLKRoute *route;
    NSString *activityType = [userActivity activityType];
    NSURL *url;
    
    if ([activityType isEqualToString:CSSearchableItemActionType]) {
        // Searchable item from Core Spotlight
        NSString *itemIdentifier = [userActivity.userInfo objectForKey:CSSearchableItemActivityIdentifier];
        route = FLKRouteFromSearchableItemIdentifier(itemIdentifier);
        
    } else if ([activityType isEqualToString:@"FLKSearchableUserActivityType"] ||
               [activityType isEqualToString:NSUserActivityTypeBrowsingWeb]) {
        // Searchable item from NSUserActivity or Universal Link
        url = userActivity.webpageURL;
        route = [url flk_route];
        
    }
    
    if (route) {
        [self.router navigateToRoute:route];
        return YES;
    } else if (url) {
        [[UIApplication sharedApplication] openURL:url]; // Fail gracefully
        return YES;
    } else {
        return NO;
    }
}

3D Touch

With the release of iPhone 6S and iPhone 6S Plus, Apple introduced a new gesture that can be used with your iOS app: 3D Touch. One of the coolest features it has brought is the ability to preview content before pushing it onto the navigation stack. This is also known as “peek and pop.”

You can easily see how this feature is implemented in the native Mail app. But you won’t always have a simple UIView hierarchy like Mail’s UITableView, where a tap anywhere on a cell opens a UIViewController. Take Flickr’s notifications screen, for example:

4.0-04-core-five-notifications

If the user taps on a photo in one of these cells, it will open the photo view. But if the user taps on another user’s name, it will open that user’s profile view. Previews of these UIViewControllers should be shown accordingly. But the “peek and pop” mechanism requires you to register a delegate on your UIViewController with registerForPreviewingWithDelegate:sourceView:, which means that you’re working in a much higher layer. Your UIViewController’s view might not even know about its subviews’ structures.

To solve this problem, we used UIView’s method hitTest:withEvent:. As the documentation describes, it will give us the “farthest descendant of the receiver in the view hierarchy.” But not every hitTest will necessarily return the UIView that we want. So we defined a protocol, FLKPeekAndPopTargetView, that must be implemented by any UIView subclass that wants to support peeking and popping from it. That view is then responsible for returning the model used to populate the UIViewController that the user is trying to preview. If the view doesn’t implement this protocol, we query its superview. We keep checking for it until a UIView is found or there aren’t any more superviews available. This is how this logic looks:

+ (id)modelAtLocation:(CGPoint)location inSourceView:(UIView*)sourceView
    
    // Walk up hit-test tree until we find a peek-pop target.
    UIView *testView = [sourceView hitTest:location withEvent:nil];
    id model = nil;
    while(testView && !model) {
      
        // Check if the current testView conforms to the protocol.
        if([testView conformsToProtocol:@protocol(FLKPeekAndPopTargetView)]) {
            
            // Translate location to view coordinates.
            CGPoint locationInView = [testView convertPoint:location fromView:sourceView];
            
            // Get model from peek and pop target.
            model = [((id<FLKPeekAndPopTargetView>)testView) flk_peekAndPopModelAtLocation:locationInView];
            
        } else {
            //Move up view tree to next view
            testView = testView.superview;
        }
    }
    
    return model;
}

With this code in place, all we have to do is to implement UIViewControllerPreviewingDelegate methods in our delegate, perform the hitTest and take the model out of the FLKPeekAndPopTargetView‘s implementor. Here’s is the final implementation:

- (UIViewController *)previewingContext:(id<UIViewControllerPreviewing>)previewingContext
              viewControllerForLocation:(CGPoint)location {
    
    id model = [[self class] modelAtLocation:location inSourceView:previewingContext.sourceView];
    UIViewController *viewController = nil;
    if ([model isKindOfClass:[FLKPhoto class]]) {
        viewController = // ... UIViewController that displays a photo.
    } else if ([model isKindOfClass:[FLKAlbum class]]) {
        viewController = // ... UIViewController that displays an album.
    } else if ([model isKindOfClass:[FLKGroup class]]) {
        viewController = // ... UIViewController that displays a group.
    } // ...
    return viewController;
    
}

- (void)previewingContext:(id<UIViewControllerPreviewing>)previewingContext
     commitViewController:(UIViewController *)viewControllerToCommit {
    
    [self.navigationController pushViewController:viewControllerToCommit animated:YES];
    
}

Last but not least, we added support for Quick Actions. Now the user has the ability to quickly jump into a specific section of the app just by pressing down on the app icon. Defining these Quick Actions statically in the Info.plist file is an easy way to implement this feature, but we decided to go one step further and define these options dynamically. One of the options we provide is “Upload Photo,” which takes the user to the asset picker screen. But if the user has Auto Uploadr turned on, this option isn’t that relevant, so instead we provide a different app icon menu option in its place.

Here’s how you can create Quick Actions:

NSMutableArray<UIApplicationShortcutItem *> *items = [NSMutableArray array];
    
[items addObject:[[UIApplicationShortcutItem alloc] initWithType:@"FLKShortcutItemFeed"
                                                  localizedTitle:NSLocalizedString(@"Feed", nil)]];
    
[items addObject:[[UIApplicationShortcutItem alloc] initWithType:@"FLKShortcutItemTakePhoto"
                                                  localizedTitle:NSLocalizedString(@"Upload Photo", nil)] ];

[items addObject:[[UIApplicationShortcutItem alloc] initWithType:@"FLKShortcutItemNotifications"
                                                  localizedTitle:NSLocalizedString(@"Notifications", nil)]];
    
[items addObject:[[UIApplicationShortcutItem alloc] initWithType:@"FLKShortcutItemSearch"
                                                  localizedTitle:NSLocalizedString(@"Search", nil)]];
    
[[UIApplication sharedApplication] setShortcutItems:items];

And this is how it looks like when the user presses down on the app icon:

IMG_0344

Finally, we have to handle where to take the user after she selects one of these options. This is yet another place where we can make use of our FLKRoute object. To handle the app opening from a Quick Action, we need to implement application:performActionForShortcutItem:completionHandler: in the app delegate.

- (void)application:(UIApplication *)application performActionForShortcutItem:(UIApplicationShortcutItem *)shortcutItem completionHandler:(void (^)(BOOL))completionHandler {
    FLKRoute *route = [shortcutItem flk_route];
     [self.router navigateToRoute:route];
    completionHandler(YES);
}

Conclusion

There is a lot more to consider when shipping these features with an app. For example, with Flickr, there are various platforms the user could be using. It is important to make sure that the Spotlight index is up to date to reflect changes made anywhere. If the user has created a new album and/or left a group from his desktop browser, we need to make sure that those changes are reflected in the app, so the newly-created album can be found through Spotlight, but the newly-departed group cannot.

All of this work should be totally opaque to the user, without hogging the device’s resources and deteriorating the user experience overall. That requires some considerations around threading and network priorities. Network requests for UI-relevant data should not be blocked because we have other network requests happening at the same time. With some careful prioritizing, using NSOperationQueue and NSURLSession, we managed to accomplish this with no major problems.

Finally, we had to consider privacy, one of the pillars of Flickr. We had to be extremely careful not to violate any of the user’s settings. We’re careful to never publicly index private content, such as photos and albums. Also, photos marked “restricted” are not publicly indexed since they might expose content that some users might consider offensive.

In this blog post we went into the basics of integrating iOS 9 Search, Universal Links, and 3D Touch in Flickr for iOS. In order to focus on those features, we simplified some of our examples to demonstrate how you could get started with them in your own app, and to show what challenges we faced.

Flickr September 2014

Like this post? Have a love of online photography? Want to work with us? Flickr is hiring mobile, back-end and front-end engineers, in our San Francisco office. Find out more at flickr.com/jobs.

Perceptual Image Compression at Flickr

Archie Russell, Peter Norby, Saeideh Bakhshi

At Flickr our users really care about image quality.  They also care a lot about how responsive our apps are.  Addressing both of these concerns simultaneously is challenging;  higher quality images have larger file sizes and are slower to transfer.   Slow transfers are especially noticeable on mobile devices.   Flickr had historically aimed for high quality at the expense of larger files, but in late 2014 we implemented a method to both maintain image quality and decrease the byte-size of the images we serve to users.   As image appearance is very important to our users,  we performed an extensive user test before rolling this change out.   Here’s how we did it.

Background:  JPEG Quality Settings

Fig 1.    JPEG settings vs file size for a test image.

JPEG compression has several tuneable knobs.   The q-value is the best known of these; it adjusts the level of spatial detail stored for fine details;  a higher q-value typically keeps more detail.    However,  as q-value gets very close to 100,  file size increases dramatically,  usually without improving image appearance.

If file size and app performance isn’t an issue,  dialing up q-value is an easy way to get really nice-looking images; this is what Flickr has done in the past.    And if appearance isn’t very important,  dialing down q-value is a viable option.    But if you want both,  you’re kind of stuck.   Additionally,  q-value isn’t one-size-fits-all,  some images look great at q-value 80 while others don’t.

Another commonly adjusted setting is chroma-subsampling,  which alters the amount of color information stored in a JPEG file.    With a setting of 4:4:4,  the two chroma (color) channels in a JPG have as much information as the luminance channel.   In an image with a setting of 4:2:0, each chroma channel has only a quarter as much information as in an a 4:4:4 image.

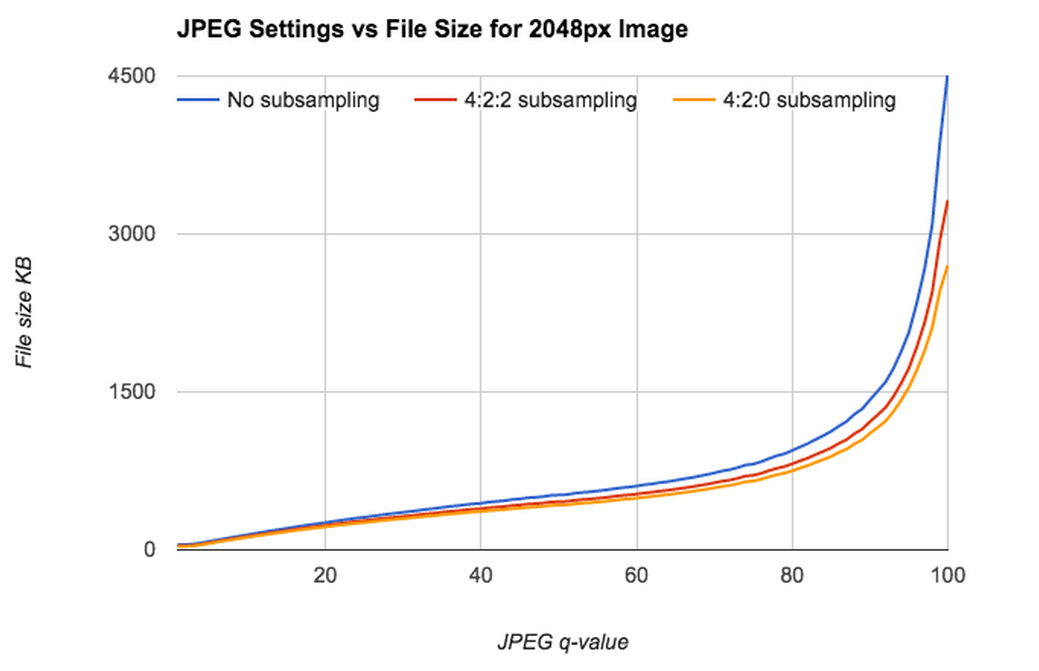
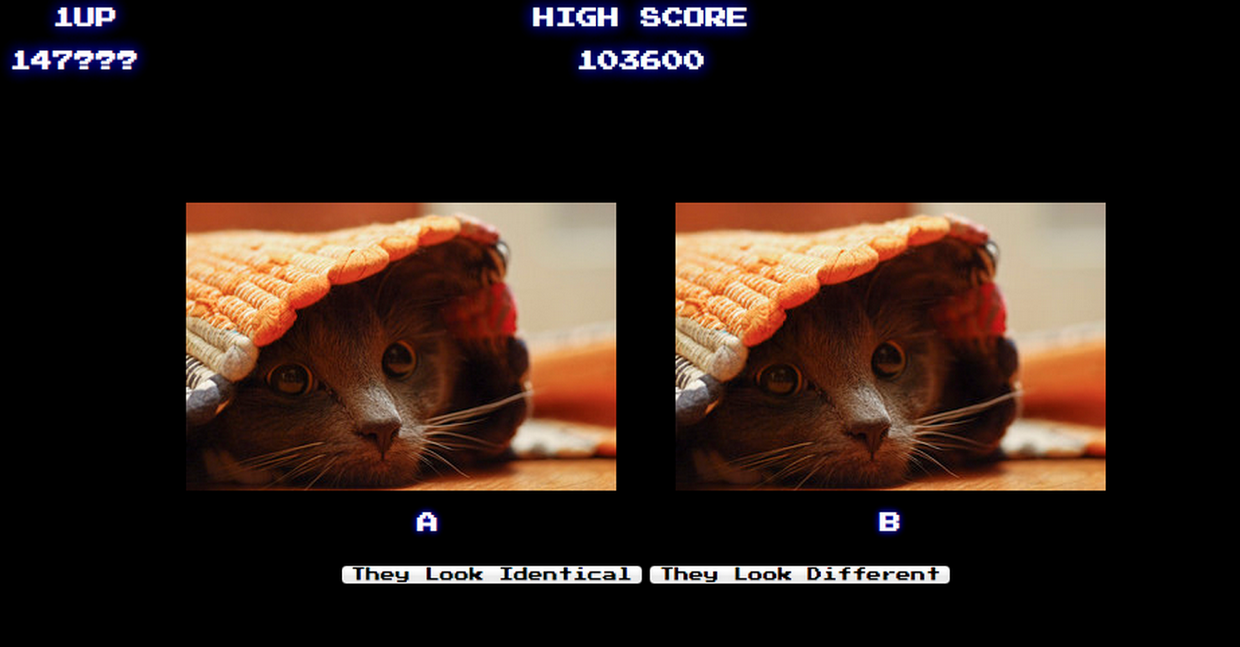
 q=96,  chroma=4:4:4 (125KB) q=70, chroma=4:4:4 (67KB)
q=96, chroma=4:2:0 (62KB)  q=70, chroma=4:2:0 (62KB)

Table 1:   JPEG stored at different quality and chroma levels.   The upper left image is saved at high quality and chroma level; notice the color and detail in the folds of the red flag.   The lower right image has the lowest quality;  notice artifacts along the right edges of the red flag.

Perceptual JPEG Compression

Ideally we’d have an algorithm which automatically tuned all JPEG parameters to make a file smaller, but which would limit perceptible changes to the image.  Technology exists that attempts to do this and can decrease image file size by 30-50%. This compression ratio is highly dependent on image content and dimensions.

compressed: 112KB non-compressed: 224KB

Fig 2. Compressed cropped JPEG is 50% smaller than not-compressed cropped JPEG, above, with no obvious defects.  Compression ratio is similar for a compressed 2048-pixel wide JPEG (475KB) of the entire scene and its corresponding not-compressed JPEG (897KB). 

We were pleased with perceptually compressed images in non-structured examinations.  The compressed images were smaller and nearly indistinguishable from their sources.   But we wanted to really quantify how well the technology worked before considering incorporating it into Flickr.  The standard computational tools for evaluating compression, such as SSIM, are fairly simplistic and don’t do a great job at modeling how a user sees things.  To really evaluate this technology had to use a better measure of perceptibility:  human minds.

The Gamified Taste Test

To test whether our image compression would impact user perception of image quality, we put together a “taste test.”  The taste test is constructed as a game with multiple rounds where users look at both compressed and uncompressed images.  Users accumulate points the longer they play, and get more points for doing well at the game.  We maintained a leaderboard to encourage participation and used only internal testers.The game’s test images came from a diverse collection of 250 images contributed by Flickr staff.  The images came from a variety of cameras and included a number of subjects from photographers with varying skill levels.

sampling of images used in taste test
Fig 3. A sampling of images used in our taste test.

In each round, our test code randomly select a test image, and present two variants of this image side by side.  50% of the time we present the user two identical images; the rest of the time we present one compressed image and one uncompressed image.  We ask the tester if the two images look the same or different and we’d expect a user choosing randomly OR a user unable to distinguish the two cases would answer correctly about half the time.  We randomly swap the location of the compressed images to compensate for user bias to the left or the right.  If testers choose correctly, they are presented with a second question: “Which image did you prefer, and why?”

two kittens in a video game
Fig 4. Screenshot of taste test.

Our test displays images simultaneously to prevent testers noticing a longer load time for the larger, non-compressed image.  The images are presented with either 320, 640, or 1600 pixels on their longest side.  The 320 & 640px images are shown for 12 seconds before being dimmed out.  The intent behind this detail is to represent how real users interact with our images.  The 1600px images stay on screen for 20 seconds, as we expect larger images to be viewed for longer periods of time by real users.   We award 100 points per round, regardless of whether a tester chose correctly and also award a bonus of 400 points when a tester correctly identifies whether images were identical or different.  We update the tester’s score every five tests so that the user perceives an increasing score without being rewarded immediately for any particular behavior.

Taste Test Outcome and Deployment

We ran our taste test for two weeks and analyzed our results.    Although we let users play as long as they liked,  we skipped the first result per user as a “warm-up” and considered only the subsequent ten results,  this limited the potential for users training themselves to spot compression artifacts.   We disregarded users that had fewer than eleven results.

images total results # labeled “identical” by tester % labeled “identical” by tester
two identical images 368 253 68.8%
one compressed, one non-compressed 352 238 67.6%

Table 2.   Taste test results.   Testers select “identical” at nearly the same rate, whether the input is identical or not.

When our testers were presented with two identical images, they thought the images were identical only 68.8% of the time(!), and when presented with a compressed image next to a non-compressed image,  our testers thought the images were identical slightly less often:  67.6% of the time.  This difference was small enough for us,  and our statisticians told us it was statistically insignificant.  Our image pairs were so similar that multiple testers thought all images were identical and reported that the test system was buggy. We inspected the images most often labeled different, and found no significant artifacts in the compressed versions.

So even in this side-by-side test,  perceptual image compression is just barely noticeable when images are presented side-by-side.  As the Flickr website wouldn’t ever show compressed and uncompressed images at the same time, and the use of compression had large benefits in storage footprint and site performance, we elected to go forward.

At the beginning of 2014 we silently rolled out perceptual-based compression on our image thumbnails (we don’t alter the “original” images uploaded by our users).  The slight changes to image appearance went unnoticed by users, but user interactions with Flickr became much faster,  especially for users with slow connections, while our storage footprint became much smaller.  This was a best-case scenario for us.

Evaluating perceptual compression was a considerable task,  but it gave the confidence we needed to apply this compression in production to our users.    This marked the first time Flickr had adjusted image settings in years, and, it was fun.
High Score List
Fig 5.  Taste test high score list

Epilogue

After eighteen months of perceptual compression at Flickr,  we adjusted our settings slightly to shrink images an additional 15%.   For our users on mobile devices,  15% fewer bytes per image makes for a much more responsive experience.We had run a taste test on this newer setting and users were were able to spot our compression slightly more often than with our original settings.   When presented a pair of identical images, our testers declared these images identical 65.2% of the time,  when presented with different images,  of our testers declared the images identical 62% of the time.   It wasn’t as imperceptible as our original approach, but, we decided it was close enough to roll out.

Boy were we wrong!   A few very vocal users spotted the compression and didn’t like it at all.    The Flickr Help Forum had a very lively thread which Petapixel picked up.  We beat our heads against the wall considered our options and came up with a middle path between our initial and follow-on approaches,  giving us smaller, faster-to-load files while still maintaining the appearance our users expect.

Through our use of perceptual compression,  combined with our use of on-the-fly resize and COS,  we’ve been able to decrease our storage footprint dramatically, while simultaneously improving user experience. It’s a win all around but we’re not done yet — we still have a few tricks up our sleeves.

Powering Flickr’s Magic view by fusing bulk and real-time compute

Try it for yourself!

You can try out Flickr’s Magic View on your own photos here, and you can download a working code sample of the simplified lambda architecture here: https://github.com/yahoo/simplified-lambda

Introduction

In this post we’re going to talk about how we came up with a novel revision of the Lambda Architecture for fusing large-scale bulk compute with streaming compute to power Flickr’s Magic View. We were able to create a responsive, real time database operating at a scale of tens of billions of records, with tens to hundreds of millions of records updated per day. We turned to Yahoo’s Hadoop stack to find a way to build this at the massive scale we needed.

Magic View

Figure 1. Magic View in action

Motivation: the Magic View

Flickr’s Magic View takes the hassle out of organizing your photos by applying our computer-vision technology to automatically recognize objects or styles in your photos and present them to you in the Camera Roll’s scrolling view. This all happens in real time as soon as a photo is uploaded, it is categorized and placed into the Magic View.

Aggregating computer vision tags

When a photo is uploaded, it is processed by a computer vision pipeline to generate a set of computer vision tags, which are text labels of the contents of the image. We already had an existing architecture for stream computation of tags on upload, but to implement the Magic View, we needed to maintain per-user reverse indexes and some aggregations of the tags. And we needed to make sure all the data was consistent if a photo was added, removed or updated these indexes and aggregations would have to be updated to reflect this. Finally, we needed to initialize the system with tags for 12 billion photos and videos and run periodic backfills (every time we improved our computer vision algorithms and to cover cases where the stream compute missed images).

The Problem

We initially computed a snapshot of the Magic View indexes and aggregations using map-reduce (via Apache Oozie and Apache Pig), and we were happy with the quick turnaround time (about 7 hours). We considered updating Magic View as a daily batch job, but soon realized this would not give our users the responsive, “live” experience we wanted. So, we built a streaming data layer using Apache Storm and were soon able to update the categories in Magic View in real-time.

The next time we needed to run a backfill, we explored using this streaming layer to load the data. Unfortunately, the overhead of the read-modify-write process was simply too much for a load of this size — after kicking off the process we estimated it would take 28 days this way — much longer than the seven hours we had achieved with a bulk load.

Twenty-eight days was a non-starter – we realized we needed a way to update our bulk aggregations independently of the real-time data streaming in. Solving this problem is how we arrived at our revision to Lambda Architecture. Before digging into the solution, let’s do a quick review of the Lambda Architecture.  If you’re already familiar with it, you can skip this next section.

The Lambda Architecture

We’ll start with Nathan Marz’s book ‘Big Data’, which proposes the database concept of  ‘Lambda Architecture.’ In his analysis, he states that a database query can be represented as a function – Query – which operates on all the data:

result = Query(all data)

In the Lambda architecture, a traditional database is replaced with both a real time and a bulk database. Then query function becomes a “combiner” function of independent queries to each database:

result = Combiner(Query(real time data) + Query(bulk data))

An example of a typical Lambda Architecture is shown in figure 2. It is powered by an append-only queue for its system of record, which is fed by a real time stream of events. Periodically, all the data in the queue is fed into a bulk computation which pre-processes the data to optimize it for queries, and stores these aggregations in a bulk compute database. The real time event stream drives a stream computer, which processes the incoming events into real time aggregations. A query then goes via a query combiner, which queries both the bulk and real time databases, computes the combination, and stores the result.

Typical Lambda Architecture

Figure 2. Typical Lambda Architecture

While relatively new, Lambda Architecture has enjoyed popularity and a number of concrete implementations have been built. Some significant examples are the distributed analytics platform druid, Twitter’s Summingbird, and FiloDB. These implementations conveniently abstract away the databases behind the query combiner.

A significant advantage with this style of architecture is robustness and fault-tolerance via eventual consistency. If a piece of data is skipped in the real time compute there is a guarantee that it will eventually appear in the bulk compute database.

Criticism of the Lambda Architecture has centred around the complicated nature of the combiner. The combiner incurs a developer and systems cost from the need to maintain two different databases. It can be challenging to make sure both systems give the same result. Merging the two queries can become complicated, and finally, more points of failure may be introduced.

The “Ah-ha” Moment

Back to the problem. The data access layer we used for streaming compute uses the atomic read-modify-write pattern to ensure we write consistent data, one record-at-a-time to Apache HBase (a BigTable-style, non-relational database). Again, since this pattern was so much slower in the backfill case we needed to figure out how to get both consistent updates for streaming and  fast loads of the full dataset. Since our bulk data was static, we realized that if we relaxed the consistency constraint we could just run a fast, streaming, write-only load of the bulk data, bringing the load time back down to hours instead of days.

But how could we get around the consistency requirements? We didn’t want a bulk load to clobber data being written from the real time compute process. The insight was that we could just write bulk and streaming data to different column families in the same HBase row. So we added the concept of real time columns and bulk columns in a single row. Basically, bulk loads write to one set of columns and real time writes go to a different set of columns. Since HBase columns are sparse and data is updated relatively slowly we don’t pay much in storage or IO.

We could  now simplify the equation back to:

result = Combiner(Query(data))

The two sets of columns are managed separately by the real time and bulk subsystems. At query time, we perform a single fetch using the HBase API to get both the bulk and real time data. A separate combiner process assembles the final result.

Implementation

 Magic View backend system overview

Figure 3. Magic View Architecture

Figure 3 shows an overview of the system and our enhanced Lambda architecture. For the purposes of this discussion, a convenient abstraction is to consider that each row in the HBase table represents the current state of a given photo. The combiner stage is abstracted into a single Java process, which collects data from HBase and runs transformations on the data and sends it to a Redis cache which is used by the serving layer for the site.

Consistency on read in HBase — the combiner

We have two sets of columns to go with each row in HBase: bulk and real time. The combiner determines the final value for each attribute at read. In the case where data exists for real time but not for bulk (or vice versa) then there is only one value to choose. In the case where they both exist we always choose the real time value. This keeps the combiner very simple and fast.

There is a trick though – whenever we do a backfill, we may need to repair the row since the backfill data may be newer than any real time data that is already present. It turns out this slows down the backfill from seven hours to about 14 — still far faster than loading with read-modify-write.

Production throughput

At scale, this architecture has been able to keep up very comfortably with production load. We can simultaneously run backfills to HBase and serve user information at the same time without impacting latency or the user experience.

User experience

An important measure for how the system works is how the viewer perceives it. The slowest part of the system is paging data from HBase into the serving cache; median time for above-the-fold latency – i.e. enough data is available to render the page – is around 10ms.

Future directions

Our experience has been very positive so far with Magic View and we’re looking at how we might enable users to browse their photos in other dimensions (location or color for example). Early tests have shown that building an OLAP or data cube in this architecture is certainly possible but it’s less clear that it will scale well.

Contributors: Peter Welch, Bhautik Joshi, Hugo Haas, Srinivasan Singanallur, Ayan Ray, Pierre Garrigues, Ben Firestone, Sai Madhavan, Tim Miller

Thanks to Nathan Marz for reviewing this post.

Flickr September 2014

Like this post? Have a love of online photography? Want to work with us? Flickr is hiring mobile, back-end and front-end engineers, in our San Francisco office. Find out more at flickr.com/jobs.

The Data Freshener


Change

You may have noticed some changes in Flickr a couple months back. Like, half the site changed. 95% even, by some metrics. Some say CHANGE IT BACK! while others welcome change. Whatever your thoughts, the changes are here, and they mean things. For example, they mean new visual design and better usability. They mean a faster site. Unfortunately, up until recently, they also meant more stale data. Yuck.

Change
Change
 

Why? What? Well…here’s the deal. We have a new-ish frontend stack we’ve been using for the past couple years now. It’s an isomorphic single-page application, runs on node.js, and is generally awesome. We call it Reboot.

hi there / i am the computer
Reboot
 

In the World of Reboot, we treat data with kid gloves. We <3 data. We never want to give it up, never want to let it down. Once we pull data from our APIs, we store the fetched data in your browser so that we don’t have to fetch it again the next time it’s needed. This means faster page loads and faster navigation, and less API traffic (and thus a more stable and scalable API). The data cached in your browser exists as long as the current Reboot session — until you refresh or leave Reboot for a non-Rebooted page.

However, this also meant that data could become stale. You change the date taken of your photo, someone else adds a comment, you navigate to a page with cached data…and you don’t see the changes. Wat? Yeah. So, this was not a huge problem until we moved lots of pages onto Reboot in the beginning of May. From that point forward, most Flickr user sessions have spent their entirety on Reboot, feeding off the same stale loaves of cached data.

The thinking (design / prototypes)

We considered a number of possibilities for freshening up data during a user session. A brief history of the strategies we sampled, and their results:

1. Refresh on update

Ice Tea
 

The first stab focused on updating data locally after it was changed by the user. Most of our simpler use cases already updated as expected, but some trickier cases with indirect relationships did not. For example, changing the date taken of a photo updated the data model for the photo, but deleting a photo did not necessarily ensure the photo was removed from all the cached albums, groups, and galleries to which it belonged. (Note that the photo was removed correctly from the backend, just not from the cached representation of those entities on the client.)

Cleaning up these relationships using change events between models helped, but didn’t solve all our problems. When someone outside of the local session (read: another user) changed data, it would not reflect in the current session. The only way to catch changes from outside the current session was to be more aggressive about evicting models.

2. Nuclear option

The pendulum swung all the way in the other direction — instead of surgical removal of data models we knew to be out-of-date, what would happen if we removed all cached data on every navigation? This prototype was quick to build, and incredibly destructive. By doing this, all our cached data always remained as fresh as could be, but we essentially reverted to Web 1.0 — with the exception of the Reboot framework, everything was reloaded on every page.

Not surprisingly, this blew up API traffic (locally only! did not unleash that disaster at scale), and inflated page load times like a Jeff Koons sculpture. It did give us some baseline timing metrics we could point to as worst-case scenarios, however. The next step was to swing the pendulum back toward the middle — to a carefully-knitted solution that would preserve fast page loads and navigation, while ensuring the freshest data we could serve up.

3. Refetch on navigate

fetched
 

At this point, our challenge was to find a solution that would keep navigation fast, API traffic slim, and pick up all changes to session data, whether local or remote. We ended up with a solution we call “refetching”: evicting and requesting new data models as the model is needed by the application. But when?
We could refetch periodically or on a user action; we determined that the best time to trigger a refetch was on navigation — when the user navigates, cached models become eligible for refetching. Specifically, when the user navigates between sections of the site, refetching is triggered. This proved to be the happiest medium between speed and freshness.

A high-level outline of how the refetching strategy works:

  • The user loads a page; data are requested from the API, and models are cached. As new models are created, they’re marked as being fresh.
  • The user navigates to another site section (e.g. Photostream → Search); all freshness marks are removed from all models. They’re now all eligible for refetching.
  • As Reboot builds the new page, it requests data models from the cache. Since they no longer have their seal of freshness, they are refetched, and marked as fresh once retrieved and cached.

One important note — refetching is not triggered on browser back/forward navigation. Users expect near-immediate navigation, thanks to browser caching, when navigating to already-viewed content. Therefore, we refetch only when the user clicks a link to navigate to a new site section.

4. Miscellany

There were a couple other options we considered and rejected from the start, but they’re worth mentioning here.

One was a TTL (time-to-live) algorithm, commonly used in caching applications. TTL algorithms expire data and evict from the cache a certain amount of time after they’re written or last updated. The arbitrary nature of TTL would mean that users would sometimes have fresh data and sometimes stale; it would be fresh more often than without any solution, but freshness would vary arbitrarily and would not result in much of an improvement on user experience.

The other was to write an algorithm that tracks the amount of time since a data model was last accessed, and refetch when it grows too old. While this sounded interesting at first, it has the same flaw as a standard TTL algorithm — freshness becomes arbitrary. It’s also more complex to implement, and might end up not being worth the complexity.

The doing (implementation)

So that was it! Refetch on navigate, all done. Right?….of course not. With the general strategy in place, the devil started sneaking around in all the details. Some of the highlights:

Exemptions

It proved to be not the best idea to evict on all navigation. For example, in Reboot we often preload photo metadata models on pages with lists of photos, in order to make navigation into the photo page snappy. The refetch setup therefore has an exemption config that allows us to easily retain models when navigating into, away from, or between specific site sections.

Child models

We often have parent-child associations between data models. For example, the data model for a photo has a reference to a data model for the author of the photo. When the photo model is refetched, the person model must be refetched as well. This means the function doing the eviction and refetching has to recurse through all child models.

Collections

An issue similar to child models above, but more complex, is the case of a model containing a list of other models. For example, the data model for a person’s photostream contains a list of photo models.

What made this particularly tricky is pagination and filtering — say you load the first 2 pages of your photostream, set your view filter to private, jump to page 5, switch the view to “Date taken”, and navigate away and back to your photostream…imagine the mess of different models with partially-loaded collections. Evicting one parent model, and its children, might evict photo models from the collection within another, without properly refetching. The solution here actually lay in the controller responsible for fetching pages: if a requested page of models is not already completely in-cache, a refetch will always happen to ensure we have all the data, in its freshest state.

Refetch only once per page view

Critical to the refetch-on-navigation strategy is to refetch only once per navigation. This was not too difficult, but essential to get right. We accomplish this by adding a flag when a model is initially fetched and upserted into the cache. When navigating to a new, non-exempt site section, all those flags are cleared, and any model requested by the new page will be refetched. When refetched, the model is again upserted into the cache and marked as fresh, until the next navigation.

But did it fresh?

Go on without me
 

With the thinking and the doing out of the way, it was time to push all this to production. Because these changes are essentially pulling the rug out from underneath the data layer on every navigation, we had to tread very carefully in order to prevent any negative impact to the end user experience.

We did very thorough manual and automated testing across all of Reboot. We left the feature turned on for staff users for a while, to be able to respond to any bug reports. Finally, the time came to test on Real People. There were three things we needed to keep an eye on: errors (of course), impact on page navigation timing, and API traffic. Since refetching implies more requests for data, we needed to be sure that we were keeping the user experience smooth and fast, and also that we weren’t blowing up our data centers.

In order to get a good read on these things, though, we had to go all in. Letting in just a small percentage of users would not give reliable numbers for timing or traffic impacts, due to the noise inherent in relatively small sample sizes. So, we did something unusual: we turned on refetching for all users for a short period of time. We flipped on refetching and kept an eagle eye on our stats for 2 hours, then reverted; then, we took a careful look at the aggregated data to see how the experiment went.

Surprisingly, the impact on both timing and traffic was relatively low. After some thought, we decided this is most likely because the changes disproportionately impact people on long sessions, say a Flickr tab open for hours or days. Most people don’t hang around that long; they come, they go. Also, the photo page represents north of 90% of our page views, and is exempt from refetching (see Exemptions above).

So where did we end up? A negligible bump in navigation timing and API traffic, and fresher data for all. Perhaps an anticlimactic resolution, but the story we’ve heard today outlines a serious consideration for anyone building an application with a data caching layer: keep in mind from the beginning how you plan to deal with stale data, but in a way that keeps all the other benefits of a single-page application.

#CCC is a breadcat
Busting through staleness. Yep.

Optimizing Caching: Twemproxy and Memcached at Flickr

Introduction

Flickr places a high priority on our users’ experience, and a critical part of that experience is the speed of the interface.  Regardless of the client you use to access Flickr, caching the proper data and the speed at which our servers can access cached data is critical to delivering on that quality user experience.  The more effective our caching strategy is, the better the Flickr experience will be for our users.  This is true for all the layers of caching we deploy at Flickr from the photo caches to the process data caches buried deep in the system.  In a previous post, we looked at how regional photo caching improved photo serving time in other countries, in this post we’re going to dive down into the innards of Flickr’s software stack and take a look at how we improved Memcached performance for our backend systems.

Back in the olden days (pre-2014), we accessed our Memcached systems through a mix of direct reads from our web servers and writes through a Flickr-developed proxy.  Our proprietary proxy system, Cerberus, handled a whole host of responsibilities. In addition to Memcached set operations, Cerberus managed database updates, the bulk of our Redis accesses, cache consistencyCerberus Based Memcached Architecture 
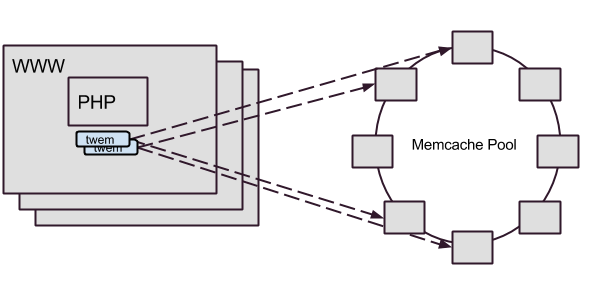
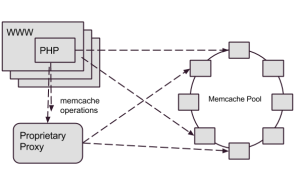
(which is why we directed our writes through Cerberus), and a few other miscellaneous transactions.   As Flickr’s traffic and functionality had grown, Memcached set operation performance wasn’t keeping up, so we needed to consider how to address the gap.

Since the development of Cerberus, the software landscape had drastically changed.  When we developed Cerberus, there was no comparable software available, but now several open source projects exist that provide similar proxy services.  On top of the availability of open source tools, Flickr’s traffic and usage patterns have changed over the course of a decade, changing the requirements we had for a proxy system.  Needless to say we had a lot of questions to ask ourselves before we dived into revising the caching architecture.

After years of operation, we had a good picture into the strengths and weaknesses of our current architecture, so when we started thinking about revising it, a few lessons from the past years really stood out.  One thing that we learned over the years was that Cerberus’ lack of a single purpose made it difficult to troubleshoot operational issues with Memcached.  Due to the lack of isolation, a downstream issue with a user database, could impact Memcached access time.  Whatever came next had to isolate cache requests from other data accesses.

Experience had shown us that Memcached get operation latency was a key performance metric, and we learned through trial and error that placing our current Cerberus proxy between the web servers and the Memcached hosts added more network latency than we were willing to tolerate.  Unfortunately, our options for connection pooling and more efficient use of connections were limited in PHP, so we had little recourse than to suffer with a high connection load and fluctuating connections against our Memcached servers.  The next generation system would have to carefully monitor get operation timings and ensure we didn’t introduce more latency into the process.

So as 2014 rolled around, we started to look into an alternative to Cerberus for accessing the Memcached systems.  Should we build a Cerberus 2.0?  Should we look at an open source alternative?  As we weighed our options, one alternative that stood out because it was quite successful in other parts of Yahoo and throughout the industry was Twitter’s Twemproxy.

Introducing Twemproxy

Twemproxy is a lightweight daemon that proxies requests to a pool of Memcached instances.  It provides the following features that we believed would improve our caching infrastructure:

  • Consistent hashing:  Figuring out what hosts in the ring on which to store and retrieve cache data.  While we had implemented consistent hashing before Twemproxy, it was previously left to the client libraries to sort out.
  • Connection pooling:  Reuse of network connections to the Memcached instances, cutting down significantly on the connection load to the Memcached daemons.
  • Command Pipelining:  Accumulating requests destined for the same host and sending as a combined payload.  This feature further reduces connection load and network overhead to the cache processes.

Resulting Architecture

We implemented a solution where each web server host had two local Twemproxies, forwarding to the Memcached rings.

Twemproxy Based Memcached Architecture

In the resulting architecture, all Memcached operations go through twemproxy.  The change accomplished many goals, including:

  • Providing a dedicated system for Memcached requests that was isolated from other systems
  • Reducing the connection load on our Memcached servers through Twemproxy’s connection pooling.  We experienced a 75% overall reduction of TCP connections to Memcached nodes
  • Improved overall caching latency.  This was a benefit that we didn’t necessarily expect.  With Twemproxy, we found that get operations had a 5% reduction in mean processing time and set operations had a 40% in mean processing time

The Road to Twemproxy

As nice as it would be to say we dropped in Twemproxy, declared victory and went for ice cream, we still had to solve a few interesting challenges along the way: maintaining availability, dealing with disparate consistent hashing schemes, and re-implementing cache coherency.

If One is Good, Two is Even Better

From the start, we recognized that the simple daemon model of Twemproxy would need to be managed carefully.  Each deploy through our continuous deployment system could result in changes to the Memcached hosts configuration.  And unfortunately, configuration changes for Twemproxy require the process to be restarted to take effect.  We measured the time to restart Twemproxy in the 1-2 second range, but even for these necessary restarts, it was too much of an interruption for the clients.

Our solution was to run two instances of the daemon on every host that needed the service and manage a careful synchronization between the restarts.  This restart “dance” was wired into the process that deploys the configuration changes to all the Memcached clients.  A couple of patches have been proposed to allow configuring Twemproxy without restarting it, but none of them have yet made the master branch.

When is Ketama not Ketama?

Ketama is a popular consistent hashing algorithm used by many systems to determine where to place a particular key in a multi-node caching system.  Out of the box, Twemproxy uses an implementation of the Ketama algorithm that is compatible with libketama, the C library which is the most commonly used implementation of the Ketama algorithm.

Our initial implementation of consistent hashing was done using Ketama, but with the Spymemcached Java library.  It turns out that Spymemcached has a slight variation in the implementation that makes it incompatible with Twemproxy.

Our transition from our current system to Twemproxy had to happen live, and a sudden change in the cache algorithm would have a painful (and unacceptable) impact on our database systems.  How could we get across this bridge?  Ultimately, we had to patch Twemproxy’s implementation of Ketama to match Spymemcached to maintain a consistent implementation of the Ketama algorithm.

Redis latency in propagating cache clears

Until we figure out how to change the speed of light, the only way we are going to make Flickr fast across the world, is through multiple data centers conveniently located near our users.  While this is way easier than changing the speed of light, it’s not without its complications.

What do they compute at Night ?

Caches between the data centers have to be kept consistent.  Some caches, like photo caches, deal with immutable data and are easy to keep in synch, others like Memcached systems have read-write data which is harder.  Our approach to handling cache consistency in our Memcached systems was to invalidate stale keys in other colo facilities whenever a process updated a value.  As we mentioned previously, Memcache write operations were directly through our Cerberus proxy specifically so Cerberus could dispatch a cache invalidation event to other colo facilities.  The migration to Twemproxy would not be complete, until we implemented a new solution for cache invalidation.

In our Twemproxy-based architecture, we decided to take the responsibility for cache invalidation our of the hands of the data proxy and push it into the client libraries we used to access Memcached.  Whenever a client updates a Memcache key, it enqueues a corresponding cache invalidation event into a distributed Redis queue.  We then deployed simple, single-purpose Java daemons to process the cache invalidation events from the Redis queue and delete the corresponding keys in their local Memcached systems.  A diagram of the system, appears below: Cache Clear - Blog Post

The wrinkle with this approach was that the enqueuing of clear keys would occasionally take 20 times longer than the normal mean time, pushing cache sets up to 40ms. After much digging, we found that the spikes were happening when the clearing daemons dequeued a batch of keys.  The dequeuing daemons were performing operations across a WAN. Due to the single-threaded nature of Redis, it would periodically block the queue for adding keys for 10s of milliseconds.  Once we figured that out, the fix was a matter of keeping separate in- and out-queues, and moving the keys from in to out with a local daemon, which significantly reduced the blocked time for writing keys.

Conclusion

Caching is crucial to a high-traffic site like Flickr, and we have taken a big stride in making our Memcached utilization more effective.  Using Twemproxy, we were able to clean up an internal system, reduce the connection load on our caching daemons, and even make modest improvements to caching latency for all clients.  Although we faced some technical challenges in implementing twemproxy for Memcached, particularly in propagating cache clear events, it was ultimately well worth the engineering investment.  After several months, our implementation of Twemproxy has proven to make a positive contribution to caching speed and ultimately the experience of a responsive site for our users.

If you dream in low latency and love to rip that extra 10 microseconds of overhead out of an operation, we’d love to have you! Stop by our Jobs page and tell us how awesome you are.

Real-time Resizing of Flickr Images Using GPUs

At Flickr we work with a huge number of photos. Our users upload over 27 million photos a day, and our total collection has over 12 billion photos. This is fantastic! As usage grows, we are always looking for ways to use our storage more efficiently. Recently our storage team wrote about some new commodity storage technology now in use at Flickr which increases efficiency. But we also looked into how much data we store for each photo. In the past we stored many sizes of every photo to make serving fast. We wanted to challenge that model and find the minimal set of data to store.

Thumbnail Footprint Reduction

One of our biggest opportunities for byte per photo improvement is through reduction in the footprint of Flickr’s “thumbnails”. Thumbnail is a bit of a misnomer at Flickr; our thumbnails are as large as 2048 pixels on their longest side, so at Flickr we usually refer to these as resizes.  We create these resizes in order to provide a consistent,  fast experience for our users over a variety of use cases.


Different sizes used in different contexts. From left to right: Cameraroll uses small thumbnails, to enable fast navigation through many sizes. Our Photo Page uses our largest, most detailed sizes. Search uses sizes in between these two extremes. Red panda photos by Mathias Appel.

The selection of sizes has grown semi-organically over the years, and all told, we serve eleven different resizes per photo which, in sum, use nearly as much storage as the original photo. Almost 90% of this storage is held in the handful of resizes 640px and larger, so we targeted our efforts at eliminating some of these sizes.


Left: Distribution of byte size by resize dimension. Storage is concentrated in images with largest dimensions. Right: size distribution after largest sizes eliminated.

A Few Approaches

A simple approach to this problem would be just to cease offering some of the larger sizes.    For instance, we could drop the 1600px image from our API and require the design to adjust.   However, this requires compromises that we didn’t want to take on. Instead we took on a pretty ambitious goal: maintain our largest resize, usually 2048px wide, as a source image and create any other moderate or large-sized resizes on-the-fly from this source, without sacrificing image quality or significantly affecting performance. Using the original uploaded photo as a resize source image was impractical, as these can be very large and exist in a variety of formats.

Sounds easy, right? We already resize images when users upload, so why not just use that same technology on serving. Well, almost. The problem with the naive approach is that high-quality resizing of JPEGs is a lot slower than is widely known. A tool we use frequently, GraphicsMagick, produces beautiful images but takes over 225ms to resize a 2048px JPEG down to 1600px, depending on quality settings. This is slow enough that this method would impact user experience, and would require many CPUs to handle our load. Ymagine,  a high-performance CPU-based tool we’ve open sourced,  is twice as fast as GraphicsMagick(!). We use Ymagine extensively on smaller images, but for the large sizes we’re targeting we needed even more performance. A GPU-based solution ultimately filled our needs.

Our GPU-based Solution

We created a tier of dedicated resize servers, each with an GPU co-processor. Each of these boards has two GPUs, each with 1500+ “cores”, running at just under 1GHz. These cores aren’t anywhere near as performant as a CPU core, but there are many of them. We tested a range of server-grade boards to find the best performing type for our workload. Many manufacturers offer consumer-grade boards with incredible specifications and lower price points, but these lack server-grade cooling and other features such as ECC RAM. One member of our team had experience using these lower grade boards in a previous application and recommended against it.


Resize system architecture

On these resize servers we run a fairly vanilla Apache with a plugin written in C++.  This server responds to resize requests, reads our source image from disk into shared memory,  and hands off requests off to persistent resize daemons that do all communication with our  GPUs.  A daemon-type approach is necessary due to a somewhat lengthy initialization process with our GPUs.

Our resize daemons transfer JPEGs from shared memory to GPU device memory. Once here,  the real image processing takes place. The JPEGs are decoded, cropped, sharpened, resized, re-sharpened as needed, re-encoded as JPEGs, and finally transferred back to shared memory.    From shared memory, our Apache module returns the resized JPEG to the caller.


A simple resize pipeline. Post-sharpening overcomes fuzziness introduced when downscaling.

There are several accepted resize algorithms, but to retain the Flickr “look”, we implemented the same Lanczos resize and kernel sharpening algorithms that we’ve used for years in CUDA.     This had the added benefit of being able to directly compare images generated through GraphicsMagick and our GPU-based code.

Performance

With significant optimization, this code is able to resize our 2048px JPEGs to 1600px in under 16ms. This is more than 15x faster than GraphicsMagick and nearly 10x faster than Ymagine.  Resizes from 2048px to 640px take under 10ms. Equally noteworthy,  at peak load,  each resize server can perform over 300 resizes per second.


Performance of different resize approaches.

Although these timings are quite fast,  the source image for our resizes  is larger, byte-wise, than the images it is resizing to,  requiring additional I/O. For example,  a typical 2048px source JPEG is roughly 600kB and our typical 1024px JPEGs are just under 200kB. This difference in size leads to roughly 35ms additional I/O time per resize.

Taking it slow

As our GPU code is new and images are our most important product, this change carries some risk. We’ve addressed this with extensive testing, progressive rollout and provisions for rollback. We also used some insights into our user behavior to roll this solution out in a very controlled manner.

Conclusion

This system is currently in production and as we roll it out more fully, has the potential to cut the resize footprint of the majority of our photos by 50%, with negligible impact on performance and image appearance. We also have the ability to apply this same footprint reduction technique to images uploaded in the past, which has the potential to reduce our storage growth to zero for a significant period of time.

Credits

This project would not have been possible with hard work of Peter Norby, Tague Griffith, John Ko and many others.

Much Photos!

Introducing the New! Shiny! Photolist framework

photolist-sky
Blue skies. Mostly.

Here at Flickr, we have photos. Lots of photos. Like, billions and billions of photos. So, it’s pretty important for us to be able to show you more than one at once.

We have used what we call the “justified algorithm” to lay out photos for a while now, but as we move more and more pages onto our new-ish isomorphic node.js stack, we determined it was time to revisit the algorithm and create an updated implementation.

A few of us here in Frontend-landia got together to figure out all the things this new shiny should be able to do. With a lot of projects in full swing and on the near horizon, we came up with a pretty significant list, including but not limited to:
– Easy for developers to use
– Fit into any kind of container
– Support pagination (in both directions!) and infinite scroll
– Jank-free, butter-silky-baby-smooth scrolling
– Support layouts other than justified, like square thumbnails and grid layout with native aspect ratio

After some brainstorming, drawing of diagrams, and gummi bear consumption, we got to work building out the framework and the underlying algorithm.

Rejustification

photolist-sky
Drawing of diagrams

The basics of the justified algorithm aren’t too complex. The goal is for the layout module to accept a list of photo aspect ratios, and return a list of rectangles. A layout consists of a number of rows of items (photos), each with a target height and allowable height deviation above and below. This, along with the container width, gives us a minimum and maximum row aspect ratio.

Photolist: variable row height
Fig. 1: The justified algorithm: dimensions

We push each photo into a row; once the row is filled up, we move on to the next. It goes a little something like this:

  1. Iterate over each photo in the list to display
  2. Create a new row if there’s not currently an open row
  3. Attempt to add the photo to the current row at its native aspect ratio and at the target row height
  4. If the new row aspect ratio is less than the minimum row aspect ratio, continue adding photos until the aspect ratio is greater than the maximum aspect ratio
  5. Either keep or drop the last added photo, depending on which generates a row aspect ratio closer to the target row aspect ratio; adjust the row height as needed, and seal the row
  6. Repeat until all the photos have been laid out.

Photolist: row filling
Fig. 2: The justified algorithm: row filling

It’s Never That Easy…

The justified algorithm described above is the primary responsibility of the layout module. In practice, however, there are a number of other things the layout must handle to get good results for all use cases, and to communicate the results to other parts of the framework.

Diffs

One key feature of the layout module is how it organizes its results. To minimize the amount of processing required to update photos as the layout changes, the layout module returns pre-sorted diffs, each with a specific purpose:

  • new items, used to create new photos and put them in place
  • layout-changed items, used to resize/reposition existing photos
  • visibility-changed items, used to wake/sleep existing photos
  • widows and orphans (leading and trailing items) (read on!)

The container view can process only the parts of the layout response that are necessary, given the current state of the whole framework, to keep processing time down and keep performance up.

Widows and orphans


Annie the Musical,
Annie the Musical, by Eva Rinaldi

Some photolist pages on Flickr use infinite scrolling, and some display results one page at a time. Regardless of how a page shows its photos, it starts to feel messy when there is an incomplete row of photos hanging off the end of the page. If there is more content in the set, the last row should be full. However, since we fetch photos from the API in fixed batch sizes, things don’t always work out so nicely, leaving “leftovers” in the bottom row. Borrowing from typesetting terminology, we call these leftover photos orphans. (We can also paginate backwards; leftovers at the top are technically widows but we’ll just keep using the term orphans for simplicity.)

The layout notes these incomplete rows and hides them from the rest of the framework until the next page of content loads in. (This led to frequent and questionable metaphors about “orphan suppression” and “orphan rehydration.”) When orphans are to be hidden, the layout simply keeps them out of the diff. When the orphans are brought back in as the next page loads, the layout prepends them to the next diff. The container view is none the wiser.

This logic gets even more fun when you consider that it must perform in all of these use cases:

  • fixed page size (book-style) pagination
  • downward-scrolling infinite pagination
  • upward-scrolling infinite pagination (enter into an “infinite” content set somewhere other than the beginning); this requires right-to-left layout!

There’s also the case of the end of an “infinite” content set (scrolling down to the end or up to the beginning); in these cases, we still want the row to appear complete, and still must maintain the native aspect ratio of the photo. Therefore, we allow the row height to grow as much as it needs in this case only.

Bonus Round!

You might have noticed that Flickr is kind of a big site with, like, lots of photos. And we display photos in lots of different ways, with lots of different use cases. The photolist framework bends over backwards to support all of those, including:

  • forward and backward pagination
  • infinite scroll and fixed page-size pagination
  • specific aspect ratios (e.g. squares)
  • fixed number of rows
  • fast relayout (only a few milliseconds for thousands of photos)

Going into detail on each of those features is way beyond the scope of this blog post, but suffice it to say the framework is built to handle just about anything Flickr can throw at it. The one exception is the upcoming Camera Roll (coming soon to those of you who don’t yet have it!), which is Too Extreme for this framework, so we devised something special just for that page.

The whole enchilada


Mmm... enchiladas,
Mmm… enchiladas, by jeffreyww

The layout is at the heart of the photolist framework, but wait — there’s more! The main components of the framework are the layout (dissected above), the container view / controller, and the subviews (usually containing photos).

Photolist: the whole enchilada
Fig. 3: Relationship of view/controller, layout, and subviews, and changing subview states during downward scroll

The container view does a lot of fancy things, like:

  • loading in photos as you scroll down or paginate
  • triggering a relayout when the container size changes (i.e. when you resize your window)
  • matching up server-rendered HTML with clientside JavaScript objects (see isomorphic JavaScript, and an upcoming blog post about the Hermes stack at Flickr).

Its primary job, though, is to act as the conduit between the layout module and the individual subviews.

Every time a layout is processed or changes, it returns a “layout response” to the container view. The layout response contains a list of rectangles and wake/sleep flags (actually, a list of lists; see Diffs above); the container view relays that new information on to each individual subview to determine position and visibility. The container view doesn’t even need to know about the layout details — each subview adjusts itself to its layout data all on its own.

The subviews each have a decent amount of intelligence of their own, performing such tasks as:

  • choosing the most appropriate photo file size to fit the layout rectangle
  • adding/removing itself to/from the DOM as instructed by the layout to maintain good scroll performance
  • providing an annotation and interaction layer for titles, faves, comments, etc.

Coming soon to a webpage near you

The new photolist framework is certainly not a one-size-fits-all solution; it’s tailored for Flickr’s specific use cases. However, we tried to design and build it to be as broadly useful for Flickr as possible; as we continue to move parts of the site onto the new frontend stack and innovate new features, it’s critical to have solid components upon which we can build Flickr’s future. The layout algorithm is probably useful for many applications though, and we hope you gained some insight into how you might implement your own.

The photolist framework is already live in a number of places on the site, including the new Unified Search pages (currently in Beta), the Create / Wall art pages, the Group pool preview, and is coming soon to a number of other pages.

As always, if you’re interested in helping with that “and more” part, we’d love to have you! Stop by our jobs page and drop us a line.

33 Browser Stats You Just Might Believe

We care an awful lot about the kinds of browsers and computers visiting Flickr. As people update to the latest versions of their browsers, the capabilities we can build against improve, which lets us build cool new things. At the same time, if lots of people continue using older browsers then we have to do extra work to gracefully support them.

These days we not only have incredibly capable browsers, but thanks to the transparent and rapid update process of Chrome, Firefox, and soon Internet Explorer (hooray!), we can rely on new features rapidly showing up en masse. This is crazy great, but it doesn’t mean that we can stop paying attention to our usage statistics. In fact, as people spend more time on their phones, there’s as much of a need for a watchful eye as ever.

We’ve never really shared our internal numbers, but we thought it would be interesting to take a look at the browsers Flickr visitors used in 2014. We use these numbers constantly to inform our project planning. Since limitations in older browsers take time to support we have to be judicious in picking which battles to fight. As you’ll see below, these numbers can be quite dynamic with a popular browser dropping to nearly 0% market-share in just a year. Let’s dive in and see some specifics.

Fort Vancouver
Fort Vancouver by Kate Dickerson

Top level OSes and browsers

At the highest level we learn a lot by looking at our OS family data. Probably the most notable thing here is how much of our traffic is coming from mobile devices. Moreover, the rate of growth is eye-popping. And this is just our website – this data doesn’t include our iOS or Android clients at all. A quarter of our traffic is from mobile devices.

OSes in use on Flickr.com
2013 Q4 2014 Q4 Y/Y
Windows 56.55% 50.61% -5.94
Macintosh 21.49% 21.42% -0.07
iOS 11.09% 17.61% 6.52
Android 5.39% 7.82% 2.43
Other 5.48% 2.54% -2.94

Let’s slice things slightly differently and look at browser families. We greatly differ from internet-wide traffic in that IE isn’t the outright majority browser. In fact, it clocks in at only the #4 position. More than half of Flickr visitors use a Webkit/Webkit-heritage browser (Safari and Chrome, respectively). Chrome rapidly climbed into its leadership position over the last few years and it’s stabilized there. Safari is hugely buoyed by iOS’s incredible growth numbers, while IE has been punished by Windows’s Flickr market-share decline.

Browsers in use on Flickr.com
2013 Q4 2014 Q4 Y/Y
Chrome 35.71% 35.42% -0.29
Safari 24.11% 27.50% 3.39
Firefox 17.94% 18.29% 0.35
Internet Explorer 13.98% 10.31% -3.67
Other 8.26% 8.48% 0.22

Fine-grained details

We can go a step further and see many details in the individual versions of OSes and browsers out there. It’s one thing to say “Windows is down 6% over the year” but another to say “the growth rate for the latest version of Windows is 350% year over year.” When we look at the individual versions we can infer quite a bit of detail around update rates and changes in the landscape.

OS version details

A few highlights:

  • Windows 7 is on the decline, XP and Vista fell by roughly 50% each, and Windows 8 and 8.1 are surging ahead.
  • iOS 8.1 and Android 5.0 don’t appear in the list due to their late appearance in Q4. Our current monthly numbers have iOS 8.1 far outpacing every other iOS version.
  • OS X 10.10 has accelerated Mac user upgrades; since its launch 10.9 has shed over a percent per month, and the legacy versions have sharply accelerated their decline.
OS versions in use on Flickr.com
2013 Q4 2014 Q4 Y/Y
Windows NT 3.39% 0% -3.39
Windows XP 10.12% 4.49% -5.63
Windows Vista 3.56% 2.41% -1.15
Windows 7 36.29% 33.14% -3.15
Windows 8 2.01% 2.31% 0.30
Windows 8.1 1.06% 8.22% 7.16
Macintosh OS X 10.5* 0.65% 0.65
Macintosh OS X 10.6* 2.90% 2.90
Macintosh OS X 10.7* 1.91% 1.91
Macintosh OS X 10.8* 1.83% 1.83
Macintosh OS X 10.9* 8.26% 8.26
Macintosh OS X 10.10 0% 5.69% 5.69
iOS 4.3 0.19% 0% -0.19
iOS 5.0 0.12% 0% -0.12
iOS 5.1 0.59% 0% -0.59
iOS 6.0 0.42% 0% -0.42
iOS 6.1 2.02% 0.61% -1.41
iOS 7.0 7.36% 1.54% -5.82
iOS 7.1 0% 5.76% 5.76
iOS 8.0 0% 3.27% 3.27
Android 2.3 0.77% 0% -0.77
Android 4.0 0.82% 0% -0.82
Android 4.1 2.11% 1.22% -0.89
Android 4.2 0.84% 1.16% 0.32
Android 4.3 0.39% 0.56% 0.17
Android 4.4 0% 3.80% 3.80
Linux 4.37% 1.94% -2.43

* We didn’t start breaking out individual versions of OS X until Q1 2014. So unfortunately for this post we don’t have great info breaking down the versions of OS X, but we will in the future. OS X 10.10 did not exist in Q1 2014 so it’s counted as a natural 0% in our Q1 data.

Browser version details

These are the most dynamic numbers of the bunch. If there’s one thing they prove, it’s how incredibly effective the upgrade policies of Chrome and Firefox are. Where Safari and IE have years-old versions still hanging on (I’m looking at you Safari 5.1 and IE 8.0), virtually every Chrome and Firefox user is using a browser released within the last six weeks. That’s a hugel powerful thing. The IE team has suggested that Windows 10’s Project Spartan will adopt this policy, which is absolutely fantastic news. A few highlights:

  • Despite not being on a continuous upgrade cycle, Safari and IE were able to piggyback on successful OS launches to consolidate their users on their latest releases.
  • IE 8.0 is the only non-latest version of IE still holding on, thanks to its status as the latest version available for the still somewhat popular Windows XP.
OS versions in use on Flickr.com
2013 Q4 2014 Q4 Y/Y
Chrome 22.0.1229 1.67% 0% -1.67
Chrome 29.0.1547.76 1.39% 0% -1.39
Chrome 30.0.1599.101 8.94% 0% -8.94
Chrome 30.0.1599.69 3.74% 0% -3.74
Chrome 31.0.1650.57 6.08% 0% -6.08
Chrome 31.0.1650.63 6.91% 0% -6.91
Chrome 37.0.2062.124 0% 4.59% 4.59
Chrome 38.0.2125.104 0% 3.05% 3.05
Chrome 38.0.2125.111 0% 6.65% 6.65
Chrome 39.0.2171.71 0% 4.09% 4.09
Chrome 39.0.2171.95 0% 4.51% 4.51
Safari 5.0 1.96% 0% -1.96
Safari 5.1 5.60% 2.50% -3.10
Safari 6.0 6.21% 0.86% -5.35
Safari 7.0 7.29% 7.25% -0.04
Safari 7.1 0% 3.12% 3.12
Safari 8.0 0% 10.10% 10.10
Firefox 22.0 1.62% 0% -1.62
Firefox 24.0 5.50% 0% -5.50
Firefox 25.0 6.46% 0% -6.46
Firefox 26.0 1.90% 0% -1.90
Firefox 32.0 0% 4.92% 4.92
Firefox 33.0 0% 7.10% 7.10
Firefox 34.0 0% 3.52% 3.52
MSIE 8.0 3.69% 1.00% -2.69
MSIE 9.0 3.04% 1.22% -1.82
MSIE 10.0 5.94% 0% -5.94
MSIE 11.0 0% 6.69% 6.69
Generic WebKit 4.0* 3.18% 2.46% -0.72
Mozilla 5.0* 3.18% 4.80% 1.62
Opera 9.80 1.46% 0% -1.46

* These are catch-all versions of Mozilla-based and Webkit-based browsers that aren’t themselves Firefox, Safari, or Chrome.

A word on methodology

These numbers were anonymously collected using Yahoo’s in-house metrics libraries. The numbers here are aggregated over the course of three months each, making these numbers lagging indicators. This is why the latest releases, like Android 5.0 and iOS 8.1, are under-represented – they hadn’t yet enjoyed one full quarter when 2014 came to a close.

Further reading

There are a number of excellent sites out there watching similar browser statistics on a continuing basis. A few of them are:

  • Ars Technica – on a monthly basis they analyze raw data from Net Market Share with insightful commentary.
  • Net Market Share – while Ars does a bang-up job, it’s helpful to sift the data yourself to find the answers to your questions.
  • Peter-Paul Koch – No one shines a sharper light on the state of browsers than PPK, with just one example being his attention to disambiguating the various versions of Chromium out there (part two).


Flickr September 2014

Like this post? Have a love of online photography? Want to work with us? Flickr is hiring engineers, designers and product managers in our San Francisco office. Find out more at flickr.com/jobs.