Real-time Resizing of Flickr Images Using GPUs

At Flickr we work with a huge number of photos. Our users upload over 27 million photos a day, and our total collection has over 12 billion photos. This is fantastic! As usage grows, we are always looking for ways to use our storage more efficiently. Recently our storage team wrote about some new commodity storage technology now in use at Flickr which increases efficiency. But we also looked into how much data we store for each photo. In the past we stored many sizes of every photo to make serving fast. We wanted to challenge that model and find the minimal set of data to store.

Thumbnail Footprint Reduction

One of our biggest opportunities for byte per photo improvement is through reduction in the footprint of Flickr’s “thumbnails”. Thumbnail is a bit of a misnomer at Flickr; our thumbnails are as large as 2048 pixels on their longest side, so at Flickr we usually refer to these as resizes.  We create these resizes in order to provide a consistent,  fast experience for our users over a variety of use cases.


Different sizes used in different contexts. From left to right: Cameraroll uses small thumbnails, to enable fast navigation through many sizes. Our Photo Page uses our largest, most detailed sizes. Search uses sizes in between these two extremes. Red panda photos by Mathias Appel.

The selection of sizes has grown semi-organically over the years, and all told, we serve eleven different resizes per photo which, in sum, use nearly as much storage as the original photo. Almost 90% of this storage is held in the handful of resizes 640px and larger, so we targeted our efforts at eliminating some of these sizes.


Left: Distribution of byte size by resize dimension. Storage is concentrated in images with largest dimensions. Right: size distribution after largest sizes eliminated.

A Few Approaches

A simple approach to this problem would be just to cease offering some of the larger sizes.    For instance, we could drop the 1600px image from our API and require the design to adjust.   However, this requires compromises that we didn’t want to take on. Instead we took on a pretty ambitious goal: maintain our largest resize, usually 2048px wide, as a source image and create any other moderate or large-sized resizes on-the-fly from this source, without sacrificing image quality or significantly affecting performance. Using the original uploaded photo as a resize source image was impractical, as these can be very large and exist in a variety of formats.

Sounds easy, right? We already resize images when users upload, so why not just use that same technology on serving. Well, almost. The problem with the naive approach is that high-quality resizing of JPEGs is a lot slower than is widely known. A tool we use frequently, GraphicsMagick, produces beautiful images but takes over 225ms to resize a 2048px JPEG down to 1600px, depending on quality settings. This is slow enough that this method would impact user experience, and would require many CPUs to handle our load. Ymagine,  a high-performance CPU-based tool we’ve open sourced,  is twice as fast as GraphicsMagick(!). We use Ymagine extensively on smaller images, but for the large sizes we’re targeting we needed even more performance. A GPU-based solution ultimately filled our needs.

Our GPU-based Solution

We created a tier of dedicated resize servers, each with an GPU co-processor. Each of these boards has two GPUs, each with 1500+ “cores”, running at just under 1GHz. These cores aren’t anywhere near as performant as a CPU core, but there are many of them. We tested a range of server-grade boards to find the best performing type for our workload. Many manufacturers offer consumer-grade boards with incredible specifications and lower price points, but these lack server-grade cooling and other features such as ECC RAM. One member of our team had experience using these lower grade boards in a previous application and recommended against it.


Resize system architecture

On these resize servers we run a fairly vanilla Apache with a plugin written in C++.  This server responds to resize requests, reads our source image from disk into shared memory,  and hands off requests off to persistent resize daemons that do all communication with our  GPUs.  A daemon-type approach is necessary due to a somewhat lengthy initialization process with our GPUs.

Our resize daemons transfer JPEGs from shared memory to GPU device memory. Once here,  the real image processing takes place. The JPEGs are decoded, cropped, sharpened, resized, re-sharpened as needed, re-encoded as JPEGs, and finally transferred back to shared memory.    From shared memory, our Apache module returns the resized JPEG to the caller.


A simple resize pipeline. Post-sharpening overcomes fuzziness introduced when downscaling.

There are several accepted resize algorithms, but to retain the Flickr “look”, we implemented the same Lanczos resize and kernel sharpening algorithms that we’ve used for years in CUDA.     This had the added benefit of being able to directly compare images generated through GraphicsMagick and our GPU-based code.

Performance

With significant optimization, this code is able to resize our 2048px JPEGs to 1600px in under 16ms. This is more than 15x faster than GraphicsMagick and nearly 10x faster than Ymagine.  Resizes from 2048px to 640px take under 10ms. Equally noteworthy,  at peak load,  each resize server can perform over 300 resizes per second.


Performance of different resize approaches.

Although these timings are quite fast,  the source image for our resizes  is larger, byte-wise, than the images it is resizing to,  requiring additional I/O. For example,  a typical 2048px source JPEG is roughly 600kB and our typical 1024px JPEGs are just under 200kB. This difference in size leads to roughly 35ms additional I/O time per resize.

Taking it slow

As our GPU code is new and images are our most important product, this change carries some risk. We’ve addressed this with extensive testing, progressive rollout and provisions for rollback. We also used some insights into our user behavior to roll this solution out in a very controlled manner.

Conclusion

This system is currently in production and as we roll it out more fully, has the potential to cut the resize footprint of the majority of our photos by 50%, with negligible impact on performance and image appearance. We also have the ability to apply this same footprint reduction technique to images uploaded in the past, which has the potential to reduce our storage growth to zero for a significant period of time.

Credits

This project would not have been possible with hard work of Peter Norby, Tague Griffith, John Ko and many others.

Introducing: Flickr PARK or BIRD

park OR bird
Zion National Park Utah by Les Haines Creative Commons License Secretary Bird by Bill Gracey Creative Commons License

tl;dr: Check it out at parkorbird.flickr.com!

We at Flickr are not ones to back down from a challenge. Especially when that challenge comes in webcomic form. And especially when that webcomic is xkcd. So, when we saw this xkcd comic we thought, “we’ve got to do that”:

xkcd-1425
Creative Commons License

In fact, we already had the technology in place to do these things.  Like the woman in the comic says, determining whether a photo with GPS info embedded into it was taken in a national park is pretty straightforward. And, the Flickr Vision team has been working for the last year or so to be able to recognize more than 1000 things in images using deep convolutional neural nets. Incidentally, one of the things we’re pretty good at recognizing is birds!

We put those things together, and thus was born parkorbird.flickr.com!

Recognizing Stuff in Images with Deep Networks

The thing we’re really excited to show off with PARK or BIRD is our image recognition technology. To recognize 1000+ things, we employ a deep convolutional neural network similar to the one depicted below.

conv-net

This model transforms an input image into a representation in which different objects and scenes are easily distinguishable by a simple binary classification algorithm, like an SVM. It does this by passing the image through a series of layers, where each layer computes a function of the output of the layer below it.

Each successive one of these layers, after training on millions of images, has learned to recognize higher- and higher-level features of images and the ways these features go together to form different objects and scenes. For example, the first layer might recognize the most basic image features, such as short straight lines, corners, and small circular arcs. The next layer might recognize higher level combinations of those features, such as circles or other basic shapes. Further layers might recognize higher-level concepts, like eyes and beaks, and even further ones might recognize heads and wings. For an example of what this looks like, check out Figure 2 in this paper by Matt Zeiler and Rob Fergus.

As the image passes through these layers, they are “activated” in different ways depending on the features they’ve seen in the input image, and at the top of this network—after the image is transformed by the bottom layer, and that transformation of the image is transformed by the next layer, and that transformation of the transformation of the image is transformed by the next layer, and so on— a short floating-point vector summarizing all of the various activations at each layer is output. We pass this floating-point vector into more than 1000 binary classifiers, each of which is trained to give us a yes/no answer to identify a specific object/scene class. And, of course, one of those classes is birds!

The Flickr Vision team is already applying this deep network to Flickr photos to help people more more easily find what they’re looking for via Flickr search, and we plan to integrate it into Flickr in other cool ways in the future. We’re also working on other innovative computer vision and image recognition technologies that will make it easier for Flickr members to find and organize their photos.

Acknowledgements

The Flickr Vision and Search team is awesome and PARK or BIRD is built upon technologies that we all pitched in on. Here we all are (at least most of us), in all our beautiful glory. Thanks Vision/Search! Thanks also to Stephen Woods, Bart Thomee, John Ko, Mike Shema, and Sean Perkins, all of whom provided a lot of help getting PARK or BIRD off the ground.

Flickr flamily floto

If this all sounds like a challenge you’re interested in helping out with, you should join us! Flickr is hiring engineers, designers and product managers in our San Francisco office. Find out more at flickr.com/jobs.

Performance improvements for photo serving

We’ve been working to make Flickr faster for our users around the world. Since the primary photo storage locations are in the US, and information on the internet travels at a finite speed, the farther away a Flickr user is located from the US, the slower Flickr’s response time will be. Recently, we looked at opportunities to improve this situation. One of the improvements involves keeping temporary copies of recently viewed photos in locations nearer to users.  The other improvement aims to get a benefit from these caches even when a user views a photo that is not already in the cache.

Regional Photo Caches

For a few years, we’ve deployed regional photo caches located in Switzerland and Singapore. Here’s how this works. When one of our users in Vietnam requests a photo, we copy it temporarily to Singapore. When a second user requests the same photo, from, say, Kuala Lumpur, the photo is already present in Singapore. Flickr can respond much faster using this copy (only a few hundred kilometers away) instead of using the original file back in the US (over 8,000 km away).

The first piece of our solution has been to create additional caches closer to our users. We expanded our regional cache footprint around two months ago. Our Australian users, among others, should now see dramatically faster load times. Australian users will now see the average image load about twice as fast as it did in March.

We’re happy with this improvement and we’re planning to add more regional caches over the next several months to help users in other regions.

Cache Prefetch

When users in locations far from the US view photos that are already in the cache, the speedup can be up to 10x, but only for the second and subsequent viewers. The first viewer still has to wait for the file to travel all the way from the US. This is important because there are so many photos on Flickr that are viewed infrequently. It’s likely that a given photo will not be present in the cache. One example is a user looking at their Auto Upload album. Auto uploaded photos are all private initially. Scrolling through this album, it’s likely that very few of the photos will be in their regional cache, since no other users would have been able to see them yet.

It turns out that we can even help the first viewer of a photo using a trick called cache warming.

To understand how caching warming works, you need to understand a bit about how we serve images. For example, say that I’m a user in Spain trying to access the photostream of a user, Martin Brock, in the US. When my request for Martin Brock’s Photostream at https://www.flickr.com/photos/martinbrock/ hits our backend servers, our code quickly determines the most recent photos Martin has uploaded that are visible to me, which sizes will fit best in my browser, and the URLs of those images. It then sends me the list of those URLs in an HTML response. The user’s web browser reads the HTML, finds the image URLs and starts loading them from the closest regional cache.


Standard image fetch

So you’re probably already guessing how to speed things up.  The trick is to take advantage of the time in between when the server knows which images will be needed and the time when the browser starts loading them from the closest cache. This period of time can be in the range of hundreds of milliseconds. We saw an opportunity during this time to send the needed images over to the viewer’s regional cache in advance of their browser requesting the images. If we can “win the race” to do this, the viewer’s experience will be much faster, since images will load from the local cache instead of loading from the US.

To take advantage of this opportunity, we created a new “cache warming” process called The Warmer. Once we’ve determined which images will be requested (the first few photos in Martin’s photostream) we send  a message from the API servers to The Warmer.

The Warmer listens for messages and, based on the user’s location, it determines from which of the Flickr regional caches the user will likely request the image. It then pushes the image out to this cache.


Optimized image fetch, with cache warming path indicated in red

Getting this to work well required a few optimizations.

Persistent connections

Yahoo encrypts all traffic between our data centers. This is great for security, but the time to set up a secure connection can be considerable. In our first iteration of The Warmer, this set up time was so long that we rarely got the photo to the cache in time to benefit a user. To eliminate this cost, we used an Nginx proxy which maintains persistent connections to our remote data centers. When we need to push an image out – a secure connection is already set up and waiting to be used.

Transport layer

The next optimization we made helped us reduce the cost of sending messages to The Warmer.  Since the data we’re sending always fits in one datagram, and we also don’t care too much if a small percentage of these messages are never received, we don’t need any of the socket and connection features of TCP. So instead of using HTTP, we created a simple JSON format for sending messages using UDP datagrams. Another reason we chose to use UDP is that if The Warmer is not available or is reacting slowly, we don’t want that to cause slowdowns in the API.

Queue management

Naturally, some images are quite popular and it would waste resources to push them to the same cache repeatedly. So, the third optimization we applied was to maintain a list of recently pushed images in The Warmer. This simple “de-deduplication” cut the number of requests made by The Warmer by 60%. Similarly, The Warmer drops any incoming requests that are more than fifty milliseconds old. This “time-to-live” provides a safety valve in case The Warmer has fallen behind and can’t catch up.


def warm_up_url(params):
  requested_jpg = params['jpg']

  colo_to_warm = params['colo_to_warm']
  curl = "curl -H 'Host: " + colo_to_warm + "' '" + keepalive_proxy + "/" + requested_jpg + "'"
  os.system(curl)

if __name__ == '__main__':

# create the worker pool

  from multiprocessing.pool import ThreadPool
  worker_pool = ThreadPool(processes=100)

  while True:

    # receive requests
    json_data, addr = sock.recvfrom(2048)

    params = json.loads(json_data)

    requested_jpg = warm_params['jpg']
    colo_to_warm =
      determine_colo_to_warm(params['http_endpoint'])

    if recently_warmed(colo_to_warm, requested_jpg) :
      continue

    if request_too_old(params) :
      continue

    # warm up urls
    params['colo_to_warm'] = colo_to_warm

    warm_result = worker_pool.apply_async(warm_up_url,(params,))

Cache Warmer pseudocode

Java

Our initial implementation of the Warmer was in Python, using a ThreadPool. This allowed very rapid prototyping and worked great — up to a point. Profiling the Python code, we found a large portion of time spent in socket calls. Since there is so little code in The Warmer, we tried porting to Java. A nearly line-for-line translation resulted in a greater than 10x increase in capacity.

Results

When we began this process, we weren’t sure whether The Warmer would be able to populate caches before the user requests came in. We were pleasantly surprised when we first enabled it at scale. In the first region where we’ve deployed The Warmer (Western Europe), we observed a reduced median latency of more than 200 ms, 95% of photos requests sped up by at least 100 ms, and for a small percentage of photos we see over 400 ms reduction in latency. As we continue to deploy The Warmer in additional regions, we expect to see similar improvements.

Next Steps

In addition to deploying more regional photo caches and continuing to improve prefetching performance, we’re looking at a few more techniques to make photos load faster.

Compression

Overall Flickr uses a light touch on compression. This results in excellent image quality at the cost of relatively large file sizes. This translates directly into longer load times for users. With a growing number of our users connecting to Flickr with wireless devices, we want to make sure we can give users a good experience regardless of whether they have a high-speed LTE connection or two-bars of 3G in the countryside. An important goal will be to make these changes with little or no loss in image quality.

We are also testing alternative image encoding formats (like WebP). Under certain conditions WebP compression may offer better image quality at the same compression ratio than JPEG can achieve.

Geolocation and routing

It turns out it’s not straightforward to know which photo cache is going to give the best performance for a user. It depends on a lot of factors, many of which change over time — sometimes suddenly. We think the best way to do this is with a system that adapts dynamically to “Internet weather.”

Cache intelligence

Today, if a user needs to see a medium sized version of an image, and that version is not already present in the cache, the user will need to wait to retrieve the image from the US, even if a larger version of the image is already in the cache. In this case, there is an opportunity to create the smaller version at the cache layer and avoid the round-trip to the US.

Overall we’re happy with these improvements and we’re excited about the additional opportunities we have to continue to make the Flickr experience super fast for our users. Thanks for following along.

Flickr flamily floto

Like what you’ve read and want to make the jump with us? We’re hiring engineers, designers and product managers in our San Francisco office. Find out more at flickr.com/jobs.

Exploring Life Without Compass

Compass is a great thing. At Flickr, we’re actually quite smitten with it. But being conscious of your friends’ friends is important (you never know who they’ll invite to your barbecue), and we’re not so sure about this “Ruby” that Compass is always hanging out with. Then there’s Ruby’s friend Bundler who, every year at the Christmas Party, tells the same stupid story about the time the police confused him with a jewelry thief. Enough is enough! We’ve got history, Compass, but we just feel it might be time to try seeing other people.

Solving for Sprites

In order to find a suitable replacement (and for a bit of closure), we had to find out what kept us relying on Compass for so long. We knew the big one coming in to this great experiment: sprites. Flickr is a huge site with many different pages, all of which have their own image folders that need to be sprited together. There are a few different options for compiling sprites on your own, but we liked spritesmith for its multiple image rendering engines. This gives us some flexibility in dependencies.

A grunt task is available for spritesmith, but it assumes you are generating only one sprite. Our setup is a bit more complex and we’d like to keep our own sprite mixin intact so we don’t actually have to change a line of code. With spritesmith and our own runner to iterate over our sprite directories, we can easily create the sprites and output the dimensions and urls via a simple Handlebars template to a Sass file.

{{#each sprites}}
    {{#each images}}
        %{{../dir}}-{{name}}-dimensions {
            width: {{coords.width}}px;
            height: {{coords.height}}px;
        }
        %{{../dir}}-{{name}}-background {
            background: image-url('{{../url}}') -{{coords.x}}px -{{coords.y}}px no-repeat;
        }
    {{/each}}
{{/each}}

You could easily put all three of these rules in the same declaration, but we have some added flexibility in mind for our mixin.

It’s important to note that, because we’re using placeholders (the % syntax in Sass), nothing is actually written out unless we use it. This keeps our compiled CSS nice and clean (just like Compass)!

@import 'path/to/generated/sprite/file'

@mixin background-sprite($icon, $set-dimensions: false) {
    @extend %#{$spritePath}-#{$icon}-background;

    @if $set-dimensions == true {
        @extend %#{$spritePath}-#{$icon}-dimensions;
    }
}

Here, our mixin uses the Sass file we generated to provide powerful and flexible sprites. Note: Although retina isn’t shown here, adding support is as simple as extending the Sass mixin with appropriate media queries. We wanted to keep the example simple for this post, but it gives you an idea of just how extensible this setup is!

Now that the big problem is solved, what about the rest of Compass’s functionality?

Completing the Package

How do we account for the remaining items in the Compass toolbox? First, it’s important to find out just how many mixins, functions, and variables are used. An easy way to find out is to compile with Sass and see how much it complains!


sass --update assets/sass:some-temp-dir

Depending on the complexity of your app, you may see quite a lot of these errors.


error assets/css/base.scss (Line 3: Undefined mixin 'font-face'.)

In total, we’re missing 16 mixins provided by Compass (and a host of variables). How do we replace all the great mixin functionality of Compass? With mixins of the same name, node-bourbon is a nice drop-in replacement.

What is the point of all this work again?

The Big Reveal

Now that we’re comfortably off Compass, how exactly are we going to compile our Sass? Well try not to blink, because this is the part that makes it all worthwhile.

Libsass is a blazing-fast C port of the Sass compiler that exposes bindings to modules like node-sass.

Just how fast? With Compass, our compile times were consistently around a minute and a half to two minutes. Taking care of spriting ourselves and using libsass for Sass compilation, we’re down to 5 seconds. When you deploy as often as we do at Flickr (in excess of 10 times a day), that adds up and turns into some huge savings!

What’s the Catch?

There isn’t one! Oh, okay. Maybe there are a few little ones. We’re pretty willing to swallow them though. Did you see that compile time?!

There are some differences, particularly with the @extend directive, between Ruby Sass and libsass. We’re anticipating that these small kinks will continue to be ironed out as the port matures. Additionally, custom functions aren’t supported yet, so some extensibility is lost in coming from Ruby (although node-sass does have support for the image-url built-in which is the only one we use, anyway).

With everything taken into account, we’re counting down the days until we make this dream a reality and turn it on for our production builds.

Flickr flamily floto

Like what you’ve read and want to make the jump with us? We’re hiring engineers, designers and product managers in our San Francisco office. Find out more at flickr.com/jobs.

Redis Sentinel at Flickr

HIGH FIVE!

We recently implemented Redis Sentinel at Flickr to provide automated Redis master failover for an important subsystem and we wanted to share our experience with it. Hopefully, we can provide insight into our experience adopting this relatively new technology and some of the nuances we encountered getting it up and running. Although we try to provide a basic explanation of what Sentinel is and how it works, anyone who is new to Redis or Sentinel should start with the excellent Redis and Sentinel documentation.

At Flickr we use an offline task processing system that allows us to execute heavyweight operations asynchronously from our API and web pages. This prevents these operations from making users wait needlessly for pages to render or API methods to return. Our task system handles millions of tasks per day which includes operations like photo uploads, user notifications and metadata edits. In this system, code can push a task onto one of several Redis-backed queues based on priority and operation, then forget about the task. Many of these operations are critical and we need to make sure we process at least 99.9999% of them (less than 1 in 1 million dropped). Additionally, we need to make sure this system is available to insert and process tasks at least 99.995% of the time – no more than about 2 minutes a month downtime.

Until a few months ago our Redis BCP consisted of:

Upon master failure, the recovery plan included several manual steps: reconfiguring code to take the Redis master(s) offline and manually promoting a Redis slave (a mildly time consuming activity). Then we would rebuild and backfill unprocessed data from AOF files and error logs — a very time consuming activity. We knew if we lost a master we would have hours and hours of less-than-satisfying work to run the recovery plan, and there was potential for user impact and even a small amount of data loss. We had never experienced a Redis master failure, but we all know that such events are simply a matter of time. Overall, this fell far short of our durability and availability goals.

Configuring Sentinel

We started by installing and testing Sentinel in a development environment and the first thing we noticed was how simple Sentinel is to use and how similar the syntax is to Redis. We read Aphyr’s article and his back-and-forth blog duel with Salvatore and verified Aphyr’s warning about the “split brain” scenario. Eventually we decided the benefits outweighed the risks in our specific use case. During testing we learned about some Sentinel nuances and got a better feel for appropriate configuration values, many of which have little or no community guidance yet.

One such example was choosing a good value for the level-of-agreement setting, which is the number of Sentinels simultaneously reporting a host outage before automatic failover starts. If this value is too high then you’ll miss real failures and if it’s too low you are more susceptible to false alarms. (*thanks to Aleksey Asiutin(@aasiutin) for the edit!) In the end, we looked at the physical topology of our hosts over rack and switches and chose to run a relatively large number of Sentinel instances to ensure good coverage. Based on tuning in production we chose a value for level-of-agreement equal to about 80% of the Sentinel instances.

The down-after-milliseconds configuration setting is the time the Sentinels will wait with no response to their ping requests before declaring a host outage. Sentinels ping the hosts they monitor approximately every second, so by choosing a value of 3,100 we expect Sentinels to miss 3 pings before declaring host outage. Interestingly, because of Sentinel’s ping frequency we found that setting this value to less than 1,000 results in an endless stream of host outage notifications from the Sentinels, so don’t do that.  We also added an extra 100 milliseconds (3,100ms rather than 3,000ms) to allow for some variation in Redis response time.

We chose a parallel-syncs value of 1.  This item dictates the number of slaves that are reconfigured simultaneously after a failover event.  If you serve queries from the read-only slaves you’ll want to keep this value low.

For an explanation of the other values we refer you to the self-documented default sentinel.conf file.

An example of the Sentinel configuration we use:

sentinel monitor cluster_name_1 redis_host_1 6390 35
sentinel down-after-milliseconds cluster_name_1 3100
sentinel parallel-syncs cluster_name_1 1

sentinel monitor cluster_name_2 redis_host_2 6391 35
sentinel down-after-milliseconds cluster_name_2 3100
sentinel parallel-syncs cluster_name_2 1

port 26379

pidfile [path]/redis-sentinel.pid
logfile [path]logs/redis/redis-sentinel.log
daemonize yes

An interesting nuance of Sentinels is that they write state to their configuration file. This presented a challenge for us because it conflicted with our change management procedures. How do we maintain a dependably consistent startup configuration if the Sentinels are modifying the config files at runtime? Our solution was to create two Sentinel config files. One is strictly maintained in Git and not modified by Sentinel. This “permanent” config file is part of our deployment process and is installed whenever we update our Sentinel system configuration (i.e.: “rarely”). We then wrote a startup script that first duplicates the “permanent” config file to a writable “temporary” config file, then starts Sentinel and passes it the “temporary” file via command-line params. Sentinels are allowed to modify the “temporary” files as they please.

sunset

Interfacing with Sentinel

A common misconception about Sentinel is that it resides in-band between Redis and Redis clients. In fact, Sentinel is out-of-band and is only contacted by your services on startup. Sentinel then publishes notifications when it detects a Redis outage. Your services subscribe to Sentinel, receive the initial Redis host list, and then carry on normal communication directly with the Redis host.

The Sentinel command syntax is very similar to Redis command syntax. Since Flickr has been using Redis for a long time the adaptation of pre-existing code was pretty straightforward for us. Code modifications consisted of adding a few Java classes and modifying our configuration syntax. For Java-to-Redis interaction we use Jedis, and for PHP we use Predis and libredis.

Using Sentinel from Jedis is not documented as well as it could be. Here’s some code that we hope will save you some time:

// Verify that at least one Sentinel instance in the Set is available and responding.
// sentinelHostPorts: String format: [hostname]:[port]
private boolean jedisSentinelPoolAvailable(Set<String> sentinelHostPorts, String clusterName){
   log.info("Trying to find master from available Sentinels...");
   for ( String sentinelHostPort : sentinelHostPorts ) {
      List<String> hostPort = Arrays.asList( sentinelHostPort.split(":") );
      String hostname = hostPort.get(0);
      int port = Integer.parseInt( hostPort.get(1) );
      try {
         Jedis jedis = new Jedis( hostname, port );
         jedis.sentinelGetMasterAddrByName( clusterName );
         jedis.disconnect();
         log.info("Connected to Sentinel host:%s port:%d", hostname, port);
         return true;
      } catch (JedisConnectionException e) {
         log.warn("Cannot connect to Sentinel host:%s port:%d”, hostname, port);
      }
   }
   return false;
}

private Pool<Jedis> getDefaultJedisPool() {
   // Create and return a default Jedis Pool object…
   // ...
}

// ConfigurationMgr configMgr ⇐ your favorite way of managing system configuration (up to you)
public Pool<Jedis> getPool(ConfigurationMgr configMgr) {
   String clusterName = configMgr.getRedisClusterName();
   Set<String> sentinelHostPorts = configMgr.getSentinelHostPorts();

   if(sentinels.size()>0) {
      if(jedisSentinelPoolAvailable( sentinelHostPorts, clusterName )) {
         return new JedisSentinelPool(clusterName, sentinelHostPorts);
      } else {
         log.warn(“All Sentinels unreachable.  Using default Redis hosts.”);
         return getDefaultJedisPool();
      }
   } else {
      log.warn(“Sentinel config empty.  Using default Redis hosts.”);
      return getDefaultJedisPool();
   }
}

running with the bulls

Testing Sentinel at Flickr

Before deploying Sentinel to our production system we had several questions and concerns:

  • How will the system react to host outages?
  • How long does a failover event last?
  • How much of a threat is the split-brain scenario?
  • How much data loss can we expect from a failover?

We commandeered several development machines and installed a few Redis and Sentinel instances. Then we wrote some scripts that insert or remove data from Redis to simulate production usage.

Screen Shot 2014-07-23 at 3.19.56 PM

We ran a series of tests on this setup, simulating a variety of Redis host failures with some combination of the commands: kill -9, the Sentinel failover command, and Linux iptables. This resulted in “breaking” the system in various ways.

Screen Shot 2014-07-23 at 3.20.16 PM Figure: Redis master failure

Screen Shot 2014-07-23 at 3.20.41 PM

Figure: Network partition producing a ‘split-brain’ scenario

How will the system react to host outages?

For the most part we found Sentinel to behave exactly as expected and described in the Sentinel docs. The Sentinels detect host outages within the configured down-after-milliseconds duration, then send “subjective down” notifications, then send “objective down” notifications if the level-of-agreement threshold is reached. In this environment we were able to quickly and accurately test our response to failover events. We began with small test scripts, but eventually were able to run repeatable integration tests on our production software. Adding Redis to a Maven test phase for automated integration testing is a backlog item that we haven’t implemented yet.

How long does a failover event last?

The Sentinel test environment was configured with a down-after-milliseconds value of 3,100ms (just like production, see above). With this value Sentinels would produce a host outage notification after approximately 3 unsuccessful pings (one ping per second). In addition to the 3,100ms delay, we found there were 1-3 seconds in overhead for processing the failover event and electing a new Redis master, resulting in 4-6 seconds of total downtime. We are pretty confident we’ll see the same behavior in production (verified — see below).

How much of a threat is the “split-brain” scenario?

We carefully read Aphyr and Salvatore’s blog articles debating the threat of a “split brain scenario.” To summarize: this is a situation in which network connectivity is split, with some nodes still functioning on one side and other nodes continuing to function independently on the other side. The concern is the potential for the data set to diverge with different data being written to masters on both sides of the partition. This could easily create data that is either impossible or very difficult to reconcile.

We recreated this situation and verified that a network partition could create disjoint concurrent data sets. Removing the partition resulted in Sentinel arbitrarily (from our perspective) choosing a new master and losing all data written (post-partitioning) to the other master. So the question is: given our production architecture, what is the probability of this happening and is it acceptable given the significant benefit of automatic failover?

We looked at this scenario in detail considering all the potential failure modes in our deployment. Although we believe our production environment is not immune from split-brain, we are pretty sure that the benefits outweigh the risks.

How much data loss can we expect from a failover event?

After testing we were confident that Redis host outages could produce 4-6 seconds of downtime in this system. Rapid Sentinel automated failover events combined with reasonable backoff and retry techniques in the code logic were expected to further reduce data loss during a failover event. With Sentinel deployed and considering a long history of a highly stable Redis operation, we believed we could achieve 99.995% or more production availability – a few minutes of downtime per year.

Sentinel in Production

So how has Sentinel performed in production? Mostly it has been silent, which is a good thing. A month after finishing our deployment we had a hardware failure in a network switch that had some of our Redis masters behind it. Instead of having a potential scenario involving  tens of minutes of user impact with human-in-the-loop actions to restore service, automatic failover allowed us to limit impact to just seconds with no human intervention. Due to the quick master failover and other reliability features in the code, only 270 tasks failed to insert due to the outage — all of which were captured by logging. Based on the volume of tasks in the system, this met our 99.9999% task durability goal. We did however decide to re-run a couple tasks manually and for certain critical and low-volume tasks we’re looking at providing even more reliability.

One more note from production experience. We occasionally see Sentinels reporting false “subjective down” events. Our Sentinel instances cohabitate host machines with other services. Occasionally these hosts get busy and we suspect these occasional load spikes affect the Sentinels’ ability to send and receive ping requests. But because our level-of-agreement is high, these false alarms do not trigger objective down events and are relatively harmless. If you’re deploying Sentinel on hosts that share other workloads, make sure that you consider potential impact of load patterns on those hosts and make sure you take some time to tune your level-of-agreement.

Conclusion

We have been very happy with Sentinel’s ease of use, relatively simple learning curve and brilliant production execution. So far the Redis/Sentinel combination is working great for us.

Flickr flamily floto

Like this post? Have a love of online photography? Want to work with us? Flickr is hiring engineers, designers and product managers in our San Francisco office. Find out more at flickr.com/jobs.

References

  1. Redis Sentinel Documentation – http://redis.io/topics/sentinel
  2. Redis Command Reference – http://redis.io/commands
  3. Aphyr: Call me maybe: Redis – http://aphyr.com/posts/283-call-me-maybe-redis
  4. Antirez: Reply to Aphyr Attack on Sentinel – http://antirez.com/news/55
  5. Jedis Project Page – https://github.com/xetorthio/jedis

A Summer at Flickr

This summer I had the unforgettable opportunity to work side-by-side with the some of the smartest, photography-loving software engineers I’ve ever met. Looking back on my first day at Flickr HQ – beginning with a harmonious welcome during Flickr Engineering’s weekly meeting – I can confidently say that over the past ten weeks I have become a much better software engineer.

One of my projects for the summer was to build a new and improved locking manager that controls the distribution of locks for offline tasks (or OLTs for short). Flickr uses OLTs all the time for data migration, uploading photos, updates to accounts, and more. An OLT needs to acquire a lock on a shared resource, such as a group or an account, to prevent other OLTs from accessing the same resource at the same time. The OLT will then release the lock when it’s done modifying the shared data. Myles wrote an excellent blog post on how Flickr uses offline tasks here.

When building a distributed lock system, we need to take into account a couple of important details. First, we need to make sure that all the lock servers are consistent. One way to maintain consistency is to elect one server to act as a master and the remaining servers as slaves, where the master server is responsible for data replication among the slave servers. Second, we need to account for network and hardware failures – for instance, if the master server goes down for some reason, we need to quickly elect a new master server from one of the slave servers. The good news is, Apache ZooKeeper is an open-source implementation of master-slave data replication, automatic leader election, and atomic distributed data reads and writes.


Offline tasks send lock acquire and release requests through ZooLocker. ZooLocker in turn interfaces with the ZooKeeper cluster to create and delete znodes that correspond to the individual locks.

In the new locking system (dubbed “ZooLocker”), each lock is stored as a unique data node (or znode) on the ZooKeeper servers. When a client acquires a lock, ZooLocker creates a znode that corresponds to the lock. If the znode already exists, ZooLocker will tell the client that the lock is currently in use. When a client releases the lock, ZooLocker deletes the corresponding znode from memory. ZooLocker stores helpful debugging information, such as the owner of the lock, the host it was created on, and the maximum amount of time to hold on to the lock, in a JSON-serialized format in the znode. ZooLocker also periodically scans through each znode in the ZooKeeper ensemble to release locks that are past their expiration time.

My locking manager is already serving locks in production. In spite of sudden spikes in lock acquire and release requests by clients, the system holds up pretty well.


A graph of the number of lock acquire requests in ZooLocker per second

My summer internship at Flickr has been an incredibly valuable experience for me. I have demystified the process of writing, testing, and integrating code into a running system that millions of people around the world use each and every day. I have also learned about the amazing work going on in the engineering team, the ups and downs the code deploy process, and how to dodge the incoming flying finger rockets that the Flickr team members fling at each other.  My internship at Flickr is an experience I will never forget, and I am very grateful to the entire Flickr team for giving me the opportunity to work and learn from them this summer.

Redis Global Locks Redux

In my last post I described how we use Redis to manage a global lock that allows us to automatically failover to a backup process if there was a problem in the primary process. The method described allegedly allowed for any number of backup processes to work in conjunction to pick up on primary failures and take over processing.

Locks #1
Locks #1 by Christoph Kummer

Thanks to an astute reader, it was pointed out that the code in the blog wouldn’t actually work as advertised:


The Problem

Nolan correctly noticed that when the backup processes attempts to acquire the lock via SETNX, that lock key will already exist from when it was acquired by the primary, and thus all subsequent attempts to acquire locks will simply end up constantly trying to acquire a lock that can never be acquired. As a reminder, here’s what we do when we check back on the status of a lock:

function checkLock(payload, lockIdentifier) {
    client.get(lockIdentifier, function(error, data) {
        // Error handling elided for brevity
        if (data !== DONE_VALUE) {
            acquireLock(payload, data + 1, lockCallback);
        } else {
            client.del(lockIdentifier);
        }
    });
}

And here’s the relevant bit from acquireLock that calls SETNX:

    client.setnx(lockIdentifier, attempt, function(error, data) {
        if (error) {
            logger.error("Error trying to acquire redis lock for: %s", lockIdentifier);
            return callback(error, dataForCallback(false));
        }

        return callback(null, dataForCallback(data === 1));
    });

So, you’re thinking, how could this vaunted failover process ever actually work? The answer is simple: the code from that post isn’t what we actually run. The actual production code has a single backup process, so it doesn’t try to re-acquire the lock in the event of failure, it just skips right to trying to send the message itself. In the previous post, I described a more general solution that would work for any number of backup processes, but I missed this one important detail.

That being said, with some relatively minor changes, it’s absolutely possible to support an arbitrary number of backup processes and still maintain the use of the global lock. The trivial solution is to simply have the backup process delete the key before trying to re-acquire the lock (or, technically acquire it anew). However, the problem with that becomes apparent pretty quickly. If there are multiple backup processes all deleting the lock and trying to SETNX a new lock again, there’s a good chance that a race condition could arise wherein one of backups deletes a lock that was acquired by another backup process, rather than the failed lock from the primary.

The Solution

Thankfully, Redis has a solution to help us out here: transactions. By using a combination of WATCH, MULTI, and EXEC, we can perform actions on the lock key and be confident that no one has modified it before our actions can complete. The process to acquire a lock remains the same: many processes will issue a SETNX and only one will win. The changes come into play when the processes that didn’t acquire the lock check back on its status. Whereas before, we simply checked the current value of the lock key, now we must go through the above described Redis transaction process. First we watch the key, then we do what amounts to a check and set (albeit with a few different actions to perform based on the outcome of the check):

function checkLock(payload, lockIdentifier, lastCount) {
    client.watch(lockIdentifier);
    client.multi()
        .get(lockIdentifier)
        .exec(function(error, replies) {
            if (!replies) {
                // Lock value changed while we were checking it, someone else got the lock
                client.get(lockIdentifier, function(error, newCount) {
                    setTimeout(checkLock, LOCK_EXPIRY, payload, lockIdentifier, newCount);
                });

                return;
            }

            var currentCount = replies[0];
            if (currentCount === null) {
                // No lock means someone else completed the work while we were checking on its status and the key has already been deleted
                return;
            } else if (currentCount === DONE_VALUE) {
                // Another process completed the work, let’s delete the lock key
                client.del(lockIdentifier);
            } else if (currentCount == lastCount) {
                // Key still exists, and no one has incremented the lock count, let’s try to reacquire the lock
                reacquireLock(payload, lockIdentifier, currentCount, doWork);
            } else {
                // Key still exists, but the value does not match what we expected, someone else has reacquired the lock, check back later to see how they fared
                setTimeout(checkLock, LOCK_EXPIRY, payload, lockIdentifier, currentCount);
            }
        });
}

As you can see, there are five basic cases we need to deal with after we get the value of the lock key:

  1. If we got a null reply back from Redis, that means that something else changed the value of our key, and our exec was aborted; i.e. someone else got the lock and changed its value before we could do anything. We just treat it as a failure to acquire the lock and check back again later.
  2. If we get back a reply from Redis, but the value for the key is null, that means that the work was actually completed and the key was deleted before we could do anything. In this case there’s nothing for us to do at all, so we can stop right away.
  3. If we get back a value for the lock key that is equal to our sentinel value, then someone else completed the work, but it’s up to us to clean up the lock key, so we issue a Redis DEL and call our job done.
  4. Here’s where things get interesting: if the key still exists, and its value (the number of attempts that have been made) is equal to our last attempt count, then we should try and reacquire the lock.
  5. The last scenario is where the key exists but its value (again, the number of attempts that have been made) does not equal our last attempt count. In this case, someone else has already tried to reacquire the lock and failed. We treat this as a failure to acquire the lock and schedule a timeout to check back later to see how whoever did acquire the lock got on. The appropriate action here is debatable. Depending on how long your underlying work takes, it may be better to actually try and reacquire the lock here as well, since whoever acquired the lock may have already failed. This can, however, lead to premature exhaustion of your attempt allotment, so to be safe, we just wait.

So, we’ve checked on our lock, and, since the previous process with the lock failed to complete its work, it’s time to actually try and reacquire the lock. The process in this case is similar to the above inasmuch as we must use Redis transactions to manage the reacquisition process, thankfully however, the steps are (somewhat) simpler:

function reacquireLock(payload, lockIdentifier, attemptCount, callback) {
    client.watch(lockIdentifier);
    client.get(lockIdentifier, function(error, data) {
        if (!data) {
            // Lock is gone, someone else completed the work and deleted the lock, nothing to do here, stop watching and carry on
            client.unwatch();
            return;
        }

        var attempts = parseInt(data, 10) + 1;

        if (attempts > MAX_ATTEMPTS) {
            // Our allotment has been exceeded by another process, unwatch and expire the key
            client.unwatch();
            client.expire(lockIdentifier, ((LOCK_EXPIRY / 1000) * 2));
            return;
        }

        client.multi()
            .set(lockIdentifier, attempts)
            .exec(function(error, replies) {
                if (!replies) {
                    // The value changed out from under us, we didn't get the lock!
                    client.get(lockIdentifier, function(error, currentAttemptCount) {
                        setTimeout(checkLock, LOCK_TIMEOUT, payload, lockIdentifier, currentAttemptCount);
                    });
                } else {
                    // Hooray, we acquired the lock!
                    callback(null, {
                        "acquired" : true,
                        "lockIdentifier" : lockIdentifier,
                        "payload" : payload
                    });
                }
            });
    });
}

As with checkLock we start out by watching the lock key, and proceed do a (comparitively) simplified check and set. In this case, we’ve “only” got three scenarios to deal with:

  1. If we’ve already exceeded our allotment of attempts, it’s time to give up. In this case, the allotment was actually exceeded in another worker, so we can just stop right away. We make sure to unwatch the key, and set it expire at some point far enough in the future that any remaining processes attempting to acquire locks will also see that it’s time to give up.

Assuming we’re still good to keep working, we try and update the lock key within a MULTI/EXEC block, where we have our remaining two scenarios:

  1. If we get no replies back, that again means that something changed the value of the lock key during our transaction and the EXEC was aborted. Since we failed to acquire the lock we just check back later to see what happened to whoever did acquire the lock.
  2. The last scenario is the one in which we managed to acquire the lock. In this case we just go ahead and do our work and hopefully complete it!

Bonus!

To make managing global locks even easier, I’ve gone ahead and generalized all the code mentioned in both this and the previous post on the subject into a tidy little event based npm package: https://github.com/yahoo/redis-locking-worker. Here’s a quick snippet of how to implement global locks using this new package:

var RedisLockingWorker = require("redis-locking-worker”);

var SUCCESS_CHANCE = 0.15;

var lock = new RedisLockingWorker({
    "lockKey" : "mylock",
    "statusLevel" : RedisLockingWorker.StatusLevels.Verbose,
    "lockTimeout" : 5000,
    "maxAttempts" : 5
});

lock.on("acquired", function(lastAttempt) {
    if (Math.random() <= SUCCESS_CHANCE) {
        console.log("Completed work successfully!", lastAttempt);
        lock.done(lastAttempt);
    } else {
        // oh no, we failed to do work!
        console.log("Failed to do work");
    }
});
lock.acquire();

There’s also a few other events you can use to track the lock status:

lock.on("locked", function() {
    console.log("Did not acquire lock, someone beat us to it");
});

lock.on("error", function(error) {
    console.error("Error from lock: %j", error);
});

lock.on("status", function(message) {
    console.log("Status message from lock: %s", message);
});

More Bonus!

If you don’t need the added complexity if multiple backup processes, I also want to give credit to npm user pokehanai who took the methodology described in the original post and created a generalized version of the two-worker solution: https://npmjs.org/package/redis-paired-worker.

Wrapping Up

So there you have it! Coordinating work on any number of processes across any number of hosts couldn’t be easier! If you have any questions or comments on this, please feel free to follow up on Twitter.

Flickr flamily floto

Like this post? Have a love of online photography? Want to work with us? Flickr is hiring engineers, designers and product managers in our San Francisco office. Find out more at flickr.com/jobs.

Highly Available Real Time Push Notifications and You

One of the goals of our recently launched (and awesome!) new Flickr iPhone app was to further increase user engagement on Flickr. One of the best ways to drive engagement is to make sure Flickr users know what’s happening on Flickr in as near-real time as possible. We already have email notifications, but email is no longer a good mechanism for real-time updates. Users may have many email accounts and may not check in frequently causing timeliness to go right out the window. Clearly this called for… PUSH NOTIFICATIONS!

Motor bike racer getting a push start at the track, Brisbane
Motor bike racer getting a push start at the track, Brisbane by State Library of Queensland, Australia

I know, you’re thinking, “anyone can build push notifications, we’ve been doing it since 2009!” Which is, of course, absolutely true. The process for delivering push notifications is well trod territory by this point. So… let’s just skip all that boring stuff and focus on how we decided on the underlying architecture for our implementation. Our decisions focused on four major factors:

  1. Impact to normal page serving times should be minimal
  2. Delivery should be in near-real time
  3. Handle thousands of notifications per second
  4. The underlying services should be highly available

Baby Steps

Given these goals, we started by looking at systems we already have in place. Everyone loves not writing new code, right? Our thoughts immediately went to Flickr’s existing PuSH infrastructure. Our PuSH implementation is a great way to get an overview of relevant activity on Flickr, but it has limitations that made it unsuitable for powering mobile push notifications. The primary concern is that it’s less-near-real time than we’d like it to be. On average, activities occurring on Flickr will be delivered to a subscribed PuSH endpoint within one minute. That’s certainly better than waiting for an email to arrive or waiting until the next time you log in to the site and see your activity feed, but it’s not good enough for mobile notifications! This delay is due to some design decisions at the core of the PuSH system. PuSH is designed to aggregate activity and deliver a periodic digest and, because of this, it has a built in window to allow multiple changes to the same photo to be accumulated. PuSH is also focused on ensured delivery, so it maintains an up to date list of all subscribers. These features, which make PuSH great for the purpose it was designed, make it not-so-great for real time notifications. So, repurposing the PuSH code for reuse in a more real time fashion proved to be untenable.

Tentative Plans

So, what to do? In the end we wound up building a new lightweight event system that is broken up into three phases:

  1. Event Generation
  2. Event Targeting
  3. Message Delivery

Event Generation

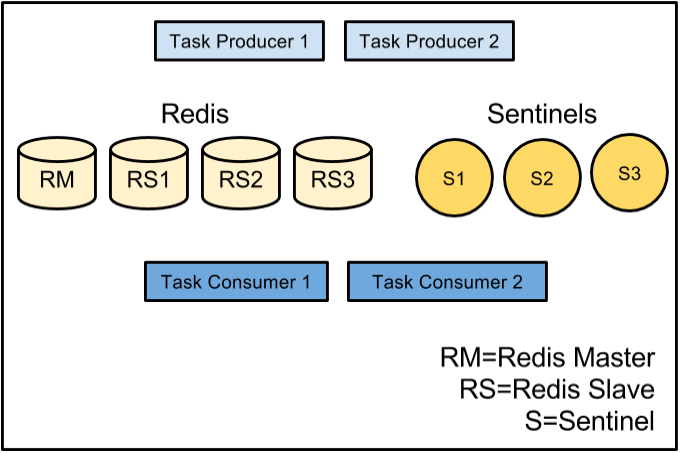
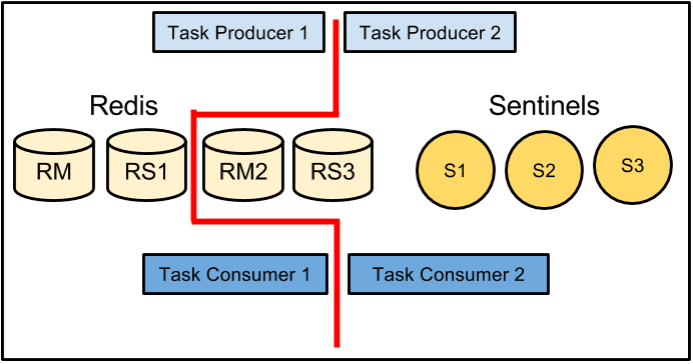
The event generation phase happens while processing the response to a user request. As such, we wanted to ensure that there was little to no impact on the response times as a result. To ensure this was the case, all we do here is a lightweight write into a global Redis queue. We store the minimum amount of data possible, just a few identifiers, so we don’t have to make any extra DB calls and slow down the response just to (potentially) kick off a push notification. Everything after this initial Redis action is processed out of band by our deferred task system and has no impact on site performance.

Event Targeting

Next in the process is the event targeting phase. Here we have many workers reading from the global Redis queue. When a worker receives an event from the queue it rehydrates the data and loads up any additional information necessary to act on the notification. This includes checking to see what users should be notified, whether those users have devices that are registered to receive notifications, if they’ve opted out of notifications of this type, and finally if they’ve muted activity for the object in question.

Message Delivery

Flickr’s web-serving stack is PHP, and, up until now, everything described has been processed by PHP. Unfortunately, one area where PHP does not excel is long-lived processes or network connections, both of which make delivering push notifications in real time much easier. Because of this we decided to build the final phase, message delivery, as a separate endpoint in Node.js.

So, the question arose: how do we get messages pending delivery from these PHP workers over to the Node.js endpoints that will actually deliver them? For this, we again turned to Redis, this time using its built in pub/sub functionality. The PHP workers simply publish a message to a Redis channel with the assumption that there’s a Node.js process subscribed to that channel eagerly awaiting some data on which it can act.

After that the Node process delivers the notification to Apple’s APNS push notification system. Communicating with APNS is a well-documented topic, and not one that’s particularly interesting. In fact, I can sum it up with a single link: https://github.com/argon/node-apn, a great npm package for talking to APNS.

The Real Challenge

There is, however, a much more interesting problem to discuss at this point: how do we ensure that delivery to APNS is both scalable and highly available? At first blush, this seems like it could be problematic. What if the Node.js worker has crashed? The message will just be lost to the ether! Solving this problem turned out to be the majority of the work involved in implementing push notifications.

Scalability

The first step to ensuring a service is scalable is to divide the workload. Since Node.js is single threaded, we would already be dividing the workload across individual Node.js processes anyway, so this works out well! When we publish messages to the Redis pub/sub channel, we simply publish to a sharded channel. Each Node.js process subscribes to some subset of those sharded channels, and so will only act on that subset of messages.

APNS, Redis Pub/Sub

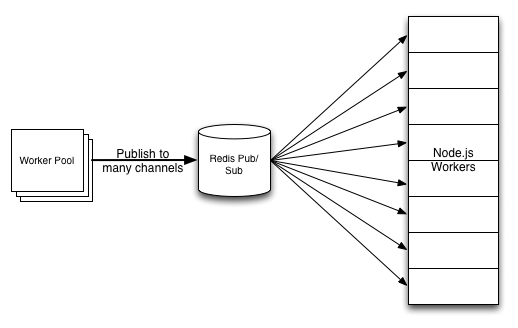
Configuring our Node.js processes in this way makes it easy to scale horizontally. Whenever we need to add more processing power to the cluster, we can just add more servers and more shards. This also makes it easy to pull hosts out of rotation for maintenance without impacting message delivery: we simply reconfigure the remaining processes to subscribe to additional channels to pick up the slack.

Availability

Designing for high availability proved to be somewhat more challenging. We needed to ensure that we could lose individual Node processes, a whole server or even an entire data center without degrading our ability to deliver messages. And we wanted to avoid the need for a human in the loop — automatic failover.

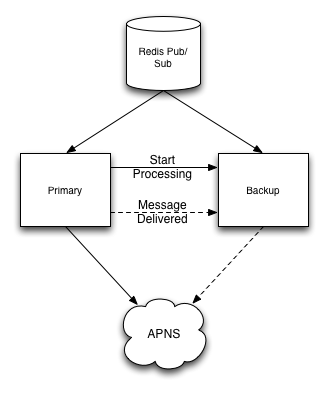
We already knew that we’d have multiple hosts running in multiple data centers, so the main question was how to get them coordinating with each other so that we would not lose messages in the event of an outage while also ensuring we would not deliver the same message multiple times. Our first thought experiment along these lines was to implement a relatively complex message passing scheme, where two hosts would subscribe to a given channel, one as the primary and one as the backup. The primary would pass a message to the backup saying that it was starting to process a message, and another when it completed. The backup would wait a certain amount of time to receive the first and then the second message from the primary. If a message failed to arrive, it would assume something had gone wrong with the primary and attempt to complete delivery to Apple’s push notification gateway.

Initial Failover Plan

This plan had two major problems: hosts had to be aware of each other and increasing the number of hosts working in conjunction raised the complexity of ensuring reliable delivery.

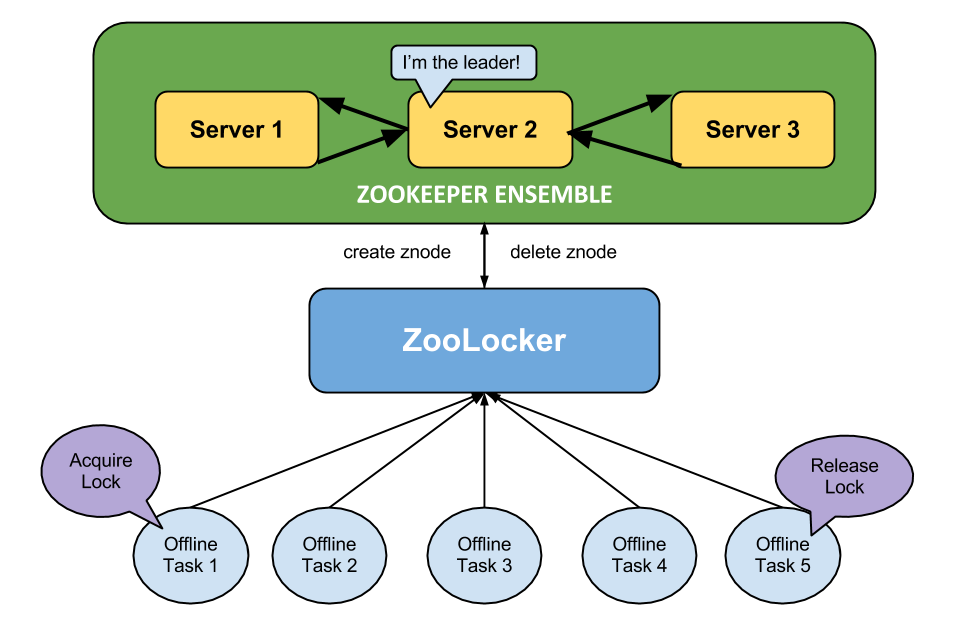
We liked the idea of having one host serve as a backup for another, but we didn’t like having to coordinate the interaction between so many moving pieces. To solve this issue we went with a convention based approach. Instead of each host having to maintain a list of its partners, we just use Redis to maintain a global lock. Easy enough, right? Perhaps some code is in order!

Finally, some code!

First we create our Redis clients. We need one client for regular Redis commands we use to maintain the lock, and a separate client for Redis pub/sub commands.

var redis = require("redis");
var client = redis.createClient(config.port, config.host);
var pubsubClient = redis.createClient(config.port, config.host);

Next, subscribe to the sharded channel and set up a message handler:

// We could be subscribing to multiple shards, but for the sake of simplicity we’ll just subscribe to one here
pubsubClient.subscribe("notification_" + shard);
pubsubClient.on("message", handleMessage);

Now, the interesting part. We have multiple Node.js processes subscribed to the same Redis pub/sub channel, and each process is in a different data center. Whenever any of them receive a message, they attempt to acquire a lock for that message:

function handleMessage(channel, message) {
    // Error handling elided for brevity
    var payload = JSON.parse(message);

    acquireLock(payload, 1, lockCallback);
}

Managing locks with Redis is made easy using the SETNX command. SETNX is a “set if not exists” primitive. From the Redis docs:

Set key to hold string value if key does not exist. In that case, it is equal to SET. When key already holds a value, no operation is performed.

If we have multiple processes calling SETNX on the same key, the command will only succeed for the process that first makes the call, and in that case the response from Redis will be 1. For subsequent SETNX commands, the key will already exist, and the response from Redis will be 0. The value we try to set with SETNX keeps track of how many attempts have been made to deliver the message, initially set to one, this allows us to retry failed messages a predefined number of times before giving up entirely.

function acquireLock(payload, attempt, callback) {
    var lockIdentifier = "lock." + payload.identifier;

    function dataForCallback(acquired) {
        return {
            "acquired" : acquired,
            "lockIdentifier" : lockIdentifier,
            "payload" : payload,
            "attempt" : attempt
        };
    }

    // The value of the lock key indicates how many lock attempts have been made
    client.setnx(lockIdentifier, attempt, function(error, data) {
        if (error) {
            logger.error("Error trying to acquire redis lock for: %s", lockIdentifier);
            return callback(error, dataForCallback(false));
        }

        return callback(null, dataForCallback(data === 1));
    });
}

At this point our attempt to acquire the lock has either succeeded or failed, and our callback is invoked. What we do next depends on whether we managed to acquire the lock. If we did acquire the lock, we simply attempt to send the message. If we did not acquire the lock, then we will check back later to see if the message was sent successfully (more on this later):

function lockCallback(error, data) {
    // Again, error handling elided for brevity
    if (data && data.acquired) {
        return sendMessage(data.payload, data.lockIdentifier, data.attempt === MAX_ATTEMPTS);
    } else if (data && !data.acquired) {
        return setTimeout(checkLock, LOCK_EXPIRY, data.payload, data.lockIdentifier);
    }
}

Finally, it’s time to actually send the message! We do some work to process the payload into a form we can use to pass to APNS and send it off. If all goes well, we do one of two things:

  1. If this was our first attempt to send the message, we update the lock key in Redis to a sentinel value indicating we were successful. This is the value the backup processes will check for to determine whether or not sending succeeded.
  2. If this was our last attempt to send the message (i.e. the primary process failed to deliver and now a backup process is handling delivery), we simply delete the lock key.
function sendMessage(payload, lockIdentifier, lastAttempt) {
    // Does some work to process the payload and generate an APNS notification object
    var notification = generateApnsNotification(payload);

    if (notification) {
        // The APNS connection is defined/initialized elsewhere
        apnsConnection.sendNotification(notification);

        if (lastAttempt) {
            client.del(lockIdentifier);
        } else {
            client.set(lockIdentifier, DONE_VALUE);
        }
    }
}

There’s one final piece of the puzzle: checking the lock in the process that did not acquire it initially. Here we issue a Redis GET to retrieve the current value of the lock key. If the process that won the lock managed to send the message, this key should be set to a well known sentinel value. If so, we don’t have any work to do, and we can simply delete the lock. However, if this value is not set to that sentinel value, then something went wrong with delivery in the process that originally acquired the lock and we should step up and try to deliver the message from this backup process:

function checkLock(payload, lockIdentifier) {
    client.get(lockIdentifier, function(error, data) {
        // Error handling elided for brevity
        if (data !== DONE_VALUE) {
            acquireLock(payload, data + 1, lockCallback);
        } else {
            client.del(lockIdentifier);
        }
    });
}

Summing Up

So, there you have it in a nutshell. This method of coordinating between processes makes it very easy to adjust the number of processes subscribing to a given shard’s channels. There’s no need for any process subscribed to a channel to be aware of how many other processes are also subscribed. As long as we have at least two processes in separate data centers subscribing to each shard we are protected from all of the from the following scenarios:

  • The crash of any individual Node.js process
  • The loss of a single host running the Node.js processes
  • The loss of an entire data center containing many hosts running the Node.js processes

Let’s go back over our initial goals and see how we fared:

  1. Impact to normal page serving times should be minimal

We accomplish this by minimizing the workload done as part of the normal browser-driven request/response processing. The deferred task system picks up from there, out of band.

  1. Delivery should be in near-real time

Processing stats from our implementation show that time from user actions leading to event generation to message delivery averages about 400ms and is completely event driven (no polling).

  1. Handle thousands of notifications per second

In stress tests of our system, we were able to process more than 2,000 notifications per second on a single host (8 Node.js workers, each subscribing to multiple shards).

  1. The underlying services should be highly available

The availability design is resilient to a variety of failure scenarios, and failover is automatic.

We hope you’re enjoying push notifications in the new Flickr iPhone app.

Addendum!

There was a minor problem with the code in this post when supporting more than two workers. For a full explanation of the problem and the solution, check out Global Redis Locks Redux.

Flickr flamily floto

Like this post? Have a love of online photography? Want to work with us? Flickr is hiring engineers, designers and product managers in our San Francisco office. Find out more at flickr.com/jobs.

Designing an OSM Map Style

With the recent change to our map system, we introduced a new map style for our OSM tiles. Since 2008, we’ve used the default OSM styles, which produces map tiles like this:

This style is extremely good at putting a lot of information in front of you. OSM doesn’t know your intended purpose for the maps (navigation, orientation, exploration, city planning, disaster response, etc.), so they err on the side of lots of information. This is good, but with the introduction of TileMill, non-professional cartographers (like myself) can now easily change map styles to better suit our needs. Using TileMill, we decided to take a crack at designing a map that is better suited to Flickr.

On Flickr, we use maps for a very specific purpose: to provide context for a photo. This means there are a lot of map features that we can leave out entirely. We can choose to hide features that are primarily used for navigation (ferry and train routes, bus stops) or for demarcation (city and county boundaries). Roads are useful as orientation tools, but certain road features (like exit numbers on highways) aren’t needed. In the end, we can reduce the data that the map shows to much smaller and more useful subset:

This is the style provided by MapBox’s excellent OSM Bright. As a starting point, this gets us a long way towards our goal of an unobtrusive yet still useful map. We made a few changes to OSM Bright and released them on GitHub as our Pandonia map style. Here are a few examples of the changes we made:

  • Toned down the road, land, and water colors, to allow greater contrast with the pink and blue dots that we use as markers
  • Reduced the density of road and highway names, as well as city, town and state names
  • Removed underground tram and rail line
  • Removed land use overlays for residential, commercial, and industrial zones, as well as parking lots
  • Removed state park overlays that overlapped the water

This is how it looks:

We tried a lot of different color combinations on the road to this style. Here is an animation of the different styles we tried, starting with OSM Bright.

Here it is zoomed in a bit more:

Over the next couple of weeks, we’ll be rolling out this style to all of the places where we use OSM tiles.

These maps are still a work in progress. The world is a big place, and creating a unified style that works well for every single location is challenging. If you notice problems with our new map styles, please let us know!

The great map update of 2012

Today we are announcing an update to the map tiles which we use site wide. A very high majority of the globe will be represented by Nokia’s clever looking tiles.

Nokia map tile

We are not stopping there. As some of you may know, Flickr has been using Open Street Maps (OSM) data to make map tiles for some places. We started with Beijing and the list has grown to twenty one additional places:

Mogadishu
Cairo
Algiers
Kiev
Tokyo
Tehran
Hanoi
Ho Chi Minh City
Manila
Davao
Cebu
Baghdad
Kabul
Accra
Hispaniola
Havana
Kinshasa
Harare
Nairobi
Buenos aires
Santiago

It has been a while since we last updated our OSM tiles. Since 2009, the OSM community has advanced quite a bit in the tools they provide and data quality. I went into a little detail about this in a talk I gave last year.

Introducing Pandonia

Nokia map tile

Today we are launching Buenos Aires and Santiago in a new style. We will be launching more cities in this new style in the near future. They are built from more recent OSM data and they will also have an entirely new style which we call Pandonia. Our new style was designed in TileMill from the osm-bright template, both created by the rad team at MapBox. TileMill changes the game when it comes to styling map tiles. The interface is developed to let you quickly iterate style changes to tiles and see the changes immediately. Ross Harmes will be writing a more detailed account of the work he did to create the Pandonia style. We appreciate the tips and guidance from Eric Gunderson, Tom MacWright, and the rest of the team at MapBox

We are looking forward to updating all of our OSM places with the Pandonia style in the near future and growing to more places after that… Antarctica? Null Island? The Moon? Stay tuned and see…

Changing our Javascript API

To host all of these new tiles we needed to find a flexible javascript api. Cloudmade’s Leaflet is a simple and open source tile serving javascript library. The events and methods map well to our previous JS API, which made upgrading simple for us. All of our existing map interfaces will stay the same with the addition of modern map tiles. They will also support touch screen devices better than ever. Leaflet’s layers mechanism will make it easier for us to blend different tile sources together seamlessly. We have a fork on GitHub which we plan to contribute to as time goes on. We’ll keep you posted.